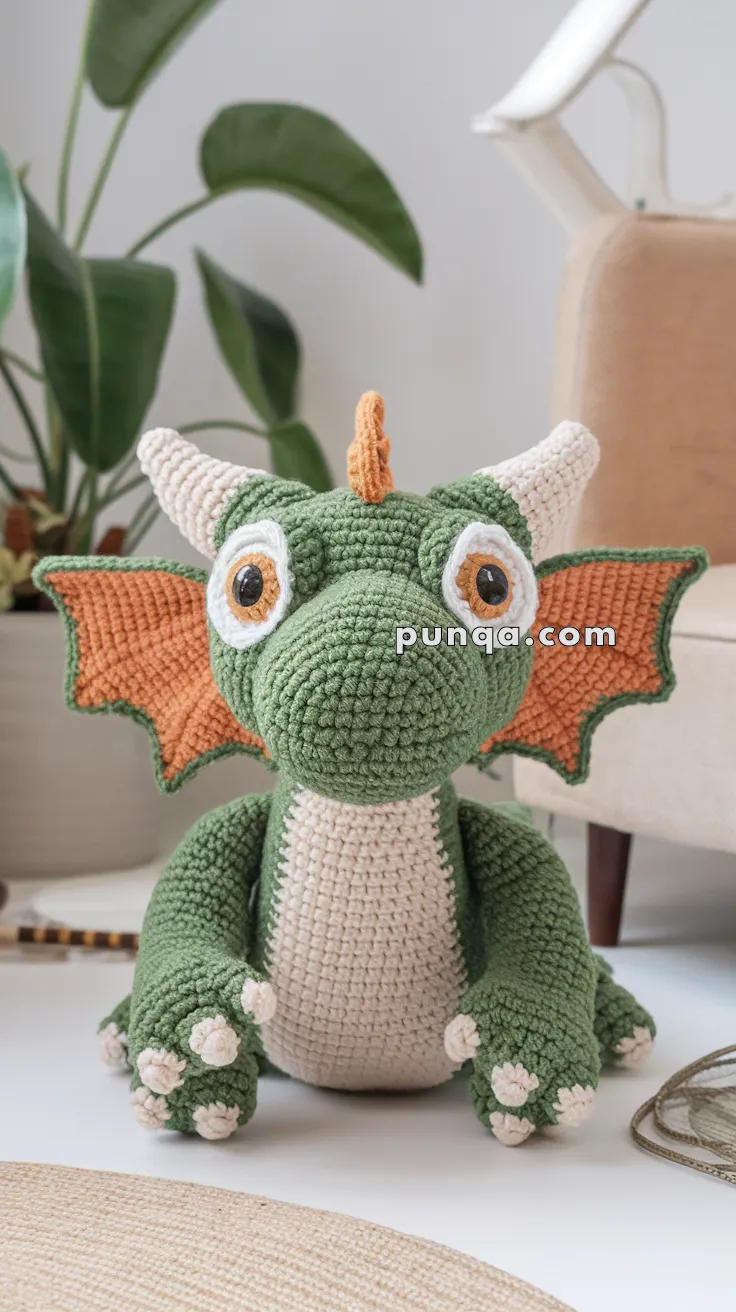
Unleash a world of mythical fun with the Amigurumi Komodo Dragon, a whimsical crochet project that’s equal parts fierce and cuddly! 🐉🧶 With wide wings, a chunky belly, big bobble claws, and an adorable expression, this dragon is ready to guard your yarn stash or become a beloved companion for little adventurers. Whether perched on a shelf or tucked into a toy chest, this handmade creature brings a touch of fantasy to any space.
Perfect for crocheters who love bold shapes and playful textures, this pattern invites you to explore imaginative detailing and cozy character work. Customize your dragon with fiery colors, add a crown for royal flair, or stitch up a whole family of magical beasts. The Amigurumi Komodo Dragon is a delightful way to stitch up wonder, whimsy, and a dash of dragon magic—one loop at a time! 🧵✨
🐉 Amigurumi Fantasy Dragon Crochet Pattern
This magical Amigurumi Dragon is as cuddly as it is legendary! With wide wings, a chunky belly, big bobble claws, and an adorable expression, this dragon is perfect for little adventurers and fantasy lovers alike.
✨ Skill Level
Intermediate – Includes shaping, color changes, bobble stitches, and multi-part assembly.
📏 Finished Size
Approx. 12–14 inches (30–35 cm) tall when made with worsted weight yarn and a 3.5 mm hook.
🧶 Materials
- Yarn (Worsted Weight)
- Green – Main body, head, arms, legs, outer wings
- Beige/Cream – Belly panel, claws, eye patches
- Orange – Wing membranes and crest/horn
- Black & brown – Pupils and iris embroidery (if not using safety eyes)
- 3.5 mm crochet hook
- 12–14 mm safety eyes
- Polyester fiberfill stuffing
- Stitch marker
- Tapestry needle & scissors
🧵 Abbreviations (US Terms)
- MR – Magic Ring
- sc – Single Crochet
- inc – Increase (2 sc in same stitch)
- dec – Decrease (sc 2 together)
- bobble – Bobble stitch (5 dc in same stitch, finished together)
- ch – Chain
- sl st – Slip Stitch
- FO – Fasten Off
🧠 Head (Green)
- MR, 6 sc
- inc x6 (12)
- (1 sc, inc) x6 (18)
- (2 sc, inc) x6 (24)
- (3 sc, inc) x6 (30)
6–14. sc around (30) - (3 sc, dec) x6 (24)
- (2 sc, dec) x6 (18)
Stuff firmly. - (1 sc, dec) x6 (12)
- dec x6 (6), FO and close.
📍 Place safety eyes between rounds 9–10, spaced about 8 stitches apart. Add beige crocheted eye patches behind them for the wide-eyed look.
👁 Eye Patches (Make 2 – Beige)
- MR, 6 sc
- inc x6 (12)
- sc around (12)
FO, flatten, and sew behind eyes.
🪖 Crest (Top Horn – Orange)
- MR, 5 sc
- sc around (5)
- (1 sc, inc) x2 + 1 sc (7)
4–6. sc around (7) - dec to close slightly.
FO and sew vertically to the top center of the head.
🐉 Body (Beige belly + Green sides)
- With beige, MR, 6 sc
- inc x6 (12)
- (1 sc, inc) x6 (18)
- (2 sc, inc) x6 (24)
- (3 sc, inc) x6 (30)
6–12. sc around (30)
Switch to green:
13–22. sc around (30)
23. (3 sc, dec) x6 (24)
24. (2 sc, dec) x6 (18)
25. (1 sc, dec) x6 (12)
26. dec x6 (6), FO and close.
Stuff firmly and sew head to body.
🦾 Arms (Make 2 – Green with Beige Bobble Claws)
- MR, 6 sc
- inc x6 (12)
3–8. sc around (12) - At the tip, work 3 bobbles spaced evenly for claws. Continue in sc to finish the round.
FO, lightly stuff, sew to sides of body.
🦵 Legs (Make 2 – Green with Beige Bobble Claws)
- MR, 6 sc
- inc x6 (12)
- (1 sc, inc) x6 (18)
4–9. sc around (18) - Add 4 bobbles spaced evenly for claws. Continue in sc to finish the round.
Stuff firmly, FO and sew to base of body.
🐍 Tail (Green)
- MR, 6 sc
- (2 sc, inc) x2 (8)
3–6. sc around (8) - (3 sc, inc) x2 (10)
8–14. sc around (10)
Stuff lightly and sew to back of body.
🪽 Wings (Make 2 – Green Frame, Orange Membrane)
- With green, ch 12
- sc back across (11)
- Turn, ch 1, inc in first st, sc across (12)
4–6. Repeat increases every row to form a triangle edge.
Switch to orange:
7–11. sc rows in decreasing triangle shape, filling the interior with orange membrane.
Outline the finished wing with green sc edging for structure.
FO and sew to back of body behind shoulders.
👂 Ears (Make 2 – Green with Beige Inner)
- MR, 6 sc
- (1 sc, inc) x3 (9)
3–6. sc around (9)
Flatten and FO.
Sew to sides of head above eyes.
✂️ Assembly & Details
- Sew head to body securely.
- Attach arms and legs with claws facing forward.
- Sew wings on upper back, angled outward.
- Attach ears and horn.
- Embroider small nostrils and eyebrows if desired.
💡 Optional Add-Ons
- Use velvet yarn for a plush, scaly texture.
- Add gold or silver embroidery on the wings for magical sparkle.
- Make tiny amigurumi gems or coins for your dragon’s treasure hoard!
This dragon isn’t fearsome at all — it’s snuggly, whimsical, and absolutely enchanting. 🧶✨ Whether for kids, fantasy lovers, or as a nursery guardian, it’s sure to capture hearts.