Say hello to the Amigurumi Bearded Dragon, a scaly little sweetheart that’s ready to charm reptile lovers and crochet fans alike! 🦎🧶 With its textured body, expressive eyes, and signature “beard” detail, this miniature lizard brings a whole lot of personality to your yarn stash. Whether you’re crafting a cuddly companion for a herpetology enthusiast or adding a quirky touch to your amigurumi collection, this bearded buddy is sure to stand out.
Perfect for crocheters who enjoy unique animal designs and playful textures, this pattern invites you to experiment with earthy tones, spiky embellishments, and even poseable limbs for extra flair. Make it realistic or go wild with fantasy colors—either way, the Amigurumi Bearded Dragon is a delightful way to stitch up scales, smiles, and a whole lot of handmade charm—one loop at a time! 💚🧵
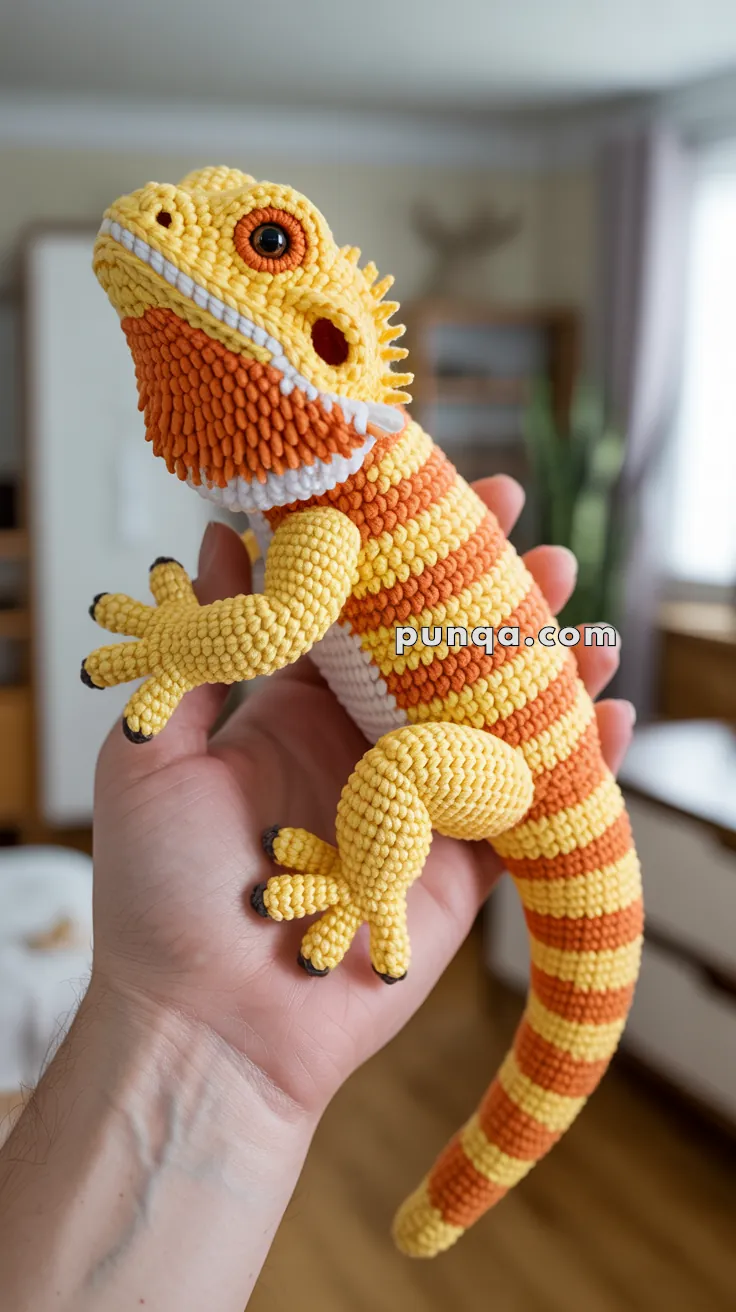
🦎 Amigurumi Bearded Dragon Crochet Pattern
Bring a bright desert reptile to life with this detailed bearded dragon amigurumi. Its long yellow-and-orange striped body, tapered tail, broad head, oversized eye rings, open-looking ear details, textured orange beard, pale belly, five-toed feet, and tiny black claws create a wonderfully expressive display piece.
The dragon is designed in a gently curved, upright pose with the head lifted, forelegs reaching forward, hind legs resting against the lower body, and the tail extending in a long striped curve. Optional internal wire may be added to the tail for shaping, although the pattern can also be made completely soft. 🧶✨
✨ Skill Level
Advanced
This project includes:
- Long tapered muzzle construction
- Dimensional eyes and crocheted eye rings
- Layered ear-hole details
- Textured loop-stitch beard
- Dorsal and cheek spikes
- Frequent stripe color changes
- Four shaped limbs
- Twenty individual toes
- Embroidered claws and nostrils
- Optional tail armature
- Pose-based assembly
📏 Finished Size
Using DK or light-worsted cotton yarn with a 2.75–3 mm crochet hook, the finished dragon measures approximately:
- 31–35 cm (12¼–13¾ in) from nose to tail tip
- 12–14 cm (4¾–5½ in) tall at the head
- 9–11 cm (3½–4¼ in) across the widest part of the body
Finished dimensions vary with yarn, hook size, tension, stuffing, and tail shaping.
🧶 Yarn Requirements
Use smooth DK cotton, cotton-blend, or light-worsted yarn for firm shaping and clear stitch definition.
- 💛 Bright golden yellow — 115–135 g
- 🧡 Burnt orange — 65–80 g
- 🤍 White or soft cream — 25–35 g
- 🤎 Rust brown for the eye rings — 10–15 g
- 🖤 Black — 5–8 g
- Dark gray, optional for nose and claw shading — 2–3 g
Polyester fiberfill — approximately 140–180 g
🧵 Materials
- 2.75 mm crochet hook for the head and small details
- 3 mm crochet hook for the body, tail, and limbs
- Two 10–12 mm black safety eyes
- Polyester fiberfill
- Tapestry needle
- Fine embroidery needle
- Stitch markers
- Pins for positioning
- Scissors
- Optional 20–22 gauge aluminum craft wire
- Floral tape for covering wire
- Optional plastic pellets for lower-body stability
Safety eyes and internal wire are not suitable for toys intended for children under three. Use embroidered eyes and omit the wire when necessary.
🔤 Abbreviations — US Terms
- MR — Magic Ring
- sc — Single Crochet
- inc — Increase: 2 sc in the same stitch
- dec — Invisible Decrease
- sl st — Slip Stitch
- ch — Chain
- hdc — Half Double Crochet
- dc — Double Crochet
- tr — Treble Crochet
- BLO — Back Loop Only
- FLO — Front Loop Only
- loop st — Loop Stitch
- FO — Fasten Off
Work in continuous rounds unless instructed otherwise.
🧠 Head
The head is a broad oval that supports the long muzzle, raised eyes, ear details, and cheek spikes.
Using golden-yellow yarn and the 2.75 mm hook:
R1
MR 6. (6)
R2
inc ×6. (12)
R3
(1 sc, inc) ×6. (18)
R4
(2 sc, inc) ×6. (24)
R5
(3 sc, inc) ×6. (30)
R6
(4 sc, inc) ×6. (36)
R7
(5 sc, inc) ×6. (42)
R8–15
sc around. (42)
Do not place the safety eyes directly through the head yet. They will be inserted through the separate eye pieces.
R16
(5 sc, dec) ×6. (36)
R17
(4 sc, dec) ×6. (30)
R18
(3 sc, dec) ×6. (24)
Begin stuffing firmly.
R19
(2 sc, dec) ×6. (18)
R20
(1 sc, dec) ×6. (12)
Finish stuffing.
R21
dec ×6. (6)
FO and close.
Gently shape the head into a broad oval. Lightly flatten the front where the muzzle will be attached.
🐲 Long Tapered Muzzle
The muzzle begins at the narrow nose end and gradually widens toward the face.
Using golden-yellow yarn:
R1
MR 6. (6)
R2
inc ×6. (12)
R3–4
sc around. (12)
R5
(1 sc, inc) ×6. (18)
R6–9
sc around. (18)
R10
(2 sc, inc) ×6. (24)
R11–15
sc around. (24)
R16
(3 sc, inc) ×6. (30)
R17–20
sc around. (30)
Stuff firmly, keeping the tip rounded and the sides smooth.
FO, leaving a long sewing tail.
Pin the wide end to the lower front of the head. Angle the muzzle slightly upward and sew securely around the opening.
👃 Nostrils
Using black or dark-gray embroidery thread, stitch one small oval nostril near each side of the muzzle tip.
Work several short stitches in the same place to create shallow, dark openings.
Keep both nostrils small and symmetrical.
👄 White Mouth Line
Using white yarn, surface-crochet or embroider a narrow line from one side of the muzzle to the other.
Place the line slightly below the midpoint of the muzzle.
The line should curve gently upward near the back corners.
For a fuller raised edge, work:
- One row of surface slip stitches.
- A second pass of white embroidery directly over the first.
Do not pull tightly.
🤍 Lower Jaw
Using white yarn:
R1
Ch 14.
Starting in the second chain:
12 sc, 3 sc in the final chain.
Continue along the opposite side:
11 sc, inc. (28)
R2
inc, 11 sc, 3 inc, 11 sc, 2 inc. (34)
R3–4
sc around. (34)
R5
(15 sc, dec) ×2. (32)
Lightly stuff only the center.
FO, leaving a long sewing tail.
Flatten the upper opening and sew beneath the muzzle. Allow a narrow strip of white to remain visible below the mouth line.
👁️ White Eye Domes — Make 2
The eyes are raised domes positioned high on the head.
Using white yarn:
R1
MR 6. (6)
R2
inc ×6. (12)
R3
(1 sc, inc) ×6. (18)
R4
(2 sc, inc) ×6. (24)
R5–6
sc around. (24)
R7
(2 sc, dec) ×6. (18)
Lightly stuff.
FO, leaving a long sewing tail.
🤎 Rust Eye Rings — Make 2
Using rust-brown yarn:
R1
MR 6. (6)
R2
inc ×6. (12)
R3
(1 sc, inc) ×6. (18)
FO.
Insert one safety eye through the center of each rust circle and then through the front of a white eye dome.
Secure the washer inside the dome.
Sew the rust ring flat against the white surface.
👀 Attaching the Eyes
Place the eye domes high on the head, one on each side of the upper muzzle.
The eyes should:
- Sit close to the muzzle
- Angle slightly outward
- Face mostly forward
- Remain raised above the head surface
Pin both eyes before sewing.
Sew around the back edge of each white dome using small stitches.
👂 Ear-Hole Details — Make 2
The ear openings are represented by dark recessed circles surrounded by a yellow rim.
Dark Ear Centers
Using burnt-orange or dark-rust yarn:
R1
MR 6. (6)
R2
inc ×6. (12)
FO.
Yellow Ear Rims
Using golden-yellow yarn:
R1
MR 6. (6)
R2
inc ×6. (12)
R3
(1 sc, inc) ×6. (18)
FO.
Place each orange center over a yellow rim and sew it down, leaving a visible yellow border.
Sew one ear detail to each side of the head, slightly behind and below the eyes.
For a deeper appearance, place a small black felt or embroidered circle beneath the orange center.
🧡 Textured Beard Base
The beard is a broad triangular panel positioned beneath the jaw.
Using burnt-orange yarn:
Row 1
Ch 14.
Starting in the second chain, sc across. (13)
Row 2
Ch 1, turn, inc, 11 sc, inc. (15)
Row 3
Ch 1, turn, inc, 13 sc, inc. (17)
Row 4
Ch 1, turn, inc, 15 sc, inc. (19)
Row 5
Ch 1, turn, inc, 17 sc, inc. (21)
Rows 6–11
Ch 1, turn, loop st across. (21)
Row 12
Ch 1, turn, dec, 17 loop st, dec. (19)
Row 13
Ch 1, turn, dec, 15 loop st, dec. (17)
FO, leaving a long sewing tail.
🔁 Loop Stitch
Insert the hook into the next stitch.
Wrap the working yarn around your index finger to create a long loop behind the work.
Catch the yarn behind the finger and pull it through the stitch.
Complete the stitch as a normal single crochet.
Keep the loops approximately 1.5–2 cm (⅝–¾ in) long.
🤍 Beard Edge
Attach white yarn along the lower beard edge.
Row 1
sc evenly across.
Row 2
Ch 1, turn, sc across.
FO.
Sew the beard beneath the lower jaw, with the orange loops facing outward and downward.
The white band should remain visible beneath the orange texture.
🦔 Head and Cheek Spikes
Make approximately 12–16 spikes in golden-yellow yarn.
Small Spike
Ch 4.
Starting in the second chain:
sl st, sc, hdc.
FO.
Medium Spike
Ch 5.
Starting in the second chain:
sl st, sc, hdc, dc.
FO.
Sew the spikes in a line:
- From behind one eye
- Around the side of the head
- Toward the back of the neck
Use longer spikes near the rear of the head and shorter spikes near the muzzle.
Add two or three small spikes along each lower cheek if desired.
🟡 Striped Body
The body is elongated and gently tapered. Work the color bands in repeating groups of three rounds.
Begin with golden-yellow yarn and the 3 mm hook:
R1
MR 6. (6)
R2
inc ×6. (12)
R3
(1 sc, inc) ×6. (18)
R4
(2 sc, inc) ×6. (24)
R5
(3 sc, inc) ×6. (30)
R6
(4 sc, inc) ×6. (36)
R7
(5 sc, inc) ×6. (42)
R8–10
Yellow: sc around. (42)
Switch to burnt orange.
R11–13
Orange: sc around. (42)
Switch to yellow.
R14–16
Yellow: sc around. (42)
Switch to orange.
R17–19
Orange: sc around. (42)
Switch to yellow.
R20–22
Yellow: sc around. (42)
Switch to orange.
R23–25
Orange: sc around. (42)
Begin stuffing firmly.
Switch to yellow.
R26
(5 sc, dec) ×6. (36)
R27–28
Yellow: sc around. (36)
Switch to orange.
R29–31
Orange: sc around. (36)
Switch to yellow.
R32
(4 sc, dec) ×6. (30)
R33–34
Yellow: sc around. (30)
Finish stuffing the body firmly.
Do not fasten off. Continue directly into the tail.
🐉 Long Striped Tail
Continue alternating yellow and orange in three-round bands.
R35–37
Orange: sc around. (30)
Switch to yellow.
R38
(3 sc, dec) ×6. (24)
R39–40
Yellow: sc around. (24)
Switch to orange.
R41–43
Orange: sc around. (24)
Switch to yellow.
R44
(2 sc, dec) ×6. (18)
R45–46
Yellow: sc around. (18)
Switch to orange.
R47–49
Orange: sc around. (18)
Switch to yellow.
R50
(1 sc, dec) ×6. (12)
R51–53
Yellow: sc around. (12)
Switch to orange.
R54–56
Orange: sc around. (12)
Switch to yellow.
R57–59
Yellow: sc around. (12)
Switch to orange.
R60
(1 sc, dec) ×4. (8)
R61–63
Orange: sc around. (8)
Switch to yellow.
R64–68
Yellow: sc around. (8)
R69
dec ×4. (4)
FO and close.
Stuff the tail progressively more lightly toward the tip.
Shape it into a long, gentle curve.
🔧 Optional Tail Armature
Cut a length of craft wire approximately 3 cm shorter than the body and tail combined.
Fold both ends into closed loops.
Wrap the entire wire with floral tape.
Insert the wire before the tail narrows below 12 stitches.
Surround it with stuffing so it cannot touch the crochet fabric directly.
Bend the tail in a gentle S-curve rather than a sharp angle.
🤍 Belly Panel
The belly is a long cream oval running from the throat toward the lower body.
Using white yarn:
R1
Ch 20.
Starting in the second chain:
18 sc, 3 sc in the final chain.
Continue along the opposite side:
17 sc, inc. (40)
R2
inc, 17 sc, 3 inc, 17 sc, 2 inc. (46)
R3–9
sc around. (46)
R10
(21 sc, dec) ×2. (44)
FO, leaving a long sewing tail.
Flatten the piece into a long oval.
Sew it to the underside of the body, beginning just below the beard and ending before the tail narrows.
💪 Front Arms — Make 2
The forearms are long and curve forward.
Using golden-yellow yarn:
R1
MR 6. (6)
R2
inc ×6. (12)
R3
(1 sc, inc) ×6. (18)
R4–8
sc around. (18)
R9
(4 sc, dec) ×3. (15)
R10–17
sc around. (15)
R18
(3 sc, dec) ×3. (12)
R19–21
sc around. (12)
Stuff lightly, leaving the wrist flexible.
Flatten the upper opening.
FO, leaving a long sewing tail.
✋ Front Toes — Make 10
Each front foot has five slender toes.
Using golden-yellow yarn:
R1
MR 5. (5)
R2–5
sc around. (5)
Lightly stuff only if possible.
FO, leaving a sewing tail.
For the inner toe on each hand, work only three rounds so it remains slightly shorter.
Sew five toes around the end of each front arm, spreading them into a fan.
🦵 Hind Legs — Make 2
The hind legs have large rounded thighs and narrower lower sections.
Using golden-yellow yarn:
R1
MR 6. (6)
R2
inc ×6. (12)
R3
(1 sc, inc) ×6. (18)
R4
(2 sc, inc) ×6. (24)
R5
(3 sc, inc) ×6. (30)
R6–10
sc around. (30)
R11
(3 sc, dec) ×6. (24)
R12–15
sc around. (24)
R16
(2 sc, dec) ×6. (18)
R17–21
sc around. (18)
Stuff firmly in the thigh and lightly near the foot opening.
Flatten the upper attachment area.
FO, leaving a long sewing tail.
🦶 Hind Toes — Make 10
Using golden-yellow yarn:
R1
MR 5. (5)
R2–5
sc around. (5)
FO.
Make the central three toes slightly longer by adding one extra round.
Sew five toes to each hind foot opening.
Spread them outward so they remain clearly visible.
🖤 Claws
Using black embroidery thread or fine black yarn, add one dark claw to every toe.
For each claw:
- Insert the needle through the toe tip.
- Work two or three stitches over the same area.
- Pull gently to create a narrow pointed end.
There should be five claws on each of the four feet.
🦔 Optional Body Spikes
For additional texture, make 8–10 small spikes using the Small Spike instructions.
Sew them in a broken line along the upper sides of the body, beginning behind the head and ending before the tail.
Keep these spikes smaller than the head spikes.
🪡 Assembly
Attach the Head
Position the head at the broad front end of the body.
Tilt it upward so the muzzle points slightly toward the ceiling.
Sew firmly around the neck opening.
Reinforce the underside because the long muzzle adds weight.
Attach the Beard
Sew the beard beneath the jaw and throat.
Spread the loops evenly.
Keep the white lower band visible.
Attach the Front Arms
Position the front arms high on the body behind the beard.
Angle them forward and outward.
The fingers should spread toward the front.
Sew securely around the shoulder openings.
Attach the Hind Legs
Place the hind legs lower on the body, slightly behind the midpoint.
Angle the thighs outward and the feet forward.
Sew the broad thigh sections firmly to the body.
Attach the Belly Panel
Pin the white panel along the underside.
Sew around its entire outer edge using small white stitches.
Allow the front end to meet the lower beard edge.
Add the Spikes
Sew the head spikes behind the eyes and along the sides of the skull.
Add optional body spikes after all limbs have been positioned.
✨ Final Shaping
- Lift the head slightly upward.
- Keep the eye domes high and prominent.
- Angle the rust eye rings toward the front.
- Position the ear details behind the eyes.
- Curve the white mouth line gently.
- Arrange the beard loops downward.
- Spread all five toes on every foot.
- Turn the front hands outward slightly.
- Curve the hind legs close to the lower body.
- Shape the tail into a long natural arc.
- Keep the belly panel centered.
💡 Helpful Tips
- Pin both eyes before sewing either one permanently.
- Stuff the muzzle firmly so it does not collapse.
- Keep the head stuffing even around the ear details.
- Use a smaller hook for toes and spikes when necessary.
- Change colors on the final yarn-over of the preceding stitch.
- Carry unused yarn loosely inside short stripe sections or cut it at every change.
- Stuff the body firmly enough to support the head.
- Keep the tail tip only lightly stuffed.
- Reinforce each toe with several stitches.
- Use fine embroidery thread for the claws and nostrils.
🧼 Care Instructions
Spot clean gently using a damp cloth.
Allow the dragon to air dry completely.
Avoid machine washing when safety eyes or internal wire are used.
Store without placing weight on the eye domes, spikes, toes, or tail.
🌟 Final Thoughts
Your striped bearded dragon amigurumi is ready to bask in handmade style. 🦎☀️
With its long lifted muzzle, raised eyes, rust-colored eye rings, recessed ear details, textured orange beard, white jaw and belly, golden-and-orange striped body, five-toed feet, tiny black claws, decorative spikes, and sweeping tail, this detailed reptile is full of bold desert personality.
Happy Crocheting! 🧶🦎


Очень красивая игрушка!огромное спасибо,что поделились!!творческих успехов!я подписываюсь на ваш канал