Step into the spotlight with this Amigurumi Glamorous Evening Doll crochet pattern! Dressed to dazzle in an elegant gown and sparkling accessories, this stunning doll is the perfect project for anyone who loves fashion, flair, and a touch of handmade magic. Whether you’re crafting a showstopper for a special gift, adding a stylish figure to your amigurumi collection, or simply indulging in a bit of crochet couture, this pattern lets you stitch up a doll that’s ready for the red carpet. 💃🧶✨
Designed for drama and detail, this pattern invites you to play with luxurious yarns, flowing silhouettes, and glamorous touches like a beaded clutch, high heels, or a chic updo. Customize her dress with ruffles, sequins, or a dramatic train to match your vision of evening elegance. Whether she’s gracing a shelf, starring in imaginative play, or simply bringing sparkle to your space, this Amigurumi Glamorous Evening Doll is a fabulous and satisfying project—perfect for adding a touch of handmade haute couture to every stitch! 💖🌟👗
✨ Glamorous Split-Front Evening Doll Amigurumi Pattern
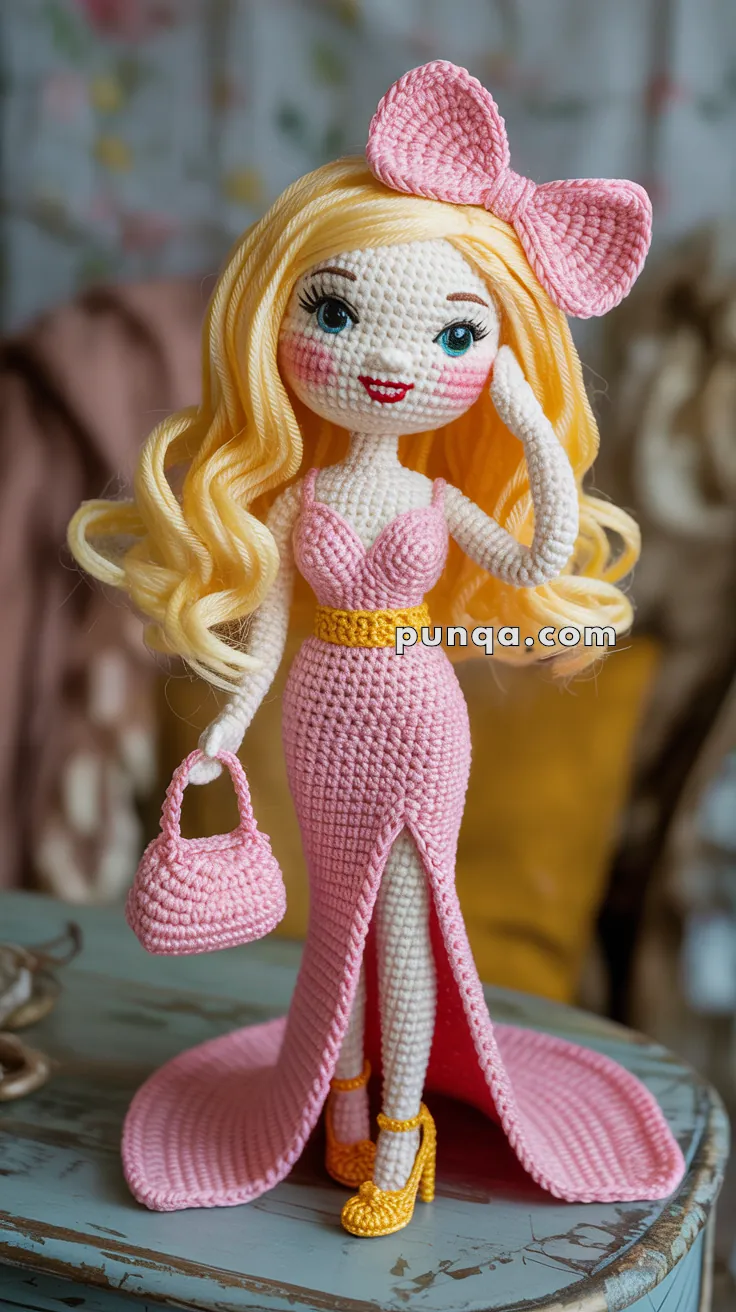
Create an elegant fashion doll with flowing golden curls, a dramatic pink gown, and couture details.
There’s something magical about crocheting a doll that captures true elegance. This glamorous evening doll features all the details that make fashion dolls so captivating: cascading blonde curls that reach past her waist, a show-stopping pink gown with a dramatic split front, an oversized bow perched atop her head like a crown, and delicate golden pumps with slim heels.
She stands approximately 25–30 cm tall and makes a stunning display piece for collectors or a cherished handmade gift. While this pattern requires intermediate to advanced skills, the results are absolutely worth the effort.
📋 What You’ll Need
Yarn
Sport or DK weight yarn in:
- Skin tone (beige/peach) – 40 g
- Pink – 60 g (dress, bow, handbag)
- Gold/Yellow – 15 g (belt, shoes)
- White – 20 g (stockings)
- Golden blonde – 50 g (hair)
- Small amounts:
- Red (lips)
- Black (details)
- Blue (eyes)
- Brown (eyebrows)
Tools & Notions
- 2.25 mm crochet hook
- Fiberfill stuffing
- 14 mm safety eyes (or embroider eyes)
- Tapestry needle
- Stitch markers
- Thin craft wire (18–20 gauge) for arm posing
- Makeup brush or chalk pastel for blush
- Embroidery needle for facial details
🧶 Skill Level
Intermediate to Advanced – This pattern includes sculptural shaping, separate construction pieces, embroidered details, and assembly techniques.
📏 Finished Size
- Height: 25–30 cm (10–12 inches) tall
🔤 Abbreviations (US Terms)
- MR – magic ring
- sc – single crochet
- inc – increase (2 sc in same stitch)
- dec – invisible decrease (sc2tog)
- ch – chain
- sl st – slip stitch
- hdc – half double crochet
- dc – double crochet
- FLO – front loop only
- BLO – back loop only
- FO – fasten off
Work in continuous rounds unless otherwise stated.
👤 The Doll: Head & Face
Head
With skin tone yarn:
- R1: MR, 6 sc (6)
- R2: inc × 6 (12)
- R3: (sc, inc) × 6 (18)
- R4: (2 sc, inc) × 6 (24)
- R5: (3 sc, inc) × 6 (30)
- R6: (4 sc, inc) × 6 (36)
- R7–12: sc around (36)
- R13: (5 sc, inc) × 6 (42)
- R14–20: sc around (42)
- R21: (5 sc, dec) × 6 (36)
- R22: (4 sc, dec) × 6 (30)
Begin stuffing firmly.
- R23: (3 sc, dec) × 6 (24)
- R24: (2 sc, dec) × 6 (18)
- R25: (sc, dec) × 6 (12)
- R26: dec × 6 (6)
FO, close opening tightly. The head should be very firm and smooth.
Facial Features
Eyes
- Place 14 mm safety eyes between R10–11, spaced 8 stitches apart.
- Eyelids: With black embroidery thread, stitch curved upper eyelid lines along the top edge of each eye.
- Eyelashes: Add 2–3 short lashes at the outer corner of each eye.
- Irises: Use blue thread to embroider a circle within each eye (if using safety eyes) or embroider complete eyes.
Eyebrows
- Use brown thread to embroider slightly arched eyebrows above each eye.
Nose
Create subtle nose shaping with embroidery:
- Insert needle at back of head.
- Exit at center front between eyes.
- Re-insert one stitch lower.
- Exit at back and pull gently to create a nose bridge.
Mouth
- With red embroidery thread, create a full, smiling mouth.
- Use satin stitch for a bold, glamorous lip.
Cheeks
- Apply light pink blush or chalk pastel below each eye for a soft rosy glow.
💇 Hair – Cascading Golden Curls
The doll’s signature feature is her voluminous, waist-length blonde curls.
Hair Cap (Foundation)
With golden blonde yarn:
- R1: MR, 6 sc
- R2: inc × 6 (12)
- R3: (sc, inc) × 6 (18)
- R4: (2 sc, inc) × 6 (24)
- R5: (3 sc, inc) × 6 (30)
FO, leaving a long tail. Sew cap securely to top of head.
Preparing the Strands
You’ll need approximately 80–100 hair strands for full coverage.
- Cut golden blonde yarn into 30 cm (12 inch) lengths.
- You’ll attach these using the latch-hook method.
Latch-Hook Technique
- Insert your crochet hook through a stitch on the hair cap (from front to back).
- Fold one yarn strand in half.
- Hook the folded loop and pull it through the cap stitch.
- Thread the two loose ends through the loop.
- Pull tight to secure.
Attachment Pattern
- Start at the nape of the neck (bottom back of head).
- Work in horizontal rows moving upward.
- Create a center part by working symmetrically from the center front.
- Continue until entire cap has full coverage.
- For the front center part: leave a small gap (2–3 stitches wide).
Creating Spiral Curls
- Once all strands are attached, wrap each strand tightly around a knitting needle or pencil.
- Lightly mist with water or use a steamer.
- Let dry completely (several hours or overnight).
- Carefully unwrap each curl.
- Gently separate and fluff for volume.
The finished hair should cascade past the waist in luxurious golden waves.
💪 Arms (Make 2)
The right arm will be posed bent at the elbow, touching the hair. The left arm hangs naturally.
With skin tone yarn:
- R1: MR, 6 sc
- R2: inc × 6 (12)
- R3–4: sc around (12)
- R5: (4 sc, dec) × 2 (10)
- R6–16: sc around (10)
Stuff very lightly (arms should be flexible, not stiff).
FO, leaving a long tail for sewing.
Wire Support for Right Arm
For the right arm only:
- Before stuffing, insert a thin craft wire through the entire length.
- This allows you to bend the arm at the elbow and position it touching the head.
- Bend wire ends into small loops to prevent poking through.
Hands
Before closing the end of each arm:
- Continue with last 10 stitches of arm.
- R17: (3 sc, dec) × 2 (8)
- R18: (2 sc, dec) × 2 (6)
Tiny fingernails: With red thread, add 3 tiny vertical stitches at the fingertip area before closing.
FO and close opening.
🦵 Legs (Make 2)
The legs feature white stockings with visible skin tone at the upper thigh.
Stockings
With white yarn:
- R1: MR, 6 sc
- R2: inc × 6 (12)
- R3: (sc, inc) × 6 (18)
- R4–14: sc around (18)
Natural knee shaping:
- R15: (4 sc, dec) × 3 (15)
- R16–18: sc around (15)
Upper Thigh
Switch to skin tone yarn:
- R19–23: sc around (15)
Stuff legs lightly below the knee only, leaving the upper thigh flexible for natural posing.
FO both legs, leaving long tails.
🧍♀️ Body (Joining Legs & Torso)
Joining the Legs
- Hold both legs side by side.
- With skin tone yarn, attach to the inside edge of one leg.
- Ch 3 to bridge across to the other leg.
- Sc around both legs and the chain bridge.
You should now have approximately 42 stitches around in total (15 + 3 + 15 + 3 + adjustments ≈ 36–42 sts depending on tension).
Body Shaping
- R1–8: sc around (adjust stitch count to 42 if needed)
- R9: (5 sc, dec) × 6 (36)
- R10–14: sc around (36)
- R15: (4 sc, dec) × 6 (30)
Bust shaping:
- R16–18: At front center area, work 2 increases per round (total 4 increases spread across 2 rounds at chest area).
- Maintain approximately 34–36 sts.
- R19–24: sc around (34–36)
Stuff body firmly as you work, maintaining smooth shaping.
FO, leaving long tail for attaching head.
👗 The Gown: Dramatic Split-Front Design
This is the doll’s showstopping feature – a pink evening gown with a deep front split revealing the white stockinged legs.
Sculpted Bust Cups (Make 2)
With pink yarn:
- R1: MR, 6 sc
- R2: inc × 6 (12)
- R3: (sc, inc) × 6 (18)
- R4: (2 sc, inc) × 6 (24)
- R5–6: sc around (24)
FO, leaving a long tail. Do not flatten – keep the cup curved and three-dimensional.
Positioning:
Sew cups to the front of the body at chest level, angled slightly outward. Sew around the entire edge to secure firmly.
Waistband & Bodice
With pink yarn:
- Foundation: Ch 32, join with sl st to form ring (check fit around doll’s waist first).
- R1–3: sc around (32)
- R4: (7 sc, inc) × 4 (36)
- R5–8: sc around (36)
The bodice should fit snugly over the torso and sit just above the bust cups.
🩷 Split-Front Skirt Panels
The skirt consists of two separate panels that attach to the sides of the waistband and drape outward, creating a dramatic open front.
Left Skirt Panel
With pink yarn:
- Attach yarn to the left side of the waistband (approximately at the side seam).
- Row 1: Ch 1, sc 14 stitches along back half of waistband, turn (14)
- Row 2: Ch 1, inc, sc 12, inc, turn (16)
- Row 3: Ch 1, sc across, turn (16)
- Row 4: Ch 1, sc across, turn (16)
- Row 5: Ch 1, inc, sc 14, inc, turn (18)
Continue working in rows, increasing at both ends every 3–4 rows to create a widening triangular panel.
- Rows 6–40: Continue pattern, working approximately 40 total rows (adjust for desired length – should reach floor when doll is standing).
Final row should be approximately 22–26 stitches wide at the hem.
Creating curved hem:
On final 3 rows, increase at outer edge but decrease at inner edge to create a rounded, elegant hem shape.
FO, leaving tail for final finishing.
Right Skirt Panel
Mirror the left panel construction:
- Attach to the right side of the waistband.
- Work the same number of rows and increases.
🧵 Assembling the Gown
- Try the bodice on the doll (it should fit snugly).
- The two skirt panels should drape naturally to the sides, creating a deep V-shaped opening at the front.
- Adjust panel attachment points if needed for symmetrical drape.
- The panels’ inner edges should curve away from each other elegantly.
- When the doll stands, the panels should pool on either side like a glamorous red-carpet gown.
The dramatic split design showcases the white stockinged legs – this is intentional and creates the gown’s couture effect!
💛 Gold Belt
With gold/yellow yarn:
- Ch 34 (adjust to fit around doll’s waist).
- Row 1: Sc in 2nd ch from hook and across (33).
- FO, leaving long tail.
Wrap around doll’s waist where bodice meets skirt panels and sew ends together at back. The belt should sit snugly and emphasize the waist.
Optional: Thread metallic gold embroidery thread through the center for extra shimmer.
🎀 Oversized Hair Bow
The bow is a statement piece that sits atop the doll’s head like a crown.
With pink yarn:
- Ch 22
- Row 1: Sc in 2nd ch from hook and across, turn (21)
- Rows 2–7: Ch 1, sc across, turn (21)
- FO, leaving long tail.
Forming the bow:
- Pinch the rectangle at the center to create two loops.
- Wrap yarn tightly around the center 6–8 times to cinch.
- Secure with several stitches through the wrap.
- Weave in ends.
Placement: Sew the bow centered on top of the head, positioned slightly back from the hairline. It should sit like a crown above the cascading curls.
👜 Pink Handbag
With pink yarn:
- R1: MR, 6 sc
- R2: inc × 6 (12)
- R3: (sc, inc) × 6 (18)
- R4–9: sc around (18)
- R10: (4 sc, dec) × 3 (15)
- R11: sc around (15)
Stuff lightly to maintain rounded shape. FO.
Handle:
- Ch 18
- Row 1: Working in back bumps of chain, sc in 2nd ch from hook and across (17)
- Row 2: Ch 1, turn, sc across (17)
FO, leaving tails. Sew handle ends to sides of bag, creating a curved handle shape.
👠 Gold Slim-Heel Pumps (Make 2)
The doll wears elegant gold pumps with pointed toes and slim heels – not block heels.
Shoe Body
With gold/yellow yarn:
- R1: MR, 6 sc
- R2: inc × 6 (12)
- R3: (sc, inc) × 6 (18)
- R4–5: sc around (18)
- R6: (4 sc, dec) × 3 (15) – beginning toe taper
- R7: (3 sc, dec) × 3 (12) – sharper point
- R8: (sc, dec) × 4 (8) – pointed toe
FO, leaving opening for leg insertion.
Slim Heel
Method 1 – Cord Heel:
- Ch 12, sl st back very tightly in back loops (11) to create a thin, firm cord.
Method 2 – Structured Heel:
- Crochet around a toothpick or thin wire:
- Hold toothpick/wire.
- Ch 2, then work sc around toothpick for 3 cm length.
- Sl st to close.
Attaching heel:
- Sew heel to back of shoe at a sharp angle (approximately 45–60 degrees), creating the elegant pump heel.
- The heel should be approximately 2–3 cm tall.
Ankle strap (optional):
Ch 12, sew across top of foot to create classic pump strap.
🔗 Assembly: Bringing Her to Life
1. Attach Head to Body
- Sew neck securely with skin-tone yarn, ensuring head sits straight and firm.
- Add extra stitches if needed for stability.
2. Attach Arms
- Left arm: Sew at shoulder, allowing it to hang naturally at the side.
- Right arm: Before sewing, bend the wire at the elbow (90-degree angle). Sew at shoulder positioned so the hand can rest near the head/hair.
3. Put On the Gown
- Carefully slide the bodice up the legs and position on torso.
- Adjust bust cups for natural placement.
4. Add Belt
- Wrap gold belt around waist where bodice meets skirt panels.
- Secure at back.
5. Attach Shoes
- Slide shoes onto legs.
- You may sew them on or leave them removable.
- Ensure doll can stand balanced – you may need to adjust leg stuffing or heel angles.
6. Position Hair
- Arrange curls flowing over shoulders and down the back.
- Pull some forward to frame the face.
- Fluff for volume.
7. Attach Bow
- Sew bow securely centered on top of head.
8. Add Handbag
- Position bag hanging from the bent right arm/wrist area.
- Tack in place with a few stitches if desired.
9. Final Face Details
- Check all embroidered features.
- Add extra blush if needed.
- Ensure eyelashes are visible and symmetrical.
💡 Styling & Display Tips
Posing
- Angle the doll slightly to show the dramatic split in the gown.
- Position the right hand touching the hair or near the face in a graceful gesture.
- Arrange skirt panels to pool elegantly on either side.
Display Stand
- Consider a small display stand – this doll is meant to be showcased.
- A simple wooden base or acrylic stand works beautifully.
Photography
- Photograph from slightly below eye level to capture the elegance.
- Side angles show the gown’s dramatic split best.
- Ensure good lighting to capture the golden hair and pink gown colors.
Variations
- Hair color: Brunette, auburn, black, or pastel shades.
- Gown color: Emerald green, royal blue, deep red, or classic black.
- Accessories: Add a tiny bead necklace, earrings, or sparkle to the belt.
📝 Pattern Notes & Tips
About Gauge
This pattern is designed for Sport or DK weight yarn with a 2.25 mm hook.
- Larger hook / bulkier yarn → larger doll.
- Thinner yarn → more delicate, miniature version.
Stuffing Tips
- Head: Stuff very firmly for a smooth, round shape.
- Body: Firm but not rock-hard – should have slight give.
- Arms: Very light stuffing – they need to be flexible.
- Legs: Light stuffing below knee only – upper thigh flexible for posing.
- Skirt panels: No stuffing – they should drape naturally.
Working with Split-Front Design
The split-front gown is what makes this doll distinctive.
Don’t be tempted to close the front – the dramatic open split showcasing the legs is intentional and creates the couture look.
Hair Tips
- Use smooth, tightly twisted yarn for best curl results.
- The tighter you wrap around the needle/pencil, the tighter the curl.
- Be patient with drying time – rushed curls won’t hold.
- Don’t skip the fluffing step – it adds crucial volume.
Wire in Arm
If you’ve never worked with wire in amigurumi:
- Use craft wire (18–20 gauge).
- Cut wire 2 cm shorter than the arm length.
- Create small loops at each end by bending the wire back on itself.
- This prevents the wire from poking through the crochet.
- Insert wire before final stuffing.
🎨 About This Pattern
This glamorous evening doll represents hours of detailed work, but the result is a true collector’s piece. She captures the elegance of high-fashion dolls with her flowing gown, cascading curls, and refined details.
The split-front gown design is inspired by red-carpet fashion, where dramatic slits and sculptural silhouettes reign supreme. Paired with her voluminous golden hair and delicate accessories, she’s a celebration of glamour and craftsmanship.
Whether you display her on a shelf, gift her to a doll collector, or simply enjoy the meditative process of bringing her to life stitch by stitch, this pattern offers a rewarding challenge for intermediate to advanced crocheters.
❤️ Final Thoughts
Creating an amigurumi doll with this level of detail is truly a labor of love. Take your time with each component, and don’t rush the assembly. The magic happens in those final moments when you position her arm, arrange her curls, and adjust her gown — suddenly, she comes alive with personality.
I hope you enjoy every stitch of this glamorous creation. Happy crocheting! ✨


omg she is beautiful this doll i have some of ur patterns before and they are fab so realistic looking i love love dolls and make a lot of them its my hobby doll artist maybe u could call me my friends love them they are so real looking thank u so much for ur patterns and fab work mary