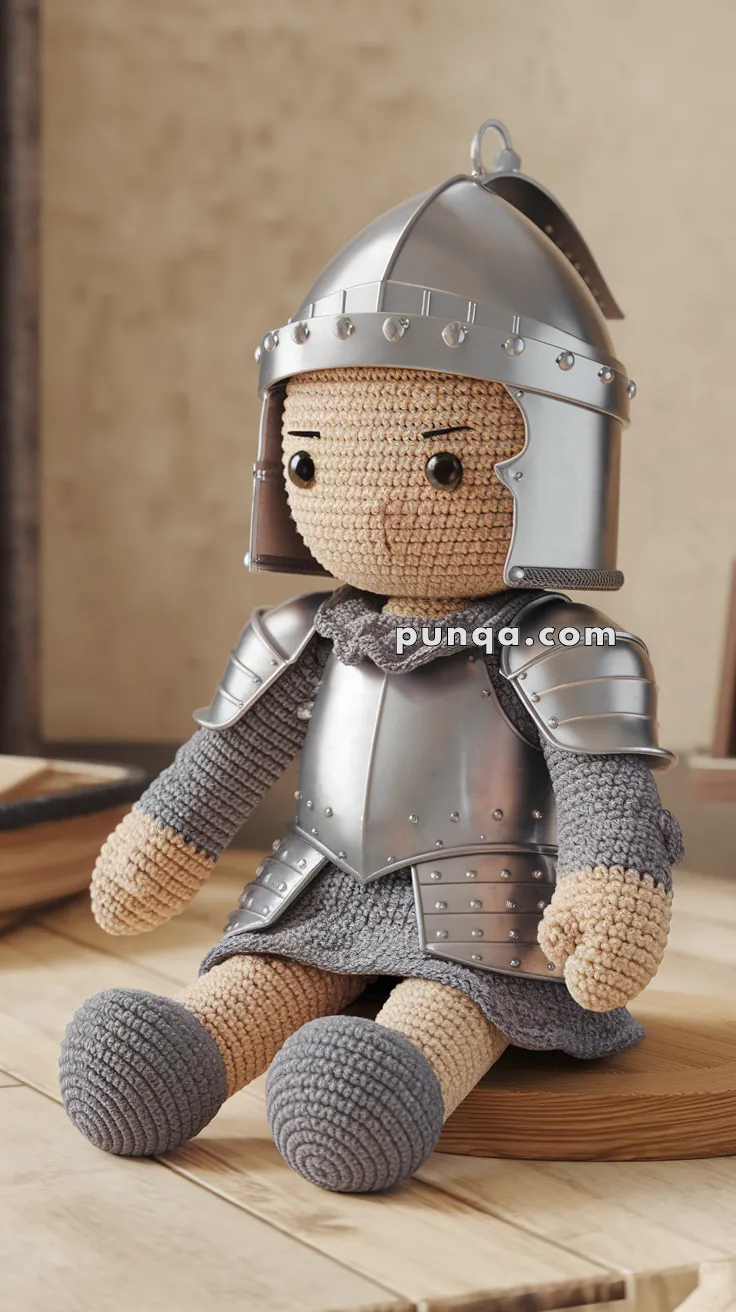
Welcome to the noble and adventurous world of amigurumi! 🏰✨ Today, I’m excited to share my free crochet pattern for a Castle Knight Doll—a brave and chivalrous creation perfect for medieval enthusiasts, fantasy-themed collections, or anyone who enjoys crafting expressive and heroic plush designs! ⚔️ Whether you love stitching up legendary warriors, creating textured and lifelike figures, or simply want to add a valiant knight to your handmade lineup, this pattern will guide you through crafting a beautifully sculpted plush with a shining helmet, sturdy shield, and a touch of medieval charm! 🏇
This design embraces rich tones, intricate shaping, and regal details to bring a sense of history and adventure to your crochet projects! 🧶✨ I’ve carefully outlined each step to ensure your Amigurumi Castle Knight Doll turns out just right—ready to defend your collection or become a treasured handmade gift! 🎁 So grab your hooks, pick out royal blues, deep silvers, or bold reds, and let’s stitch up a fearless knight! 🏰
🛡️ Amigurumi Castle Knight Doll – FREE Crochet Pattern
Bring a touch of medieval magic to your crochet collection with this valiant Castle Knight Doll! Clad in realistic armor and a soft tunic, this charming warrior is ready to guard your shelves or join an epic storytime adventure. This pattern combines soft yarn construction with customizable non-yarn armor components for a standout result. ⚔️
✨ Skill Level
Intermediate – Requires basic shaping, color changes, and some crafting for armor assembly.
📏 Finished Size
Approximately 10–12 inches (25–30 cm) tall when using worsted-weight yarn and a 3.5 mm hook.
🧶 Materials
Yarn (Worsted weight):
-
Skin tone (Head, hands, legs)
-
Grey (Tunic, sleeves, and shoes)
-
Darker grey or silver (Undergarment/chainmail look)
Other Supplies:
-
3.5 mm crochet hook
-
12 mm safety eyes
-
Tapestry needle
-
Stitch marker
-
Polyfill stuffing
Non-Yarn Parts (Armor):
-
Thin metallic plastic sheets (or craft foam painted silver)
-
Silver brads or upholstery tacks (for studs)
-
Hot glue or super glue
-
Scissors and hole punch
-
Metal keychain loop (optional, for display hanging)
🧵 Abbreviations (US Terms)
MR – Magic Ring
sc – Single Crochet
inc – Increase
dec – Decrease
sl st – Slip Stitch
ch – Chain
FO – Fasten Off
BLO – Back Loops Only
🧑 Head
With skin tone yarn:
-
MR, 6 sc
-
inc x6 (12)
-
(1 sc, inc) x6 (18)
-
(2 sc, inc) x6 (24)
-
(3 sc, inc) x6 (30)
6–14. sc around (30) -
(3 sc, dec) x6 (24)
-
(2 sc, dec) x6 (18)
– Insert safety eyes between rounds 8–9, about 6 stitches apart -
(1 sc, dec) x6 (12)
– Stuff firmly -
dec x6 (6), FO and close
🧥 Body (Chainmail Tunic)
With grey yarn:
-
MR, 6 sc
-
inc x6 (12)
-
(1 sc, inc) x6 (18)
-
(2 sc, inc) x6 (24)
-
(3 sc, inc) x6 (30)
6–13. sc around (30) -
(3 sc, dec) x6 (24)
-
(2 sc, dec) x6 (18)
– Stuff firmly -
(1 sc, dec) x6 (12), FO
Sew head onto body.
🦵 Legs (Make 2)
With skin tone yarn:
-
MR, 6 sc
-
inc x6 (12)
-
sc around (12)
Change to grey (for boots):
4–8. sc around (12)
FO and stuff lightly
Sew legs to bottom of tunic body.
💪 Arms (Make 2)
With skin tone:
-
MR, 6 sc
-
(1 sc, inc) x3 (9)
3–5. sc around (9)
Change to grey:
6–10. sc around (9)
FO and stuff
Sew to body sides.
👞 Shoes (Optional extra shaping)
With grey yarn:
-
MR, 6 sc
-
inc x6 (12)
-
(1 sc, inc) x6 (18)
-
sc around (18)
-
(2 sc, dec) x4, sc x2 (14)
-
dec x7 (7), FO and sew to bottom of leg
🪖 How to Make the Knight Armor (Non-Yarn Parts)
You’ll need lightweight, flexible materials such as:
-
Metallic cardstock, plastic folders, or craft foam painted silver
-
Silver thumbtacks, upholstery brads, or small silver stickers (for rivet details)
-
Hot glue, super glue, or glue dots
Helmet:
-
Cut a rounded dome shape from plastic or foam, curved to fit head.
-
Create a narrow face trim with a rectangular slit or separate cutout.
-
Punch small holes and add “rivets” with silver brads or glue dots.
-
Attach by lightly gluing to head, or make it removable with a snug fit.
Chest Plate:
-
Cut a chest-sized armor plate with a central fold to fit torso contour.
-
Add side flaps or shoulder guards with riveted edges.
-
Glue onto body or leave detachable with small Velcro squares or tape.
Arm Guards & Skirt Plate:
-
Create curved arm bands to match sleeve circumference.
-
Skirt plates can be layered flaps cut from cardstock and glued in overlapping rows.
Tips:
-
Keep armor rounded and lightweight to avoid overbalancing the doll.
-
For extra strength, reinforce foam with clear plastic tape or glue a second layer.
-
Add felt backing if sharp edges are exposed.
🪡 Assembly
-
Sew all limbs securely before attaching armor.
-
Glue or tape armor carefully over crocheted surface—light touch is best.
-
Add optional hanging loop with keychain ring to the helmet top if for display.
💡 Customization Ideas
-
Create a shield and sword using felt and cardboard.
-
Add a banner or crest to the armor with embroidery or fabric paint.
-
Crochet a royal companion, like a king or dragon, for an epic display!
Whether guarding a bookshelf or inspiring brave bedtime stories, this noble knight is a unique blend of yarn and craft that brings medieval charm to life! 🏰✨