Add a dash of festive flair to your holiday table with the Santa Hat Cutlery Holder—a cheerful crochet project that’s as practical as it is adorable! 🎅🍴 With its classic red-and-white design, fluffy trim, and cozy charm, this little hat is ready to cradle your silverware in true North Pole style. Whether you’re hosting a Christmas feast or simply love adding handmade touches to your décor, this cutlery holder brings warmth and whimsy to every place setting.
Quick to stitch and full of personality, this pattern is perfect for customizing with sparkly yarns, embroidered snowflakes, or even a tiny pom-pom on top. Make a matching set for the whole family or mix in other holiday characters for a playful tablescape. Whether gifted, displayed, or used to surprise your guests, the Santa Hat Cutlery Holder is a joyful and satisfying project—perfect for stitching up a little holiday magic, one loop at a time! 🧶🎄✨
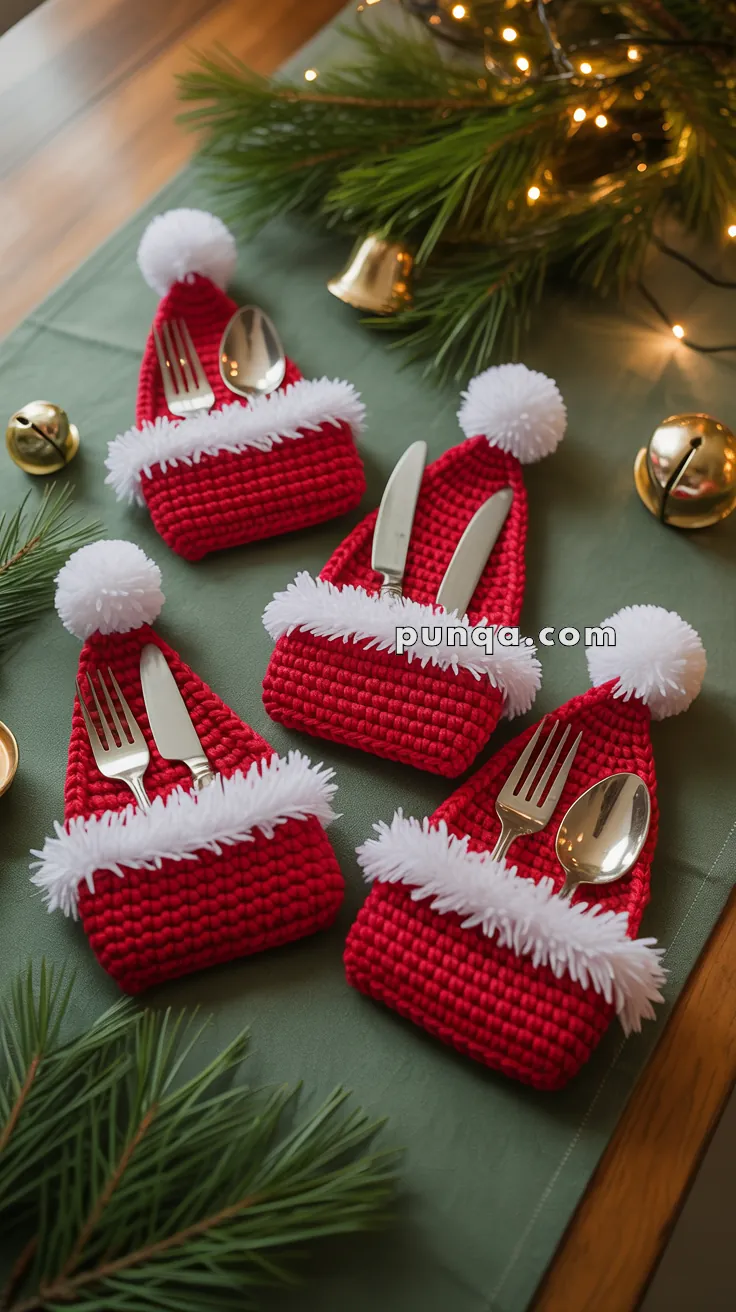
🎅 Santa Hat Cutlery Holder Crochet Pattern
Festive, sweet, and wonderfully handmade — these Santa Hat Cutlery Holders bring a cozy holiday spirit to any Christmas table. Their softly tapered hat silhouette, thick fuzzy trim, slightly rounded corners, and fluffy pom-pom perfectly match the warm charm of the reference photo. Each holds a full fork–knife–spoon set neatly and is quick enough to batch-make for family dinners or gifting.
✨ Skill Level
Beginner-friendly: Uses simple stitches, light shaping, and basic seaming.
📏 Finished Size
• Height with pom-pom: ≈ 12–14 cm
• Width: ≈ 8–9 cm
Perfect for inserting standard dinner cutlery, dessert utensils, or rolled napkins.
🧶 Materials
For 1 holder:
• Red worsted (aran) yarn — 25–30 g
• White fluffy yarn (eyelash, boucle, faux fur) — 8–10 g
• White worsted yarn (or store pom-pom) — small amount
• Crochet hook 4.0 mm
• Yarn needle
• Scissors
For a set of 6 holders:
• Red yarn — 150–180 g
• White fluffy yarn — 40–55 g
• White worsted — 20 g
🔠 Abbreviations (US Terms)
ch — chain
sc — single crochet
BLO — back loop only
dec — decrease (sc2tog)
sl st — slip stitch
rnd — round
FO — fasten off
❤️ Hat Body
Worked flat, folded, and sewn into a pocket.
With red yarn and 4.0 mm hook:
Foundation:
Ch 18
Turn.
Rows 1–14:
Sc in each st across (18). Ch 1, turn.
Creates front panel height before taper.
Rows 15–16:
Sc in each st across (18). Ch 1, turn.
Slight crown height before taper.
Row 17:
Sc 7, dec, sc 7, dec (16). Ch 1, turn.
Row 18:
Sc across (16).
Row 19:
Sc 6, dec, sc 6, dec (14). Ch 1, turn.
Row 20:
Sc across (14).
Row 21:
Sc 5, dec, sc 5, dec (12). Ch 1, turn.
Row 22:
Sc across (12).
Row 23:
Sc 4, dec, sc 4, dec (10). Ch 1, turn.
Row 24:
Sc across (10).
Row 25:
Sc 3, dec, sc 3, dec (8). Ch 1, turn.
Row 26:
Sc across (8).
Row 27:
Sc 2, dec, sc 2, dec (6). Ch 1, turn.
Row 28:
Sc across (6).
Row 29:
Sc 1, dec, sc 1, dec (4). Ch 1, turn.
Row 30:
Sc across (4).
FO leaving a long tail.
🧵 Assembly (Pocket Form)
Fold the bottom edge up to Row 8–9 line, creating a front pocket just deep enough for utensils.
With tail yarn, whip-stitch the side seams:
• Begin stitching one row up from the very bottom edge
(leaving the lower corners slightly relaxed for the soft rounded look).
• Sew up to the beginning of the taper rows.
• FO and weave in.
Pocket should now be flat, smooth, and gently curved at the bottom corners.
❄️ Fluffy Trim (Front Only)
Attach white fluffy yarn at the folded pocket edge (front layer only).
Row 1:
Sc evenly across the entire width.
Row 2:
Sc across again for a thicker, plush appearance.
FO and weave in ends.
Trim should sit only on the pocket edge — not wrapped to the back.
🎀 Pom-Pom
Use white worsted yarn or attach a store-made 3–4 cm pom-pom.
Handmade method:
Wrap yarn around 3 fingers 50–60 times.
Slide off, tie tightly through center, cut loops, and trim into a round sphere.
Sew securely to the hat tip.
🧂 Finishing Touches
• Shape hat by gently bending the top to one side for a natural tilt.
• Fluff pom-pom.
• Smooth white trim so it sits full and thick.
• Slide fork, knife, and spoon into the pocket — they should rest snugly and visibly above the trim.
🎉 Styling Ideas
✨ Place one on each dinner plate
✨ Offer as handmade hostess gifts
✨ Fill with napkins, small treats, or name cards
✨ Mix yarn shades for matching family sets
🪄 Care
Hand wash gently and air-dry flat.
Brush the fluffy trim if needed.
🎁 Final Thoughts
These Santa Hat Cutlery Holders stitch up quickly yet look beautifully refined on the holiday table. Their flat, single-panel structure, perfectly sized pocket, thick white trim, soft rounded corners, and pom-pom detail capture the warm spirit of the photo exactly. Whether for festive dinners, special gatherings, or cozy family meals — they bring a handmade joy that everyone notices.


FANTASTICO!!!