Bring jolly vibes to your holiday décor with the Santa Claus Ornament, a cheerful crochet project that captures the magic of the season in every stitch! 🎅🧶 With his rosy cheeks, fluffy beard, and iconic red hat, this mini Santa is ready to spread festive cheer from your Christmas tree, gift wrap, or mantel garland. Whether you’re crafting for loved ones or adding handmade charm to your own celebrations, this ornament is a merry must-make.
Perfect for crocheters who love quick, character-filled projects, this pattern invites you to play with textures, colors, and tiny details. Add a twinkle to his eyes, a pom-pom to his hat, or even stitch up a whole sleigh’s worth of Santas for a joyful display. Whether you’re decking the halls or gifting a bit of holiday magic, the Santa Claus Ornament is a delightful way to stitch up smiles—one festive loop at a time! 🎄✨
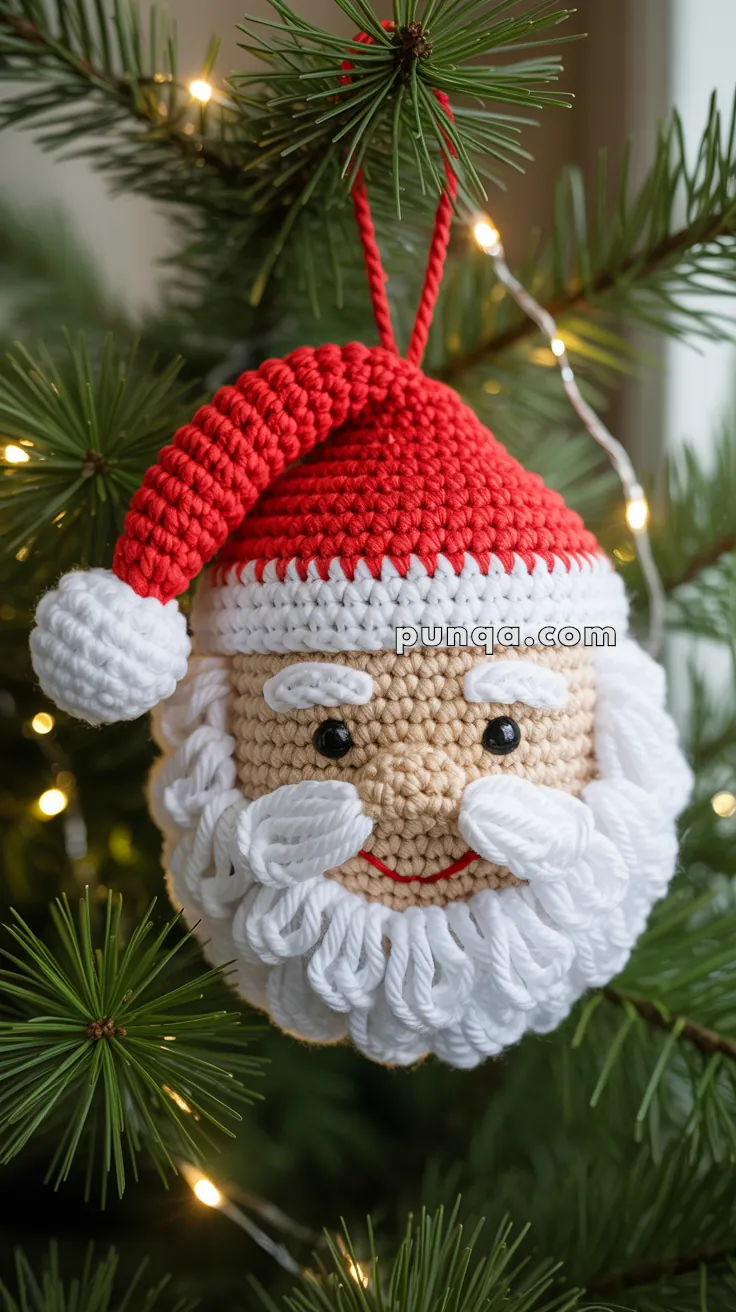
🎄 Crochet Santa Claus Ornament Pattern
Nothing says Christmas quite like Santa himself! This crochet Santa ornament captures his jolly face, fluffy beard, and classic red hat with a cozy handmade charm. Perfect for hanging on the tree, gifting, or adding to holiday garlands, this project is quick and festive.
📏 Finished Size
Approx. 4.5–5 in (11–13 cm) tall (excluding hanging loop) when using worsted weight yarn and a 3.0 mm hook.
🎯 Skill Level
Confident Beginner – Intermediate: requires working in the round, loop stitches, and textured stitches for the hat brim.
🧶 Materials
- Worsted weight cotton yarn:
- Beige (skin)
- White (beard, eyebrows, hat brim, pompom)
- Red (hat)
- Crochet hook: 3.0 mm (D/3)
- Safety eyes: 8–10 mm black
- Red embroidery thread (mouth)
- Fiberfill stuffing
- Yarn needle
- Stitch marker
- Scissors
🔤 Abbreviations (US Terms)
- MR – Magic Ring
- sc – single crochet
- inc – increase (2 sc in same st)
- dec – decrease (sc 2 sts together)
- sl st – slip stitch
- ch – chain
- FP-hdc – front post half double crochet
- Lp st – loop stitch
- FO – fasten off
🧵 Pattern Instructions
Head (Beige)
- MR, 6 sc (6)
- inc around (12)
- (sc, inc) x6 (18)
- (2 sc, inc) x6 (24)
- (3 sc, inc) x6 (30)
- (4 sc, inc) x6 (36)
7–13. sc around (36) - (4 sc, dec) x6 (30)
- (3 sc, dec) x6 (24) – insert safety eyes between R9–10, ~7 sts apart
- (2 sc, dec) x6 (18), stuff firmly
- (sc, dec) x6 (12)
- dec around (6), FO, close.
Nose (Beige)
- MR, 6 sc, join, FO leaving tail.
Sew centered between eyes.
Eyebrows (White, make 2)
- ch 6, sc in 2nd ch, hdc in next 3, sc in last. FO.
Sew above eyes.
Mustache (White, make 2 pieces)
- ch 7
- sc in 2nd ch, hdc in next 3, sc in last 2. FO.
Sew under nose, curving outward.
Beard (White – worked directly on head)
- Attach white yarn below nose level, on R11–12 of the head.
- Work Lp st (loop stitches) around the chin and cheeks.
- Continue 1–2 more rounds for fullness.
- FO, weave in ends.
Mouth (Red)
With embroidery thread, stitch a simple upward smile beneath mustache.
Santa Hat (Red with White brim)
Hat body (Red):
- MR, 6 sc
- (sc, inc) x3 (9)
- sc around (9)
- (2 sc, inc) x3 (12)
5–6. sc around (12) - (3 sc, inc) x3 (15)
8–9. sc around (15) - (4 sc, inc) x3 (18)
11–12. sc around (18) - (5 sc, inc) x3 (21)
14–15. sc around (21) - (6 sc, inc) x3 (24)
17–20. sc around (24), FO.
Hat brim (White, textured):
- Attach white yarn to last round of hat.
- Round 1: sc around.
- Round 2: FP-hdc around for a chunky rope-like brim. FO.
Pom-pom:
Make a small pom-pom or crochet:
- MR, 6 sc
- inc around (12)
- sc around (12)
- (sc, dec) around (8)
Stuff lightly, close, sew to hat tip.
Hanging Loop (Red)
ch 30, FO. Sew ends to top of hat for hanging.
🪡 Assembly
- Attach beard stitches around chin and cheeks.
- Sew nose and mustache.
- Add eyebrows above eyes.
- Embroider smile.
- Place hat on top of head, tilt slightly, sew securely.
- Attach pom-pom and hanging loop.
✨ Finishing Touches
- Add a touch of blush on cheeks with pink yarn or fabric paint.
- Use sparkly yarn for the hat brim and pom-pom for a frosty effect.
- Make several for a full set of Santa ornaments on your Christmas tree!
🎉Hang your jolly Santa on the tree, add him to gift wraps, or string up a whole garland of little Santas. Wherever he goes, he’ll bring a handmade touch of Christmas magic to your home.