Saddle up for a stunning blend of texture and artistry with this Horse Head Wall Hanging crochet and macramé fusion pattern! Combining the softness of crochet with the intricate knots of macramé, this design captures the graceful silhouette of a horse’s head in a way that’s both rustic and refined. Whether you’re decorating a cozy cabin, adding equestrian flair to a nursery, or simply love unique fiber art, this pattern lets you stitch up a statement piece that’s full of movement, charm, and handmade elegance. 🐴🧶🌾
Designed for creative expression, this pattern invites you to play with natural tones, flowing fringe, and sculptural details to bring your horse to life. Add braided reins, a floral crown, or even a bit of metallic thread for extra personality. Whether it’s a gift for a horse lover or a bold addition to your own wall, this Horse Head Wall Hanging is a captivating and satisfying project—perfect for bringing a touch of handmade wild beauty to every stitch! 💖🌿✨
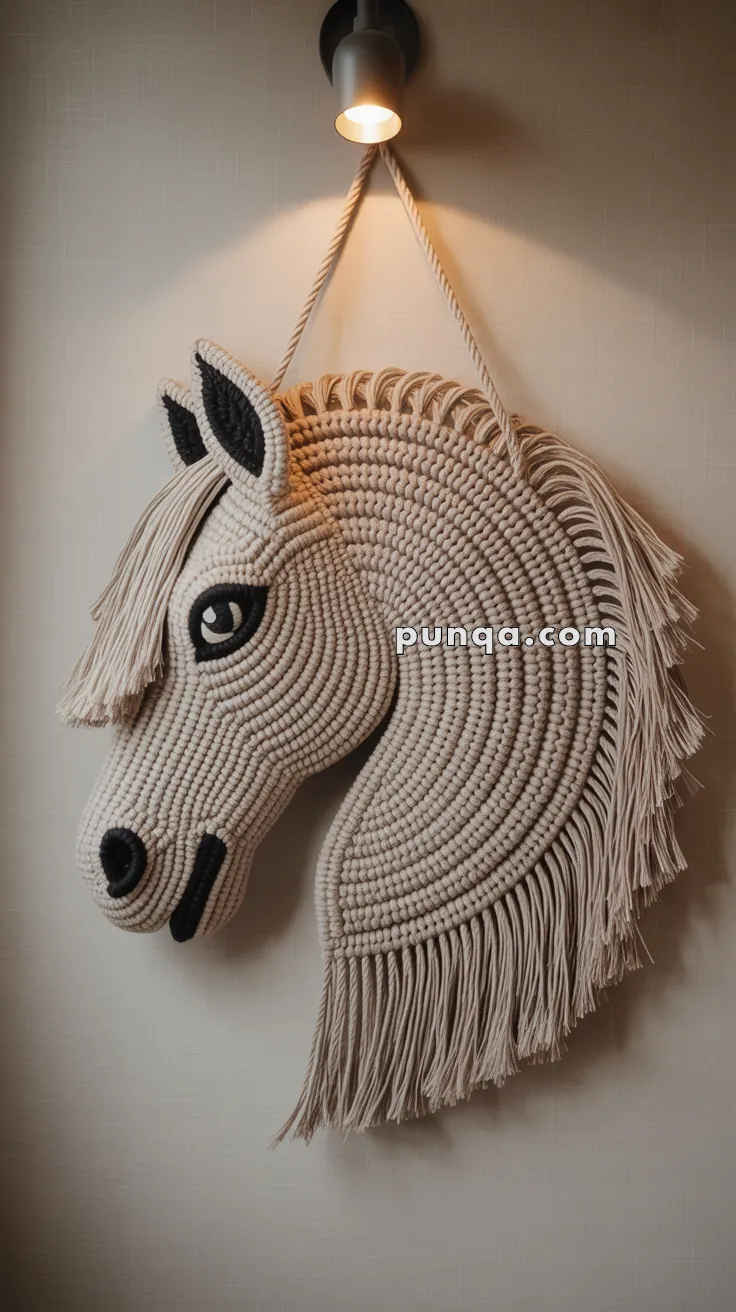
🐴 Coiled Horse Head Wall Hanging – Crochet & Macramé Fusion Pattern
Add a touch of rustic equestrian charm to any room with this statement wall piece! The design combines cord-coil crochet (working single crochet stitches around a thick cotton rope) and flowing macramé fringe for the mane. A few simple appliqués bring the eye, nostril, and inner ear to life, while a sturdy twisted cord lets you hang your new décor straight from the saddle to the wall.
✨ Skill Level
Intermediate – You should be comfortable crocheting in the round, increasing smoothly, working short rows, and stitching pieces together.
📏 Finished Size
≈ 20 in W × 24 in H (50 × 60 cm) when made with 6 mm cotton rope core and worsted-weight yarn.
(Adjust size by choosing thinner/thicker rope or adding/removing rounds.)
🧶 Materials
| Item | Details |
|---|---|
| Core Rope | ≈ 115 ft (35 m) of 6 mm natural cotton sash cord |
| Working Yarn | Worsted-weight cotton: • Color A – Cream (≈ 350 yd / 320 m) • Color B – Black (≈ 80 yd / 75 m) |
| Hook | 5.5 mm / I-9 crochet hook (fits comfortably around rope) |
| Notions | Stitch markers • Large tapestry needle • Sharp scissors • Hot glue (optional for back-side security) |
| Fringe Mane | Extra Color A yarn cut into 16 in (40 cm) lengths |
| Hanging Cord | ½ in (12 mm) twisted cotton rope, 36 in (90 cm) long |
🧵 Abbreviations (US Terms)
MR – Magic Ring
sc – single crochet
inc – 2 sc in next stitch
dec – sc 2 together
sl st – slip stitch
BLO – back loop only
ch – chain
FO – fasten off
🟤 How the Cord-Coil Method Works
- Hold the rope behind your hook; insert hook through the stitch, yarn over under the rope, pull up a loop, yarn over and pull through 2 loops—one sc is complete, hugging the rope.
- Keep the rope slightly ahead of your hook, guiding it around the curve you need.
- To increase, work 2 sc hugging the same rope segment; to short-row-shape, stop adding stitches to the rope for a few inches, then resume.
- Use a stitch marker in the first sc of every round/row because the texture hides joins.
Pattern Overview
You’ll build the piece in four stages:
- Base Spiral – a large oval spiral forms the cheek, jaw, and neck.
- Muzzle Extension – short rows create the nose and chin.
- Forehead & Ear Ridge – a second, smaller spiral sits on top for depth; ears are worked off this ridge.
- Detail & Mane – add eye, nostril, inner ear, then attach long fringe loops for the mane and a twisted hanger.
1️⃣ Base Spiral (Color A)
(Work in continuous spiral; counts are guideposts—minor variation is fine with thick cord.)
| Round | Instruction | Stitch Count |
|---|---|---|
| 1 | MR around rope, 6 sc | 6 |
| 2 | inc in each st | 12 |
| 3 | (1 sc, inc) × 6 | 18 |
| 4 | (2 sc, inc) × 6 | 24 |
| 5 | (3 sc, inc) × 6 | 30 |
Continue increasing 6 sts per round until 60 sts.
Switch to oval shaping:
- Work 12 sts, inc twice on one side only every round (jaw curve) while maintaining straight counts opposite (neck edge).
- After Round 20 (≈120 sts) begin adding 1 extra inc on the neck side every other round to widen that edge.
Stop when piece measures ≈ 17 in (43 cm) tall. Mark last stitch—this becomes the mane ridge later.
2️⃣ Muzzle Extension
With Color A still attached:
Row 1: sc 18 across jaw edge, ch 1, turn.
Rows 2-6: dec, sc across, dec (taper), ch 1, turn.
Row 7: sc evenly around extension edge, sl st to spiral. FO.
Switch to Color B and surface-sl-st along one side of muzzle to suggest the mouth line.
3️⃣ Forehead Spiral & Ears
Join Color A at marker on top of head. Work a separate mini spiral directly onto the base:
Rnds 1-5: follow same inc pattern until 30 sts. FO, leaving long tail to stitch spiral neatly onto base (creates raised brow).
Ear (make 2)
- Ch 8, sc 6 back along chain, 4 sc in last ch, continue on opposite side with sc 6, turn.
- inc, sc across inner curve, then sc around. FO.
Stitch ears to brow spiral; embroider or slip-stitch inner ear with Color B.
4️⃣ Eye & Nostril Appliqués (Color B)
Eye White – MR, 6 sc; (inc, sc) × 3 = 9. FO leaving tail.
Pupil – MR, 5 sc, sl st and pull tight; stitch onto white. Sew eye just below forehead spiral.
Nostril – MR, 6 sc, sl st, FO. Place at muzzle tip.
🦄 Mane Fringe
Along the neck curve in BLO (those back loops you marked), insert two strands of 16 in yarn per loop, fold in half, and secure with a lark’s-head knot. Trim or unravel ends for extra texture.
🪢 Hanging Cord
Feed twisted rope through two sturdy stitches at top of forehead, knot ends together. Hide knot behind piece or inside the cord-coil.
✂️ Finishing Touches
- Steam-block from the back to flatten coils.
- Dab hot glue on rear where needed to keep rope from shifting.
- Comb out the fringe and trim to a graceful curve.
💡 Customization Ideas
- Color-block a palomino (tan with white blaze) or a black stallion—simply swap yarns.
- Add felt flowers to the mane for a nursery vibe.
- Crochet a second mirror-image piece, whip-stitch together & lightly stuff for a plush 3-D trophy head.
Saddle up and display your new handmade steed proudly—this eye-catching wall hanging is sure to be the mane attraction! 🐎