Welcome to the spirited and adventurous world of amigurumi! 🐎✨ Today, I’m excited to share my free crochet pattern for an Equestrian—a dynamic and elegant creation perfect for horse lovers, equestrian enthusiasts, or anyone who enjoys crafting expressive and detailed plush figures! 🌿 Whether you love stitching up graceful riders, creating textured and lifelike designs, or simply want to add a majestic equestrian to your handmade collection, this pattern will guide you through crafting a beautifully sculpted plush with a stylish riding outfit, sturdy boots, and a trusty steed! 🏇
This design embraces rich tones, intricate shaping, and fun accessories to bring a sense of movement and adventure to your crochet projects! 🧶🌾 I’ve carefully outlined each step to ensure your Amigurumi Equestrian turns out just right—ready to gallop into your collection or become a treasured handmade gift! 🎁 So grab your hooks, pick out classic browns, deep blues, or elegant blacks, and let’s stitch up a stunning equestrian friend! ✨
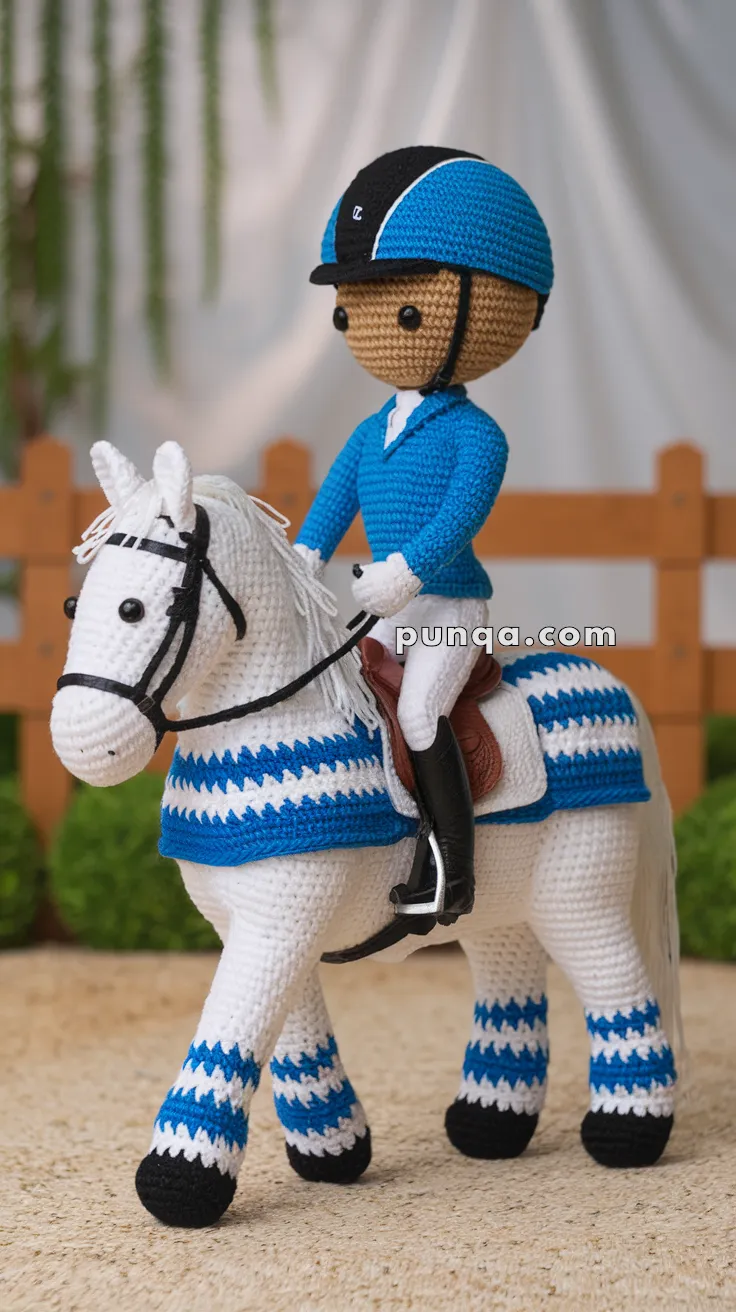
🐴 Amigurumi Equestrian Rider & Horse Crochet Pattern
Bring the elegance of the riding arena to your crochet collection with this detailed equestrian rider and horse set. 💙
The finished design features a tall white horse with a long sculpted muzzle, flowing white mane, striped blue-and-white leg wraps, black hooves, coordinated exercise blanket, fitted saddle, bridle, reins, and stirrups. The rider wears a tailored blue show jacket, white breeches, tall black riding boots, white gloves, and a fitted blue-and-black safety helmet.
This advanced amigurumi project makes a beautiful display piece, equestrian-themed gift, or treasured keepsake for riders and horse lovers. 🐎✨
✨ Skill Level
Advanced
This pattern includes:
- 🐴 Structured horse shaping
- 🧍 Seated rider construction
- 🎨 Frequent color changes
- 🪡 Multi-piece assembly
- 🧶 Surface embroidery
- 🪑 Saddle and stirrup construction
- 🖤 Bridle, reins, and helmet straps
- 💙 Decorative striped accessories
📏 Finished Size
Using DK cotton yarn and a 2.75–3.0 mm crochet hook:
- Horse height: approximately 29–31 cm
- Horse length: approximately 30–32 cm
- Rider seated height: approximately 20–22 cm
- Total height with rider: approximately 36–39 cm
Finished measurements may vary depending on yarn, hook size, tension, and stuffing.
🧶 Yarn Requirements
DK cotton or cotton-blend yarn is recommended for firm shaping and clear stitch definition.
Horse and Tack
🤍 White — 190 g
💙 Bright Blue — 65 g
🖤 Black — 40 g
🤎 Saddle Brown — 45 g
Rider
🟤 Medium Tan/Skin Tone — 45 g
💙 Bright Blue — 75 g
🤍 White — 55 g
🖤 Black — 65 g
🤎 Medium Brown Hair — 15 g
Small amount of silver-grey yarn for stirrup accents
Small amount of white embroidery thread for helmet trim and jacket details
🧵 Materials
- 2.75–3.0 mm crochet hook
- 8 mm safety eyes for the horse
- 8–10 mm safety eyes for the rider
- Polyester fiberfill
- Tapestry needle
- Stitch markers
- Pins for positioning
- Scissors
- Optional plastic pellets for stability
- Optional plastic canvas for saddle and boot support
- Optional flexible craft wire for reins
🔤 Abbreviations (US Terms)
MR – Magic Ring
sc – Single Crochet
inc – Increase
dec – Invisible Decrease
sl st – Slip Stitch
ch – Chain
hdc – Half Double Crochet
dc – Double Crochet
BLO – Back Loop Only
FLO – Front Loop Only
FO – Fasten Off
Work in continuous rounds unless stated otherwise.
🐴 Horse Body
The horse has a long horizontal torso with a broad, level back to support the saddle and rider.
Using white yarn:
R1
MR 6.
(6)
R2
inc ×6.
(12)
R3
(1 sc, inc) ×6.
(18)
R4
(2 sc, inc) ×6.
(24)
R5
(3 sc, inc) ×6.
(30)
R6
(4 sc, inc) ×6.
(36)
R7
(5 sc, inc) ×6.
(42)
R8
(6 sc, inc) ×6.
(48)
R9
(7 sc, inc) ×6.
(54)
R10–29
sc around.
(54)
Stuff firmly as you work, keeping the back broad and level.
R30
(7 sc, dec) ×6.
(48)
R31
(6 sc, dec) ×6.
(42)
R32
(5 sc, dec) ×6.
(36)
Continue stuffing firmly.
R33
(4 sc, dec) ×6.
(30)
R34
(3 sc, dec) ×6.
(24)
R35
(2 sc, dec) ×6.
(18)
R36
(1 sc, dec) ×6.
(12)
R37
dec ×6.
(6)
FO and close.
Shape the torso into a long oval with a slightly fuller chest and rounded hindquarters.
🐎 Horse Neck
The neck is tall, thick at the base, and gently tapered toward the head.
Using white yarn:
R1
MR 6.
R2
inc ×6.
(12)
R3
(1 sc, inc) ×6.
(18)
R4
(2 sc, inc) ×6.
(24)
R5
(3 sc, inc) ×6.
(30)
R6–15
sc around.
(30)
R16
(3 sc, dec) ×6.
(24)
R17–23
sc around.
(24)
Stuff firmly.
Flatten the wider opening slightly and leave a long sewing tail.
Attach the neck high on the front of the torso, angling it upward and slightly forward.
🐴 Horse Head
The head is elongated with a narrow forehead and long face.
Using white yarn:
R1
MR 6.
R2
inc ×6.
(12)
R3
(1 sc, inc) ×6.
(18)
R4
(2 sc, inc) ×6.
(24)
R5–14
sc around.
(24)
Insert the 8 mm safety eyes between Rounds 8 and 9, approximately 10 stitches apart.
R15
(2 sc, dec) ×6.
(18)
R16–19
sc around.
(18)
Begin stuffing.
R20
(1 sc, dec) ×6.
(12)
R21
sc around.
(12)
FO, leaving a long tail.
🤍 Horse Muzzle
Using white yarn:
R1
Ch 10.
Starting in the second chain:
8 sc, 3 sc in final chain, continue along opposite side, 7 sc, inc.
(20)
R2
inc, 7 sc, 3 inc, 7 sc, 2 inc.
(26)
R3
sc around.
(26)
R4
inc, 11 sc, inc, 12 sc.
(28)
R5–8
sc around.
(28)
Lightly stuff and sew to the lower front of the head.
Keep the muzzle long, broad, and slightly downward-facing.
🖤 Nostrils
Using black embroidery yarn, add one tiny horizontal stitch near each side of the muzzle.
Keep the nostrils subtle.
👂 Horse Ears (Make 2)
Using white yarn:
R1
MR 4.
R2
inc around.
(8)
R3
(1 sc, inc) ×4.
(12)
R4–8
sc around.
(12)
R9
(1 sc, dec) ×4.
(8)
Do not stuff.
Flatten and pinch the base.
Sew upright on top of the head, angled slightly forward.
🦵 Horse Legs (Make 4)
Each leg is long and sturdy with a rounded black hoof and blue-and-white striped wraps around the lower leg.
Black Hoof
Using black yarn:
R1
MR 6.
R2
inc ×6.
(12)
R3
(1 sc, inc) ×6.
(18)
R4–7
sc around.
(18)
Switch to white.
Lower Leg and Wraps
R8–9
White: sc around.
R10–12
Blue: sc around.
R13–14
White: sc around.
R15–17
Blue: sc around.
R18–19
White: sc around.
R20–22
Blue: sc around.
Switch to white.
Upper Leg
R23–35
sc around.
(18)
Stuff each leg firmly.
Flatten the opening slightly and leave a long sewing tail.
Make four identical legs.
🪡 Attaching the Horse Legs
Pin the four legs beneath the torso before sewing.
Place the front legs slightly behind the chest and the back legs beneath the rounded hindquarters.
Check that:
- All four hooves touch the surface.
- The body remains level.
- The legs stay parallel.
- The blue-and-white wraps face forward evenly.
Sew firmly around each upper leg.
🤍 Mane
Cut approximately 45–55 strands of white yarn measuring 14–18 cm.
Attach them in small bundles from between the ears down the back of the neck using lark’s head knots.
Keep the mane longest around the neck and slightly shorter near the forehead.
Trim softly and allow the strands to fall toward one side.
🤍 Forelock
Cut 8–10 shorter white strands.
Attach them between and just behind the ears.
Allow them to fall across the forehead without covering the eyes.
🤍 Tail
Cut approximately 35 strands of white yarn measuring 28–32 cm.
Fold the strands in half and attach them securely to the rear of the body.
Wrap a separate strand around the tail base for a neat finish.
Trim the ends lightly, leaving the tail long and flowing.
💙 Horse Exercise Blanket
The blanket wraps across the horse’s chest and back and includes blue-and-white striped sections.
Main Blanket Panel
Using blue yarn:
Row 1
Ch 34.
Starting in the second chain, sc across.
(33)
Rows 2–6
sc across.
Switch to white.
Rows 7–9
sc across.
Switch to blue.
Rows 10–12
sc across.
Switch to white.
Rows 13–15
sc across.
Switch to blue.
Rows 16–20
sc across.
FO.
💙 Blanket Border
Attach blue yarn and work one round of sc around the entire blanket.
Place 3 sc in each corner.
FO and block flat.
🐎 Chest Blanket Panel
Using the same stripe sequence, crochet a second rectangle:
Ch 25.
Work 14 rows of sc, alternating blue and white every 2–3 rows.
Edge with blue sc.
Sew the upper edge to the main blanket near the shoulders so it hangs over the horse’s chest.
🤎 Saddle Blanket
Using white yarn:
Row 1
Ch 25.
Starting in the second chain, sc across.
(24)
Rows 2–16
sc across.
FO.
Add a blue sc border around all four edges.
Place this pad beneath the brown saddle.
🤎 Saddle
Using saddle-brown yarn:
Saddle Seat
Row 1
Ch 18.
Starting in the second chain, sc across.
(17)
Rows 2–12
sc across.
Row 13
dec, 13 sc, dec.
(15)
Row 14
dec, 11 sc, dec.
(13)
FO.
🤎 Saddle Side Flaps (Make 2)
Ch 11.
Work 10 rows of sc.
Decrease once at each edge for the final 2 rows.
FO.
Sew one flap beneath each side of the seat.
🤎 Saddle Pommel
R1
MR 6.
R2
inc around.
(12)
R3–4
sc around.
Lightly stuff and sew to the front of the saddle seat.
🖤 Girth Strap
Using black yarn:
Ch 55.
Sl st back across the chain.
Attach one end beneath the saddle, wrap beneath the horse’s body, and sew the other end securely.
🖤 Stirrup Straps (Make 2)
Ch 31 in black.
Sl st back across.
FO.
Attach beneath the saddle flaps.
🩶 Stirrups (Make 2)
Using silver-grey yarn:
Ch 13 and join into a ring.
Work one round of sc around the ring.
FO.
Sew one ring to each stirrup strap.
🖤 Bridle
Noseband
Ch 34 using black yarn.
Sl st back across.
Wrap around the muzzle and sew beneath the head.
Cheek Straps
Make two black cords:
Ch 28 and sl st back.
Attach from the noseband to the sides of the head.
Browband
Ch 24 and sl st back.
Sew across the forehead below the ears.
Crown Strap
Ch 38 and sl st back.
Pass behind the ears and attach to both cheek straps.
🖤 Reins
Using black yarn:
Ch 105–115.
Sl st back across for a firm cord.
Attach both ends to the bridle near the muzzle.
Leave a generous center loop for the rider’s hands.
🧍 Rider Head
Using medium tan yarn:
R1
MR 6.
R2
inc ×6.
(12)
R3
(1 sc, inc) ×6.
(18)
R4
(2 sc, inc) ×6.
(24)
R5
(3 sc, inc) ×6.
(30)
R6–14
sc around.
(30)
Insert safety eyes between Rounds 9 and 10, approximately 7 stitches apart.
R15
(3 sc, dec) ×6.
(24)
R16
(2 sc, dec) ×6.
(18)
Stuff firmly.
R17
(1 sc, dec) ×6.
(12)
R18
dec ×6.
(6)
FO.
🤎 Rider Hair
Using medium-brown yarn:
Repeat Head Rounds 1–5.
Work 3 rounds even.
FO.
Sew over the back and sides of the head, leaving the forehead uncovered.
💙 Riding Helmet
The helmet is a fitted blue dome with a wide black center panel, black visor, narrow white piping, and black chin straps.
Blue Helmet Dome
Using blue yarn:
R1
MR 6.
R2
inc ×6.
(12)
R3
(1 sc, inc) ×6.
(18)
R4
(2 sc, inc) ×6.
(24)
R5
(3 sc, inc) ×6.
(30)
R6–10
sc around.
(30)
FO.
🖤 Helmet Center Panel
Using black yarn:
Row 1
Ch 8.
Work 10 rows of sc.
Decrease once at each side in the final 2 rows.
FO.
Sew from the front center to the back center of the helmet.
🤍 Helmet Piping
Using white yarn, surface-crochet or embroider one narrow line along each side of the black panel.
🖤 Helmet Visor
Using black yarn:
Row 1
Ch 15.
Starting in the second chain, sc across.
(14)
Rows 2–3
sc across.
FO.
Sew to the front lower edge of the helmet.
Curve the visor gently downward.
🖤 Chin Straps (Make 2)
Ch 22 and sl st back across.
Sew one strap to each side of the helmet.
Bring them down along the cheeks and secure beneath the chin.
💙 Rider Torso and Show Jacket
Using blue yarn:
R1
MR 6.
R2
inc ×6.
(12)
R3
(1 sc, inc) ×6.
(18)
R4
(2 sc, inc) ×6.
(24)
R5–15
sc around.
(24)
R16
(2 sc, dec) ×6.
(18)
R17–18
sc around.
Stuff firmly and FO.
🤍 Shirt Insert
Using white yarn:
Ch 6.
Work 8 rows of sc.
Decrease once at each side on the final 2 rows to create a tapered V-shaped insert.
Sew to the upper center front of the jacket.
💙 Jacket Lapels (Make 2)
Using blue yarn:
Ch 10.
Work one row of sc.
Decrease at one end over the next 3 rows.
FO.
Sew one lapel along each side of the white shirt insert.
✋ Rider Arms (Make 2)
White Gloves
Using white yarn:
R1
MR 6.
R2
inc around.
(12)
R3–5
sc around.
Blue Sleeves
Switch to blue.
R6–19
sc around.
(12)
Stuff lightly, leaving the upper arm flexible.
Flatten and FO.
👍 Glove Thumbs (Make 2)
Using white yarn:
MR 4.
Work 2 rounds even.
FO.
Sew one thumb to the inner side of each glove.
👖 Rider Legs (Make 2)
The legs are constructed from white breeches and long fitted black boots.
Black Riding Boot
Using black yarn:
R1
Ch 7.
Starting in the second chain:
5 sc, 3 sc in final chain, continue along opposite side, 4 sc, inc.
(16)
R2
inc, 4 sc, 3 inc, 4 sc, 2 inc.
(22)
R3
BLO sc around.
R4–16
sc around.
(22)
R17
(9 sc, dec) ×2.
(20)
White Breeches
Switch to white.
R18–32
sc around.
(20)
Stuff lightly, keeping the upper rounds flexible for the seated pose.
Flatten and FO.
🧵 Rider Assembly
Sew the head securely to the torso.
Position the helmet low over the hair and sew in place.
Attach the arms high on the shoulders, angled forward.
Sew the legs to the lower torso in a seated position.
Leave enough flexibility for the legs to fall naturally down the horse’s sides.
🪑 Placing the Tack
Place the blue-and-white blanket over the horse’s back and chest.
Center the white saddle pad over the blanket.
Position the brown saddle on top and secure it through all layers.
Wrap the girth strap beneath the horse.
Check that both stirrup straps hang evenly.
🏇 Positioning the Rider
Seat the rider upright in the saddle.
Place one boot inside each stirrup.
Sew the lower torso securely to the saddle.
Add hidden stitches through the upper legs and saddle flaps for stability.
Bring the hands forward toward the reins.
🖤 Securing the Reins
Pass the center of the reins through both gloved hands.
Position the reins between each thumb and palm.
Secure with small black or white stitches.
Leave a relaxed loop between the horse’s bridle and the rider’s hands.
✨ Final Shaping
Take time to shape and balance the complete set.
- Keep the horse’s body level.
- Angle the head slightly forward.
- Arrange the mane along one side of the neck.
- Allow the white tail to hang naturally.
- Position the rider upright with gently bent elbows.
- Keep the boots close to the horse’s sides.
- Align the striped leg wraps evenly.
- Curve the helmet visor slightly downward.
- Confirm that all four hooves touch the display surface.
🧼 Care Instructions
Spot clean gently with a damp cloth.
Allow the set to air dry completely.
Avoid machine washing, as the saddle, bridle, helmet, and reins may lose their shape.
Store upright and away from prolonged direct sunlight.
🎁 Display Ideas
This detailed horse-and-rider set makes a beautiful addition to:
- 🐎 Equestrian-themed rooms
- 🏆 Riding club displays
- 🎁 Gifts for horse riders
- 📚 Storybook shelves
- 🧸 Horse-themed nurseries
- 🏇 Competition and show-jumping décor
Place the finished set on a firm, level surface so all four hooves remain supported.
💙 Final Thoughts
Congratulations on completing your Equestrian Rider and Horse amigurumi set! 🐴🏇✨
From the horse’s flowing white mane and coordinated leg wraps to the rider’s tailored jacket, fitted helmet, tall boots, and gloved hands, every detail gives this project an elegant arena-ready finish.
The layered saddle, striped blanket, bridle, stirrups, and reins transform the finished pair into a striking equestrian display full of craftsmanship and personality. Whether made for a dedicated rider, a horse-loving friend, or your own collection, this handmade set is sure to become a treasured keepsake.
Happy Crocheting! 🧶💙🐎


Awesome!!