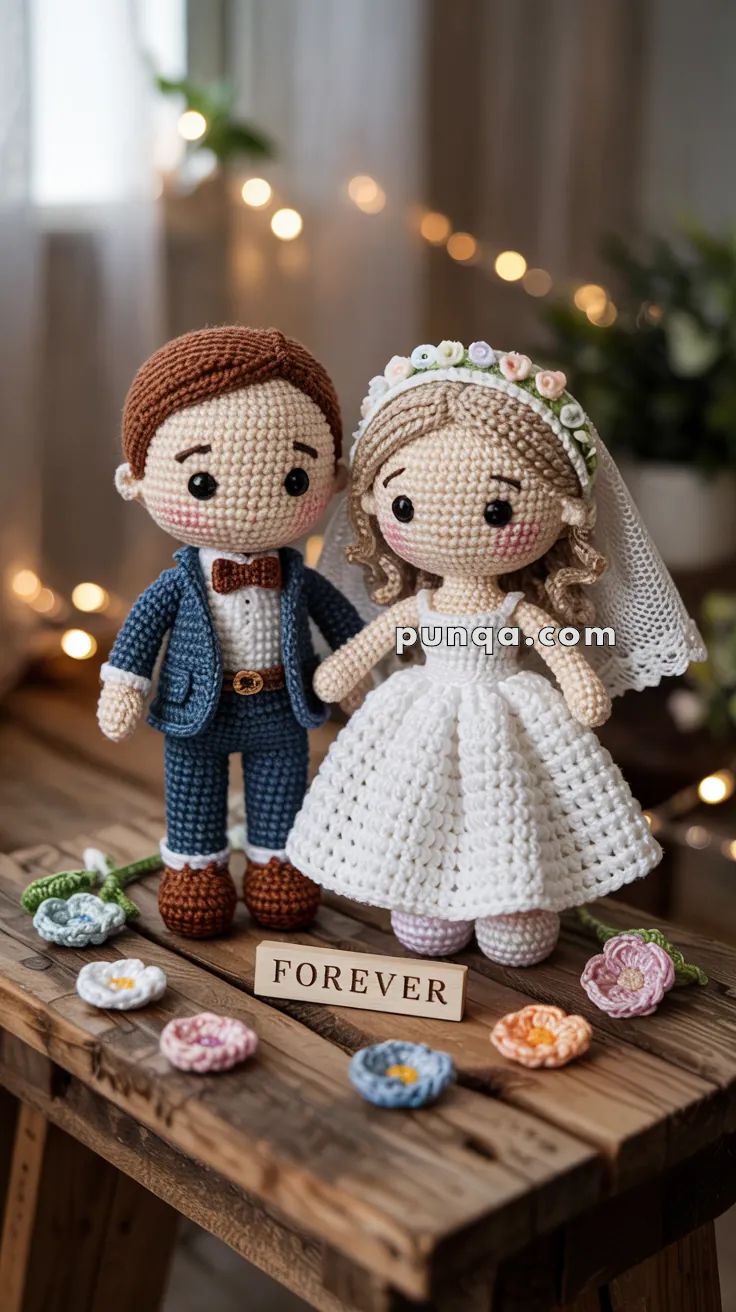
Celebrate love and craftsmanship with this Amigurumi Wedding Couple crochet pattern! Whether you’re creating a heartfelt gift, a charming wedding keepsake, or simply love making elegant character dolls, this pattern lets you stitch up a beautifully detailed bride and groom. With delicate attire, sweet embroidered expressions, and customizable details, this crochet couple captures the magic of a special day in every stitch. Perfect for bridal showers, wedding decor, or as a sentimental handmade present, this amigurumi duo is a lovely way to commemorate love—one stitch at a time! 💍✨
Designed for personalization, this pattern allows you to experiment with different dress styles, suit colors, or even tiny accessories like a bouquet, veil, or bowtie for extra charm. Craft a classic white wedding look, create a vintage-inspired couple, or even stitch up a miniature version of a real-life bride and groom! Whether displayed as a cherished keepsake, gifted to newlyweds, or made simply for the joy of crochet, this Amigurumi Wedding Couple is a timeless and romantic project—perfect for celebrating love through stitches! 🧶💖
💍 Amigurumi Wedding Couple – Free Crochet Pattern
Celebrate love in handmade style with this adorable Amigurumi Wedding Couple pattern! With thoughtful details like a full bridal dress, bouquet, veil, and the groom’s tailored suit with belt and bowtie, this charming duo is the perfect centerpiece for wedding gifts, keepsakes, or themed decor. This pattern includes every part: heads, bodies, arms, legs, fingers, accessories—and yes, even the bride’s full body beneath her gown!
✨ Skill Level
Intermediate – includes shaping, garment construction, facial details, and small accessories.
📏 Finished Size
Approx. 18–20 cm (7–8 in) tall using DK or worsted yarn and a 2.5–3.5 mm hook.
🧶 Materials
Yarn (DK or Worsted):
- Skin tone (beige/light peach) – heads, arms, legs
- White – dress, veil
- Blue or dark navy – groom suit
- Brown / gray – hair
- Light pink – blush
- Red / pastel colors – bouquet flowers
- Brown – shoes
- Accent colors – belt, bowtie
Tools
- 2.5–3.5 mm crochet hook
- 8–10 mm safety eyes
- Fiberfill stuffing
- Yarn needle
- Stitch marker
- Scissors
- Optional: tulle or lace for veil
🧵 Abbreviations (US)
MR – magic ring
sc – single crochet
inc – increase
dec – decrease
ch – chain
sl st – slip stitch
hdc – half double crochet
dc – double crochet
BLO – back loop only
FO – fasten off
st(s) – stitches
🟤 Head (Make 2 – Bride & Groom)
(Oval, photo-accurate shape)
With skin tone:
R1: MR 6 (6)
R2: inc ×6 (12)
R3: (sc, inc) ×6 (18)
R4: (2 sc, inc) ×6 (24)
R5: (3 sc, inc) ×6 (30)
R6: (4 sc, inc) ×6 (36)
R7: (5 sc, inc) ×6 (42)
R8: (6 sc, inc) ×6 (48)
R9–15: sc around (48)
Insert safety eyes between R11–12, spaced 8–9 sts apart.
R16: (6 sc, dec) ×6 (42)
R17: (5 sc, dec) ×6 (36)
R18: (4 sc, dec) ×6 (30)
R19: (3 sc, dec) ×6 (24)
Stuff firmly.
R20: (2 sc, dec) ×6 (18)
R21: (sc, dec) ×6 (12)
R22: dec ×6 (6)
FO and close.
👃 Nose (Optional – Both)
MR 4
R2: sc around (4)
FO. Sew between eyes.
👀 Face Details
- Add blush to cheeks
- Embroider small curved mouth
- Optional eyebrows with brown thread
💇 Hair
Bride Hair (Brown/Blonde)
Hair cap:
MR 6
inc to 36 sts
R5–10: sc around (36)
FO, sew to head
Add curls by chaining 12–15 and sl st back along chain. Attach around sides and back.
Groom Hair
Short hair cap:
MR 6
inc to 36
R5–8: sc around
FO, stitch neatly.
🦴 Neck
MR 6
R2–3: sc around (6)
FO. Sew between head and body.
👰 Bride Doll
🦵 Legs (Make 2)
Shoe color:
MR 6
inc ×6 (12)
BLO sc around (12)
Switch to skin tone
R4–8: sc around (12)
FO first leg only.
Join second leg with ch 2.
👗 Body (Under Dress)
R1: join legs, sc around (26)
R2: inc ×4 evenly (30)
R3–6: sc around (30)
R7: (3 sc, dec) ×6 (24)
R8–10: sc around (24)
FO.
Stuff lightly.
🤲 Arms with Fingers (Make 2)
MR 6
inc ×6 (12)
R3–5: sc around (12)
Fingers:
Ch 4, sl st back. Repeat 4 times around.
R6–7: sc around (skip finger chains)
FO. Stuff lightly.
👰 Dress (White)
Attach yarn to waist BLO:
R1: sc around, inc every 4 sts (36)
R2: (2 sc, inc) around (45)
R3: (3 sc, inc) around (56)
R4–10: hdc around (56)
Creates full bell-shaped skirt.
🧣 Veil
Cut lace/tulle rectangle.
Gather top and sew to hair back.
Add flower crown with tiny crocheted flowers.
💐 Bouquet
Make 5 mini flowers:
MR 5
sl st around
FO
Sew together and attach to hand.
🤵 Groom Doll
🦵 Legs (Make 2)
Shoe color:
MR 6
inc ×6 (12)
BLO sc (12)
Switch to blue (pants)
R4–8: sc around (12)
Join legs same as bride.
🧍 Body (Suit)
R1: join legs (26)
R2: inc ×4 (30)
R3–8: sc around (30)
Switch to jacket color
R9–12: sc around (30)
FO.
👔 Belt
Chain 30, sc back.
Sew around waist.
🎀 Bowtie
Ch 6
hdc across (5)
Wrap center and sew under chin.
🤲 Arms
Same as bride but no fingers optional.
🧷 Assembly
- Sew head to neck
- Attach arms
- Secure dress and suit
- Add veil, bouquet, belt, bowtie
- Position dolls holding hands
✨ Finishing Touches
- Blush cheeks
- Shape skirt evenly
- Style hair gently
- Add initials or wedding date tag
🌸 Final Thoughts
This Amigurumi Wedding Couple is designed with photo-accurate proportions: large oval heads, soft facial expressions, and detailed garments that give them a truly heirloom look. From the bride’s flowing dress and delicate veil to the groom’s smart suit and bowtie, every element comes together to create a meaningful handmade symbol of love.
Whether used as a wedding gift, anniversary keepsake, or decorative display, this couple will forever hold a special place in your handmade collection. 💒🧶💞


Amei os noivinhos, e os farei para o casamento da minha filha!!! Agradeço demais pela disponibilidade deste padrao tao lindo… muito, muito obrigada!!!