Have you ever found yourself enchanted by the world of amigurumi, those adorable crochet creations that seem to bring joy to everyone who encounters them? Let me share the delight of crafting a tom cat amigurumi pattern! 🐱 These charming little companions are more than just toys; they’re a blend of creativity and craftsmanship that allows your personality to shine through each stitch. As someone who’s spent countless cozy evenings with a crochet hook in hand, I can tell you there’s something magical about watching a ball of yarn transform into a character with its own unique personality. 🌟
Creating a tom cat amigurumi involves a delightful journey from a simple sketch to a cuddly companion. The process starts with choosing the perfect yarn—soft, durable, and just the right shade of feline gray or orange, perhaps. Then comes the pattern selection, where the fun really begins as you start to envision your cat’s expression and personality. As you work through the pattern, each round adds character, from the gentle curve of its tail to the expressive eyes that bring it to life. And don’t even get me started on the joy of adding the final touches, like a jaunty little bow tie or a playful whisker detail! 🎀 Each creation is a testament to patience, creativity, and the joy of crafting something truly unique.
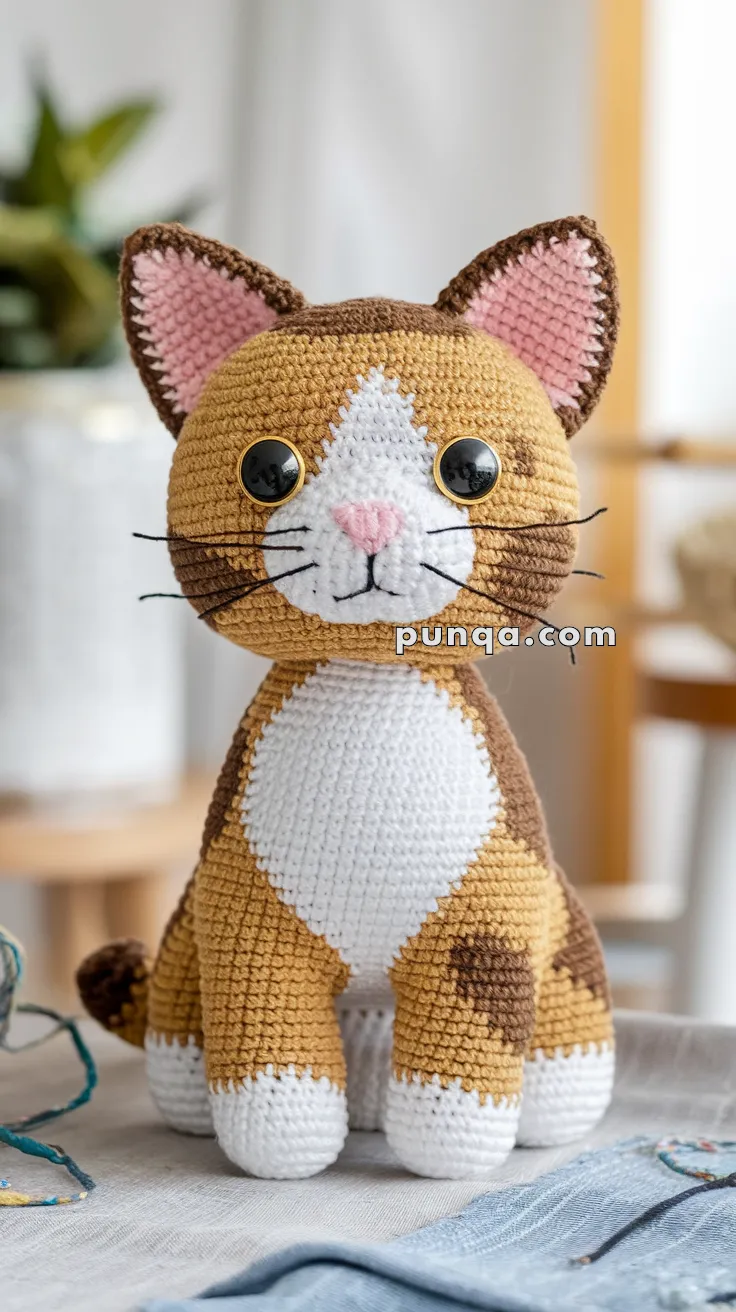
🐱Amigurumi Tabby Cat Crochet Pattern
Create this adorable orange tabby cat with distinctive white face blaze, white chest panel, brown tabby stripes, and golden-rimmed eyes. This pattern captures every detail for a realistic and charming feline friend!
Skill Level
Advanced Intermediate – Involves color changes, stripe work, large color blocking, and detailed assembly.
Finished Size
10 inches (25 cm) tall when sitting, using sport/DK weight yarn and 2.5 mm hook.
Materials
Yarn (Sport or DK Weight)
- Mustard/golden tan – main body color (50g)
- White – face blaze, chest, belly, paws (40g)
- Brown/dark tan – tabby stripes, ear edges (20g)
- Pink – nose, inner ears (small amount)
- Black – embroidery for whiskers, mouth, eye details (small amount)
Other Supplies:
- Crochet hook: 2.5 mm
- Safety eyes: 14-16 mm black with gold/amber bezels OR plain black eyes + gold felt rings
- Polyfill stuffing
- Yarn needle
- Stitch markers
- Black embroidery floss (for whiskers and mouth)
- Scissors
- Pins (for positioning pieces)
Abbreviations (US Terms)
- MR – Magic Ring
- sc – Single Crochet
- hdc – Half Double Crochet
- inc – Increase (2 sc in one stitch)
- dec – Invisible Decrease
- sl st – Slip Stitch
- ch – Chain
- BLO/FLO – Back/Front Loop Only
- FO – Fasten Off
PATTERN INSTRUCTIONS
HEAD (Mustard with white face blaze)
The key is integrating the large white facial marking.
Start with mustard:
- MR, 6 sc (6)
- inc ×6 (12)
- (1 sc, inc) ×6 (18)
- (2 sc, inc) ×6 (24)
- (3 sc, inc) ×6 (30)
- (4 sc, inc) ×6 (36)
- (5 sc, inc) ×6 (42)
Rounds 8-17: Work with color changes for face blaze
The white face blaze covers the front center of the face.
Color pattern for Rounds 8-17:
- Work mustard on sides/back of head (approximately 28-30 sts)
- Work white down center front (approximately 12-14 sts)
- The white section should be centered and run from top of head down to where muzzle will attach
Specific stitch distribution example for Round 8:
- 14 sc mustard, 14 sc white, 14 sc mustard (42)
- Continue this pattern, adjusting slightly as needed to keep white panel centered
Rounds 8-17: Continue pattern with mustard sides and white center front (42)
Begin decreasing:
- (5 sc, dec) ×6 (36) – maintain color pattern
- (4 sc, dec) ×6 (30) – maintain color pattern
Insert 14-16mm safety eyes between Rounds 11-12, positioned in the white face area, approximately 8-9 stitches apart.
- (3 sc, dec) ×6 (24)
- (2 sc, dec) ×6 (18)
Stuff head firmly.
- (1 sc, dec) ×6 (12)
- dec ×6 (6)
FO and close.
EYE BEZELS (Gold/Amber – if not using pre-bezel eyes)
If your safety eyes don’t have gold bezels, create them:
For each eye (Make 2 in gold/tan yarn):
- Ch 8, sl st to form ring
- sc 8 around ring (8)
- (sc, inc) ×4 (12)
FO with long tail.
Create hole in center of each ring large enough for eye post to fit through.
To attach:
- Position gold ring around eye location on head
- Insert eye post through gold ring, then through head
- Secure backing inside head
- Creates gold-rimmed eyes
MUZZLE (White)
- MR, 6 sc (6)
- inc ×6 (12)
- (1 sc, inc) ×6 (18)
- (2 sc, inc) ×6 (24) 5-7. sc around (24) [3 rounds]
FO with long tail. Stuff lightly.
Attachment:
- Position on lower center of face, overlapping with white face blaze
- Should be centered between eyes, below eye level
- Sew all around edges
Nose (Pink):
- Embroider triangle at top center of muzzle
- Use satin stitch to fill in solidly
- Triangle approximately 0.4 inches wide
Mouth (Black embroidery):
- From bottom point of nose, stitch vertical line down (about 0.3 inches)
- Create curved smile extending from bottom of vertical line on each side
- Use backstitch for clean lines
EARS (Make 2)
Outer ear (Mustard with brown edge):
With brown:
- MR, 4 sc (4)
- (1 sc, inc) ×2 (6)
Switch to mustard: 3. (2 sc, inc) ×2 (8) 4. (3 sc, inc) ×2 (10) 5. (4 sc, inc) ×2 (12) 6. (5 sc, inc) ×2 (14)
FO with long tail.
Inner ear (Pink):
- MR, 4 sc (4)
- (1 sc, inc) ×2 (6)
- (2 sc, inc) ×2 (8)
- (3 sc, inc) ×2 (10)
FO with long tail.
Assembly:
- Sew pink inner ear centered on mustard outer ear
- Fold bottom edges slightly toward center to create cupped shape
- Position ears on top of head (at approximately Round 4-6 of head)
- Ears should be symmetrical and point upward
- Sew securely
BODY (Mustard with white chest/belly panel and brown stripes)
The body needs a large white front panel covering the entire chest and belly.
Start with white for bottom (sitting base):
- MR, 6 sc in white (6)
- inc ×6 (12)
- (1 sc, inc) ×6 (18)
- (2 sc, inc) ×6 (24)
- (3 sc, inc) ×6 (30)
- (4 sc, inc) ×6 (36)
Rounds 7-17: Work with white front panel and mustard back/sides
Color distribution:
- Front (where chest/belly shows): 16-18 sts white
- Back and sides: 18-20 sts mustard
Example for Round 7:
- 18 sc white (front), 18 sc mustard (back) (36)
Continue this pattern for Rounds 7-17, maintaining white front panel.
Add brown stripe accents on sides (optional detail):
- In Rounds 10-12, work 2-3 sts brown where mustard meets white on each side
- Creates subtle tabby stripe marks on sides
Begin decreasing:
- (4 sc, dec) ×6 (30) – maintain color pattern 19-21. Continue pattern (30)
- (3 sc, dec) ×6 (24) 23-24. Continue pattern (24)
- (2 sc, dec) ×6 (18)
Stuff body very firmly.
- (1 sc, dec) ×6 (12)
- dec ×6 (6)
FO and close.
FRONT LEGS (Make 2 – White paws with mustard/brown upper legs)
Paw (White):
- MR, 6 sc (6)
- inc ×6 (12)
- (1 sc, inc) ×6 (18)
- BLO – sc around (18) [creates paw pad definition] 5-6. sc around (18)
Switch to mustard:
7-9. sc around (18) [3 rounds mustard]
Add brown stripe:
- Work in brown (18) [1 round creates stripe]
Back to mustard:
11-12. sc around in mustard (18)
Taper:
- (4 sc, dec) ×3 (15)
- sc around (15)
FO with long tail. Stuff firmly.
BACK LEGS (Make 2 – White paws with mustard/brown upper legs)
Paw (White):
- MR, 6 sc (6)
- inc ×6 (12)
- (1 sc, inc) ×6 (18)
- BLO – sc around (18) 5-6. sc around (18)
Switch to mustard:
7-9. sc around (18)
Add brown stripe:
- Work in brown (18)
Back to mustard:
11-14. sc around in mustard (18) [4 rounds for slightly longer back legs]
Taper:
- (4 sc, dec) ×3 (15)
- sc around (15)
FO with long tail. Stuff firmly.
Back legs are slightly longer than front legs for proper sitting posture.
TAIL (Mustard with brown stripes)
With mustard:
- MR, 6 sc (6)
- (1 sc, inc) ×3 (9)
- (2 sc, inc) ×3 (12)
Stripe pattern:
4-6. sc in mustard (12) [3 rounds] 7-8. sc in brown (12) [2 rounds – first stripe] 9-11. sc in mustard (12) [3 rounds] 12-13. sc in brown (12) [2 rounds – second stripe] 14-16. sc in mustard (12) [3 rounds] 17-18. sc in brown (12) [2 rounds – third stripe] 19-22. sc in mustard (12) [4 rounds]
Taper tip:
- (2 sc, dec) ×3 (9) 24-26. sc around (9)
- (1 sc, dec) ×3 (6) 28-29. sc around (6)
FO and close. Stuff lightly, keeping flexible.
Tail should be approximately 4-5 inches long.
BROWN TABBY MARKINGS (Optional additional detail pieces)
For extra tabby authenticity, you can add small brown stripe pieces to the head and body.
Small stripe (Make 2-3):
- Ch 6
- Starting in 2nd ch from hook: 5 sc
- Ch 1, turn, 5 sc
FO with long tail.
Sew these small rectangular stripes:
- One on forehead (above eyes in mustard area)
- One or two on sides of body in mustard areas
- Creates additional tabby marking detail
WHISKERS (Black embroidery)
For each side of face (Make 3 whiskers per side):
Using black embroidery floss:
- Thread needle with 12-inch strand
- Insert needle from inside muzzle out through side
- Pull through leaving small tail inside
- Insert back into muzzle about 0.1 inch away from exit point
- Pull snug
- Trim whisker to approximately 1.5-2 inches long
- Repeat for 3 whiskers per side
- Position whiskers fanning outward from sides of muzzle
This method is more secure than tying on strands.
ASSEMBLY
Order of Construction:
1. Prepare head:
- Head should have white face blaze integrated
- Eyes inserted with gold bezels
- Stuff firmly
2. Attach muzzle:
- Position on lower center of white face area
- Sew all around
- Embroider pink nose and black mouth
3. Attach ears:
- Position on top of head symmetrically
- Point upward
- Sew securely
4. Add whiskers:
- Embroider 3 per side from muzzle
5. Prepare body:
- Should have white chest/belly panel
- Stuff very firmly
6. Attach legs:
- Back legs: Position at bottom back of body (approximately at Rounds 2-4)
- Back legs should angle slightly forward to create sitting base
- Front legs: Position at front lower sides of body (approximately at Rounds 8-10)
- Front legs should hang naturally downward
- Sew all legs very securely through body
7. Test sitting position:
- Cat should sit naturally on back legs and bottom
- Front legs should extend forward naturally
- Adjust leg positions if needed before final securing
8. Attach tail:
- Position at back of body (approximately at Round 18-20)
- Tail should curve upward and to side
- Sew securely
9. Join head to body:
- Position head on top of body
- Neck area should overlap slightly with body top
- White chest panel should flow from body up to chin area
- Sew all around neck join securely
- Use ladder stitch for invisible seam
10. Optional brown stripe pieces:
- Sew small brown stripes to forehead or body as desired
- Position to enhance tabby appearance
FINISHING TOUCHES
1. Shape and positioning:
- Adjust ears to point upward symmetrically
- Arrange tail in natural curve
- Position legs for stable sitting
- Ensure head angles naturally on body
2. Whiskers:
- Trim to even lengths (approximately 1.5-2 inches)
- Should extend outward from face
3. Color transitions:
- Check that all color changes are neat
- White face blaze should be centered and prominent
- White chest panel should be clearly visible
4. Final checks:
- All pieces sewn securely
- Cat sits stably without tipping
- Stuffing is firm and even
- No loose ends visible
PRO TIPS FOR PHOTO ACCURACY
1. White face blaze is critical:
- Must be large and prominent
- Covers center of face from forehead to chin
- This is THE defining feature of this cat
- Don’t make it too narrow
2. White chest panel size:
- Should cover entire front of body
- Not just a small strip – full front coverage
- 16-18 stitches wide minimum for proper appearance
3. Eye placement and bezels:
- Gold rings around eyes create distinctive look
- Eyes should be positioned in white face area
- Proper size (14-16mm) for expressive appearance
4. Color accuracy:
- Golden/mustard tan (not orange or brown)
- Pure white (not cream)
- Rich brown for stripes (not black)
- Soft pink for nose and inner ears
5. Stripe placement:
- Brown stripes on tail should be evenly spaced
- Stripes on legs add authenticity
- Optional forehead stripe enhances tabby look
6. Sitting posture:
- Back legs and bottom create stable base
- Front legs extend forward naturally
- Tail curves beside or behind body
- Head slightly forward-facing
7. Proportions:
- Head should be substantial relative to body
- Legs proportional – not too thin or thick
- Tail moderate length (not overly long)
- Overall balanced appearance
8. Muzzle integration:
- Should blend seamlessly with white face blaze
- Positioned low enough to create proper cat face
- Stuffed just enough for dimension without bulkiness
TROUBLESHOOTING
Problem: White face blaze too narrow
- Solution: Use 14-16 stitches for white section, not fewer
- Should cover significant portion of face front
- Extends from top of head down through muzzle area
Problem: Cat won’t sit properly
- Solution: Back legs must be positioned at bottom back
- Angle back legs slightly forward
- Ensure body stuffing is very firm
- Front legs should touch surface lightly, not bear weight
Problem: White chest panel too small
- Solution: White should cover 16-18 sts (nearly half of 36 st round)
- Should be clearly visible from front view
- Full coverage from bottom to neck
Problem: Eyes look wrong
- Solution: Must be positioned in white face area, not mustard
- Gold bezels are essential for this look
- Size matters – 14-16mm for proper expression
Problem: Head too small for body
- Solution: Increase head to 48 sts instead of 42
- Or decrease body max to 30 sts instead of 36
- Adjust stuffing amounts
Problem: Color transitions look messy
- Solution: Carry yarn inside when changing colors
- Twist yarns at color changes
- Work over tails as you go
- Use tapestry needle to weave in color changes neatly
Problem: Stripes on tail uneven
- Solution: Count rounds carefully
- Use stitch markers at color changes
- Keep consistent tension
- Mark stripe pattern on paper before starting
SIZE ADJUSTMENTS
For larger cat (14-16 inches):
- Use DK or worsted weight yarn with 3.5 mm hook
- Increase head to 48 sts
- Increase body to 42-48 sts
- Add 4-6 rounds to body length
- Add 3-4 rounds to leg length
- Add 6-8 rounds to tail length
For smaller cat (6-8 inches):
- Use sport weight yarn with 2.0 mm hook
- Decrease head to 36 sts max
- Decrease body to 30 sts max
- Reduce rounds in body by 4-6
- Reduce leg rounds by 3-4
- Reduce tail rounds by 6-8
CARE INSTRUCTIONS
- Spot clean with damp cloth as needed
- Do not machine wash (will lose shape)
- Air dry if spot cleaned
- Store upright in sitting position
- Keep away from direct sunlight to prevent fading
- Brush gently if yarn becomes fuzzy
Your photo-accurate tabby cat is complete! With the distinctive white face blaze, golden eyes, tabby stripes, and charming sitting pose, this handmade feline friend captures all the warmth and personality of a real cat.
Perfect for cat lovers, home decor, or as a special handmade gift!