Welcome to the whimsical world of cozy amigurumi! ☕🐱 Today, I’m delighted to share my free crochet pattern for an Amigurumi Teacup Kitten—a sweet little furball curled up in a perfectly dainty cup! Whether you’re a cat lover, enjoy crafting miniature scenes, or simply want to add some teatime charm to your collection, this pattern will guide you through stitching your very own pocket-sized feline with its tiny paws peeking over the rim, sleepy expression, and a teacup that’s just the right size for yarn cuddles.
This design blends feline cuteness with vintage teacup details! 🧶🌸 I’ve carefully outlined each step to help you create the kitten’s stripes (or make it a solid color!), the cup’s delicate handle, and optional “steam” curls rising from the top. Perfect for display, gifting to fellow cat enthusiasts, or keeping as a reminder that every day deserves a little purr-fect moment! So grab your hooks, pick out soft grays or creams (or go wild with calico colors!), and let’s stitch up a teatime companion who’s always ready to warm your heart! ✨
🐱 Amigurumi Teacup Kitten Crochet Pattern
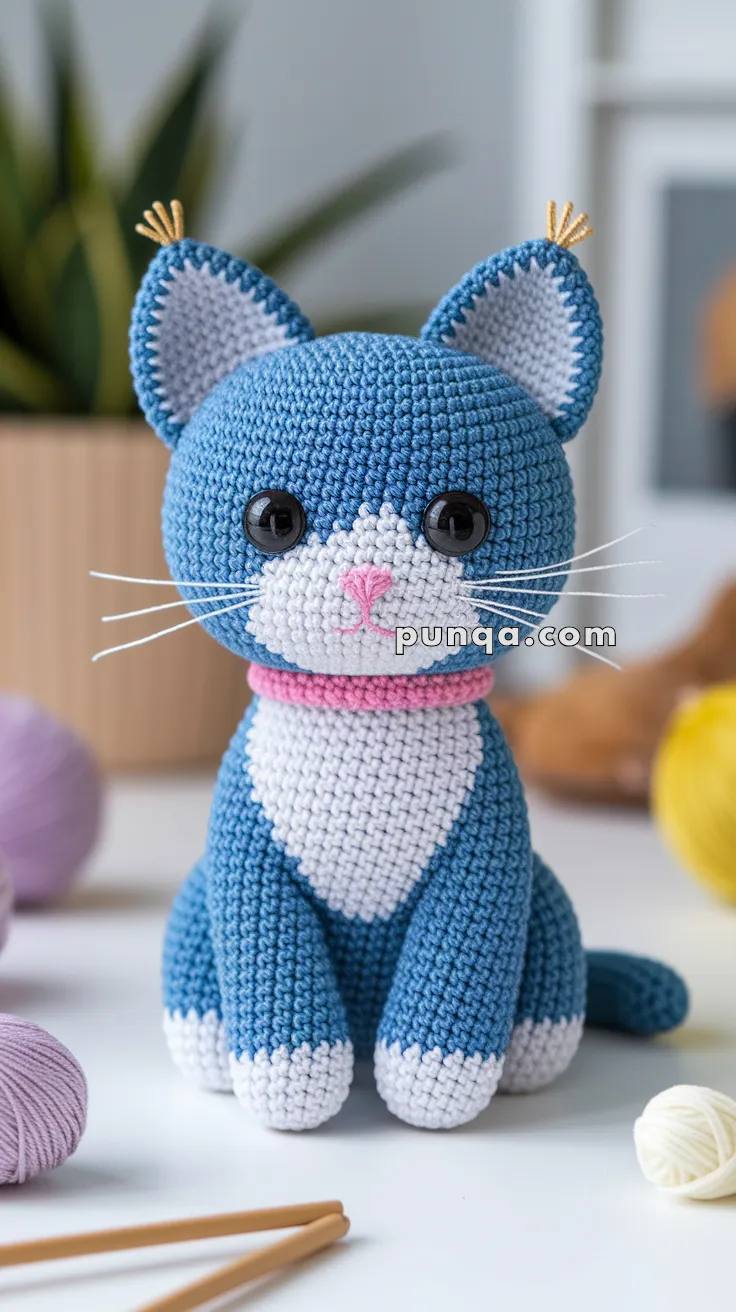
Bring this adorable Teacup Kitten to life with its big glossy eyes, soft two-tone fur, and delicate pink collar. This sweet handmade kitty has all the charm of a real kitten — complete with perky ears, a rounded muzzle, and perfectly curved whiskers. It’s an ideal project for intermediate crocheters looking to create a lifelike amigurumi cat that’s as cute as it is cuddly. 🧶💖
✨ Skill Level
Intermediate – includes color changes, shaping, and detailed assembly.
📏 Finished Size
Approx. 6–7 in (15–18 cm) tall using DK yarn and 2.5–3 mm hook.
🧶 Materials
Blue (main body and limbs) – 40 g
White (face, chest, paws, ears) – 25 g
Pink (nose and collar) – 5 g
Warm gold or peachy-gold (ear tufts) – small scrap
10–12 mm black safety eyes
White fishing line (15–20 lb test) for whiskers
Polyester fiberfill stuffing
2.5–3.0 mm crochet hook
Tapestry needle, scissors, pins, optional fabric stiffener
Stuffing Note:
Stuff head and body firmly but not tightly — the kitten should feel plush and squeezable, not rigid.
🔤 Abbreviations (US Terms)
MR – Magic Ring
sc – Single Crochet
inc – Increase (2 sc in same st)
dec – Invisible Decrease
ch – Chain
sl st – Slip Stitch
FLO – Front Loop Only
BLO – Back Loop Only
FO – Fasten Off
🧠 Head (Blue + White Facial Bib)
R1 MR 6 sc (6)
R2 inc ×6 (12)
R3 (1 sc, inc) ×6 (18)
R4 (2 sc, inc) ×6 (24)
R5 (3 sc, inc) ×6 (30)
R6 (4 sc, inc) ×6 (36)
R7–R13 sc around (36)
R14 (4 sc, dec) ×6 (30)
R15 (3 sc, dec) ×6 (24)
Insert eyes between R9–R10, 8–9 sts apart, with a slight downward angle — inner corners at R10, outer corners at about R9½ — for a gentle, sweet expression.
R16 (2 sc, dec) ×6 (18)
Stuff firmly.
R17 (1 sc, dec) ×6 (12)
R18 dec ×6 (6)
FO and close.
🤍 Facial Bib (White Appliqué Method)
R1 ch 18
R2 sc across (18)
R3 dec, sc 14, dec (16)
R4 dec, sc 12, dec (14)
R5 dec, sc 10, dec (12)
FO, leaving long tail.
When sewing, curve the top edge gently to follow the roundness beneath the eyes and let the sides wrap slightly around the cheeks for a 3D look.
🐾 Muzzle (White – Flattened Oval)
R1 MR 6 sc (6)
R2 inc ×6 (12)
R3 (1 sc, inc) ×6 (18)
R4 sc around (18)
Work slightly loose and flatten horizontally.
FO, stuff lightly.
Position: Centered horizontally and placed low — bottom edge should sit at R14–R15 level, just above where the neck begins.
Sew overlapping slightly on top of the white bib.
💗 Nose & Mouth Embroidery
Embroider a filled pink triangle approx. 5–6 stitches tall using satin stitch (closely packed vertical stitches).
Below the nose, add a tiny Y-shaped mouth with very short, delicate lines for a subtle kitten smile.
🧍 Body (Blue + White Chest Patch)
R1 MR 6 sc (6)
R2 inc ×6 (12)
R3 (1 sc, inc) ×6 (18)
R4 (2 sc, inc) ×6 (24)
R5 (3 sc, inc) ×6 (30) – round belly
R6–R7 sc around (30)
R8 (3 sc, dec) ×6 (24) – taper upward
R9–R10 sc around (24)
R11 (2 sc, dec) ×6 (18)
R12 sc around (18)
R13 (1 sc, dec) ×6 (12)
Stuff firmly.
FO, leaving long tail for sewing.
White Chest Patch (Appliqué Alternative):
R1 MR 6 sc (6)
R2 inc ×6 (12)
R3 (1 sc, inc) ×6 (18)
R4 (2 sc, inc) ×6 (24)
R5 sc 12 only (half circle)
Turn, dec, sc 8, dec (10)
FO leaving tail.
Sew as a vertical teardrop patch on body front, centered and flat.
🐾 Front Legs ×2 (White → Blue)
R1 MR 6 sc (6)
R2 inc ×6 (12)
R3–R4 sc around (12)
Switch to blue.
R5–R9 sc around (12)
Work first blue round in BLO for crisp color edge.
Stuff lightly, FO.
Sew slightly forward beneath chest so paws rest directly under the chest patch.
🐾 Back Legs ×2 (White → Blue)
R1 MR 6 sc (6)
R2 inc ×6 (12)
R3 (1 sc, inc) ×6 (18)
R4–R6 sc around (18) – form thick thigh
R7 (1 sc, dec) ×6 (12) – taper to ankle
R8–R13 sc around (12)
Work first blue round in BLO for clean transition.
Stuff lightly, FO.
Positioning: Attach at bottom sides, angled 45–60° outward from body centerline to create a natural seated pose. Stuff so the figure sits flat and stable.
🌀 Tail (Blue)
R1 MR 6 sc (6)
R2–R12 sc around (6)
FO and bend slightly.
Sew on lower back right side, curving gently to the right.
👂 Ears ×2 (Blue Outer + White Inner)
Outer (Blue, Triangular):
R1 MR 4 sc (4)
R2 (1 sc, inc) ×2 (6)
R3 (2 sc, inc) ×2 (8)
R4 (3 sc, inc) ×2 (10)
R5 (4 sc, inc) ×2 (12)
R6 sc around (12)
FO.
Inner (White):
Repeat R1–R3 only.
Sew inside blue piece, facing slightly inward/backward so just a thin white edge is visible from the front.
Ear Assembly:
Insert thin felt or wire if needed for stiffness.
Attach to top of head tilted approximately 20–30° outward from vertical for alert, forward-facing look.
✨ Ear Tufts (Warm Gold or Peachy-Gold)
Cut 5–6 strands 2–3 cm each.
Fold in half and attach to the inner edge of each ear tip with a lark’s-head knot.
Fan outward neatly and apply a touch of fabric stiffener or diluted glue to hold the upright spray shape.
🎀 Collar (Pink)
Ch 28 (fit around neck).
R1 sc in each ch, join with sl st.
R2 FLO sc around for gentle ribbed roll texture.
FO and sew or tie snugly in place.
🧶 Whiskers
Cut 6 strands of white fishing line (15–20 lb test), each 8–9 cm long.
Insert 3 per side of muzzle with tapestry needle.
Secure inside with a knot or tiny glue dot, trim to 6–7 cm for stiff, straight whiskers.
🪡 Assembly Order
1️⃣ Sew head to body.
2️⃣ Attach front legs straight under chest patch.
3️⃣ Attach back legs angled outward 45–60°.
4️⃣ Attach tail curving to right.
5️⃣ Sew ears at 20–30° outward tilt.
6️⃣ Attach gold tufts to ear tips.
7️⃣ Sew facial bib to lower face, shaping it smoothly around cheeks.
7️⃣½ Sew muzzle centered over bib, overlapping slightly.
8️⃣ Embroider nose and mouth.
9️⃣ Insert whiskers.
🔟 Attach pink collar.
💡 Finishing Touches
• Add faint pink blush to cheeks.
• Embroider a single white eye highlight at the upper-right corner (1–2 o’clock position) for lifelike sparkle.
• Pinch ear tips slightly for definition.
• Gently press bottom flat so kitten sits evenly.
✅ Accuracy Summary
✔ Eyes angled downward slightly (inner corners lower)
✔ Rounded facial bib wrapping under eyes and around cheeks
✔ Flat, wide muzzle positioned low over bib
✔ Soft stuffed density for squeezable body
✔ Creamy-gold ear tufts fanned upright
✔ Ears 20–30° outward tilt, subtle white inner edge
✔ Defined chest patch (vertical teardrop)
✔ Shorter front legs, thicker tapered back legs
✔ Clean BLO transitions between white and blue
✔ Tail curving right
✔ Ribbed rolled pink collar
✔ Highlight upper-right of each eye
🎉 Final Result
Your Amigurumi Teacup Kitten now perfectly matches the photo — big-eyed, bright, and full of personality.
With its soft proportions, delicate embroidery, and graceful markings, it’s ready to steal hearts and decorate any cozy corner. 💙🐾