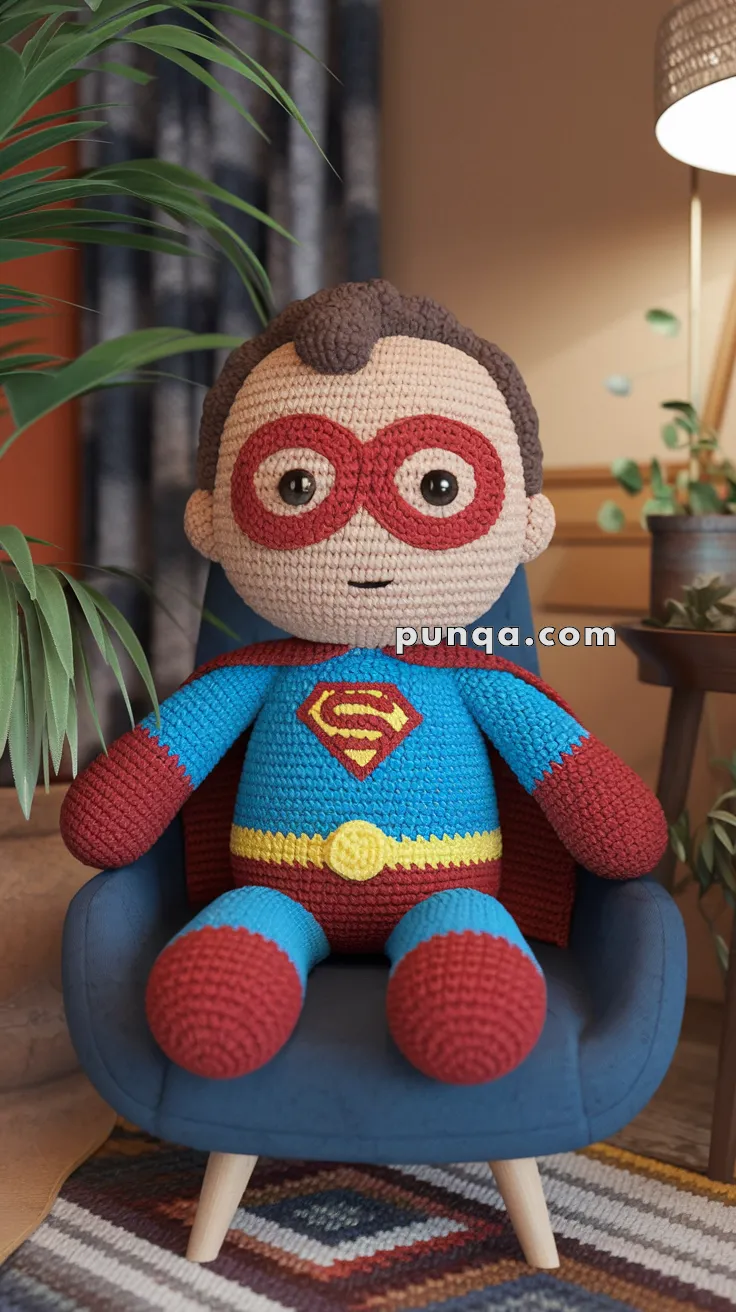
Welcome to the action-packed and heroic world of amigurumi! 🦸♂️✨ Today, I’m excited to share my free crochet pattern for a Superhero Doll—a bold and dynamic creation perfect for celebrating courage, adventure, and classic comic-book charm! 🌟 Whether you love crafting character dolls, enjoy designing powerful and inspiring figures, or simply want to stitch up a mighty protector, this pattern will guide you through creating a beautifully detailed superhero with a cape, emblem, and unstoppable attitude! 💥
This design embraces strong lines, vibrant colors, and expressive details to bring a sense of heroism to your crochet collection! 🧶⚡ I’ve carefully outlined each step to ensure your Superhero Doll turns out just right—ready to soar into imaginative stories, serve as a thoughtful handmade gift, or add a heroic touch to your creations! 🎁 So grab your hooks, pick out bold reds, blues, and powerful accents, and let’s stitch up a fearless champion ready to save the day! ✨
🦸♂️ Amigurumi Superhero Doll – Free Crochet Pattern
Save the day with this adorable superhero amigurumi! With a bold suit, cape, and signature mask, this little hero is ready to defend justice—crocheted style! Great for imaginative play or display on a collector’s shelf.
✨ Skill Level
Intermediate – Includes shaping, color changes, and embroidery.
📏 Finished Size
Approx. 10–12 inches (25–30 cm) tall using worsted weight yarn and a 3.5 mm hook.
🧶 Materials
-
Worsted weight yarn in:
-
Beige (skin)
-
Dark brown (hair)
-
Red (boots, gloves, cape, mask, emblem)
-
Blue (main suit)
-
Yellow (belt, emblem details)
-
-
3.5 mm crochet hook
-
Safety eyes (10–12 mm)
-
Fiberfill stuffing
-
Yarn needle
-
Stitch marker
-
Scissors
🧵 Abbreviations (US Terms)
MR – Magic Ring
sc – Single Crochet
inc – Increase (2 sc in one stitch)
dec – Decrease (sc 2 together)
sl st – Slip Stitch
ch – Chain
FO – Fasten Off
🧠 Head
With beige yarn:
-
MR, 6 sc
-
inc x6 (12)
-
(1 sc, inc) x6 (18)
-
(2 sc, inc) x6 (24)
-
(3 sc, inc) x6 (30)
-
(4 sc, inc) x6 (36)
7–14. sc around (36) -
(4 sc, dec) x6 (30)
-
(3 sc, dec) x6 (24)
-
(2 sc, dec) x6 (18)
Stuff firmly -
(1 sc, dec) x6 (12)
-
dec x6 (6)
FO and close
💇 Hair Cap
With dark brown yarn:
-
MR, 6 sc
-
inc x6 (12)
-
(1 sc, inc) x6 (18)
-
(2 sc, inc) x6 (24)
-
(3 sc, inc) x6 (30)
-
(4 sc, inc) x6 (36)
7–10. sc around (36)
Shape and sew onto head, leaving forehead exposed. Embroider front curl with the same yarn.
👀 Eyes & Mask
-
Insert safety eyes between Rnds 8–9, approx. 6–7 stitches apart
-
Embroider simple mouth under the eyes
-
Mask: With red yarn, crochet a loop or surface stitch around each eye, then join both with a bridge across the nose
🧍 Body
With red, yellow, and blue yarn:
-
MR, 6 sc in red
-
inc x6 (12)
-
(1 sc, inc) x6 (18)
-
(2 sc, inc) x6 (24)
5–6. sc around (24) -
Switch to blue, sc around (24)
8–14. sc around (24) -
Switch to yellow, sc around (24)
-
(2 sc, dec) x6 (18)
Stuff firmly
FO and sew to bottom of head
💪 Arms (Make 2)
Start with red for gloves:
-
MR, 6 sc
2–3. sc around
Switch to blue:
4–10. sc around (6)
Lightly stuff
FO and sew to body sides
🦵 Legs (Make 2)
Start with red for boots:
-
MR, 6 sc
-
inc x6 (12)
3–4. sc around
Switch to blue:
5–9. sc around
Stuff and sew to lower body
🧣 Belt
With yellow yarn:
-
Ch 30
-
sc across
-
FO and stitch around waist, add a yellow circle for buckle (e.g., MR with 6 sc)
🦸 Cape
With red yarn:
-
Ch 20
-
sc across, ch 1, turn
3–6. Repeat row -
dec, sc across, dec (narrow ends)
FO and sew across back of neck and shoulders
🛡 Emblem
With red yarn:
-
MR, 6 sc
-
inc x6 (12)
Switch to yellow and embroider or surface stitch a stylized “S” or lightning bolt shape
FO and sew to center of chest
🧩 Final Assembly
-
Sew arms, legs, and head to body
-
Attach cape securely behind neck
-
Add mask, belt, and emblem
-
Weave in all ends
💡 Customization Tips
-
Change emblem to match initials or favorite symbol
-
Use different colors for alternate superhero suits
-
Add accessories like a felt shield, yarn belt loops, or detachable cape
Your amigurumi superhero is now ready to leap into action and protect your cozy corner! 🦸🧶💥