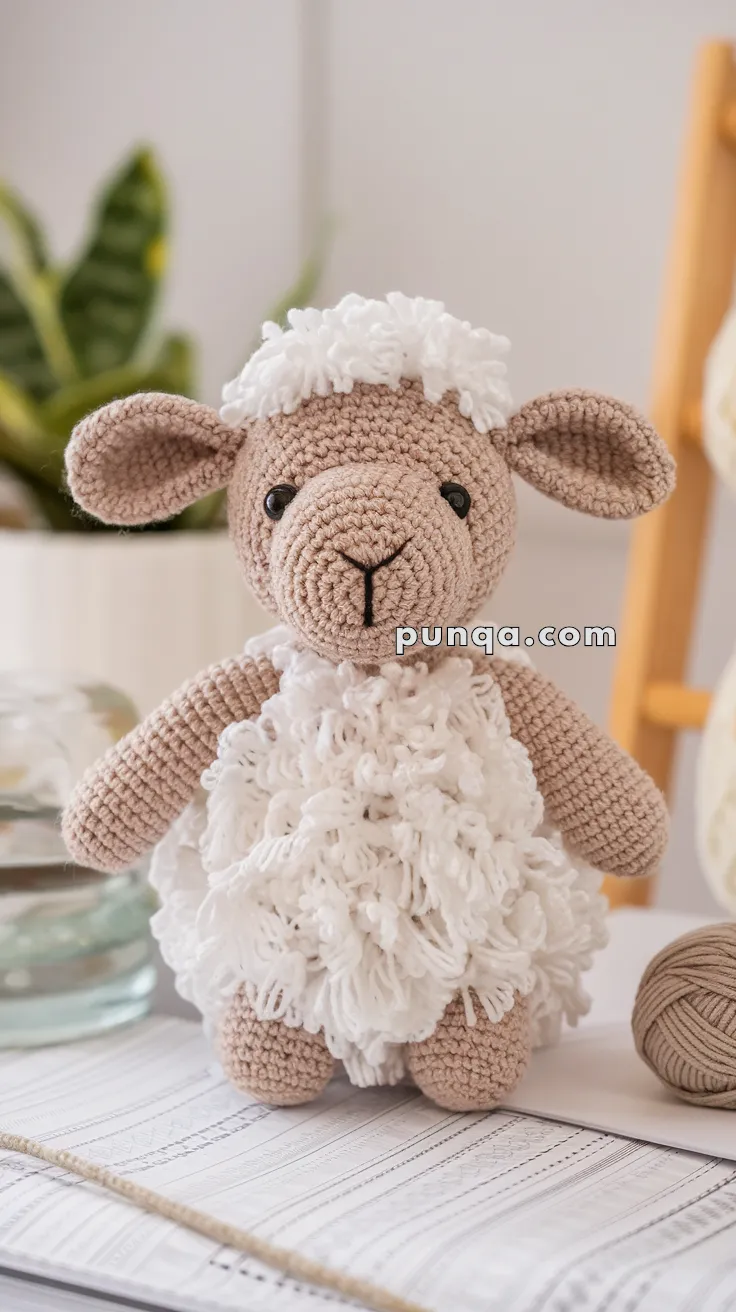
Welcome to the soft and fluffy world of amigurumi! 🐑✨ Today, I’m excited to share my free crochet pattern for a Sheep—a cuddly and adorable companion perfect for farm-themed collections, cozy décor, or anyone who enjoys crafting irresistibly woolly plush animals! 🌿 Whether you love stitching up gentle creatures, enjoy making textured and expressive designs, or simply want to add a sweet little sheep to your handmade lineup, this pattern will guide you through creating a beautifully detailed plush friend with curly fleece, tiny hooves, and that classic sheepish charm! 🤍
This design embraces soft textures, rounded shaping, and warm neutral tones to bring a heartwarming touch to your crochet creations! 🧶🌾 I’ve carefully outlined each step to ensure your Amigurumi Sheep turns out just right—ready to graze in your collection or become a treasured handmade gift! 🎁 So grab your hooks, pick out cozy whites, soft creams, or playful pastel shades, and let’s stitch up an irresistibly huggable sheep friend! ✨
🐑 Amigurumi Sheep Crochet Pattern
This irresistibly soft and cuddly amigurumi sheep features loop-stitch fleece, floppy ears, and a puffy rounded muzzle for that classic sheepish charm. Perfect for nursery décor, gifts, or simply bringing cozy handmade warmth into your home.
✨ Skill Level
Intermediate – involves shaping, loop stitch, and precision assembly.
📏 Finished Size
Approx. 20–22 cm (8–9 in) tall using DK weight yarn and a 2.5–3 mm crochet hook.
🧶 Yarn & Materials
-
Beige yarn – 60 g (head, limbs, ears, muzzle)
-
White yarn – 50 g (body fleece and head tuft)
-
Black embroidery thread – small amount (nose & mouth)
-
Safety eyes – 8 mm pair
-
Polyfill stuffing
-
2.5–3 mm crochet hook
-
Tapestry needle, scissors, stitch markers
🔤 Abbreviations (US Terms)
MR – Magic Ring
sc – single crochet
inc – increase (2 sc in same st)
dec – decrease (sc2tog)
sl st – slip stitch
ch – chain
lp st – loop stitch
FO – fasten off
🐏 Head (Beige – with Separate Muzzle)
R1 – MR 6 sc (6)
R2 – inc ×6 (12)
R3 – (sc, inc) ×6 (18)
R4 – (2 sc, inc) ×6 (24)
R5 – (3 sc, inc) ×6 (30)
R6 – (4 sc, inc) ×6 (36)
R7–R12 – sc around (36)
R13 – (4 sc, dec) ×6 (30)
R14 – (3 sc, dec) ×6 (24)
R15 – (2 sc, dec) ×6 (18)
Insert safety eyes between Rounds 8–9, about 7–8 stitches apart.
Stuff firmly.
R16 – (sc, dec) ×6 (12)
R17 – dec ×6 (6) FO and close.
🐽 Muzzle (Beige – Oval and Puffy)
R1 – ch 7, sc in 2nd ch from hook, 4 sc, 3 sc in last ch.
Continue on other side: 4 sc, inc in last ch (14)
R2 – inc, 5 sc, inc ×3, 5 sc, inc ×2 (20)
R3 – sc around (20)
R4 – sc around (20) FO, leave long tail.
Stuff lightly but rounded and puffy to create the characteristic sheep snout.
Sew centered on the lower face (covering Rounds 10–12).
Embroider a Y-shaped nose and mouth line using black thread.
🐑 Body (White – Full Loop Stitch Texture)
R1 – MR 6 sc (6)
R2 – inc ×6 (12)
R3 – (sc, inc) ×6 (18)
R4 – (2 sc, inc) ×6 (24)
R5 – (3 sc, inc) ×6 (30)
R6 – (4 sc, inc) ×6 (36)
R7–R16 – lp st around (36) ← forms dense fleece texture
R17 – (4 sc, dec) ×6 (30)
R18 – (3 sc, dec) ×6 (24)
R19 – (2 sc, dec) ×6 (18)
R20 – (sc, dec) ×6 (12)
Stuff firmly but keep body squeezably soft.
R21 – dec ×6 (6) FO and close.
🧶 Loop Stitch Tip
Insert hook, wrap yarn around finger to form a loop, yarn over and pull through stitch (three loops on hook). Yarn over and pull through all loops. Loops remain on surface.
Make each loop about 1.5–2 cm long for soft curls.
🐏 Top Head Fleece (White – Looped Cap)
R1 – MR 6 lp st (6)
R2 – inc ×6 in lp st (12)
R3 – (lp st, inc) ×6 (18)
R4 – (2 lp st, inc) ×6 (24)
R5 – lp st around (24)
R6 – lp st around (24) FO, leave tail.
Sew onto top of head, positioning it slightly forward so it covers the forehead above the eyes like soft bangs.
🐏 Ears ×2 (Beige – Floppy Shape)
R1 – MR 6 sc (6)
R2 – inc ×6 (12)
R3 – (sc, inc) ×6 (18)
R4–R6 – sc around (18)
R7 – (sc, dec) ×6 (12)
R8 – sc around (12)
Fold flat and sl st across to close (6) FO, leave tail.
Attach ears at approximately Rounds 6–7 of the head, angled slightly downward and outward for the natural floppy look.
🐏 Arms ×2 (Beige)
R1 – MR 6 sc (6)
R2 – inc ×6 (12)
R3–R8 – sc around (12)
R9 – (sc, dec) ×6 (8)
R10 – sc around (8) FO.
Stuff lightly.
🐏 Legs ×2 (Beige – Rounded Shape)
R1 – MR 6 sc (6)
R2 – inc ×6 (12)
R3 – (sc, inc) ×6 (18)
R4–R6 – sc around (18)
R7 – (sc, dec) ×6 (12)
R8 – sc around (12) FO.
Stuff firmly; flatten base slightly for sitting stability.
✂️ Assembly
1️⃣ Sew muzzle to lower front of head; ensure it’s softly puffy and centered.
2️⃣ Embroider nose and mouth.
3️⃣ Attach ears at Rounds 6–7 of head, angled downward/outward.
4️⃣ Sew head onto body.
5️⃣ Attach arms to sides of body around Round 15.
6️⃣ Sew legs to base so sheep can sit upright.
7️⃣ Sew top fleece cap on head and gently separate the loops with your fingers for added volume.
🌟 Finishing Touches
-
Fluff the loops: Gently pull or separate loops by hand for extra fullness.
-
For ultra-soft texture, lightly brush with a slicker brush (optional).
-
Shape loops evenly for a woolly finish.
-
Add a tiny bow or bell for charm.
This sheep is perfect for nurseries, springtime gifts, or just cuddly crochet fun. Happy stitching and may your yarn always be soft and tangle-free! 🧶🐑