Ever since I first stumbled upon the whimsical world of amigurumi, I’ve been completely enchanted by the endless possibilities it offers. There’s just something magical about turning a simple ball of yarn into an adorable creature that brings joy wherever it goes. When I decided to tackle a seahorse fridge magnet, the idea instantly filled me with excitement. 🐠 Not only are seahorses incredibly cute and intricate, but making them into magnets means they can add a splash of charm to any kitchen space. Plus, they make delightful gifts for friends who adore a touch of the ocean’s whimsy in their lives.
Creating an amigurumi seahorse is a wonderfully satisfying journey where creativity meets skill. First, I carefully select my yarn, opting for vibrant colors that bring the seahorse to life. As I crochet each tiny stitch, the seahorse begins to take shape, and it’s thrilling to see it come together piece by piece. Attaching the magnet adds the final touch, transforming it from just another crochet project into a functional art piece. It’s truly magical to witness a simple pattern evolve into a charming, tactile reminder of the ocean, ready to brighten up an ordinary fridge. 🌊

🌊 Amigurumi Seahorse Fridge Magnet Crochet Pattern
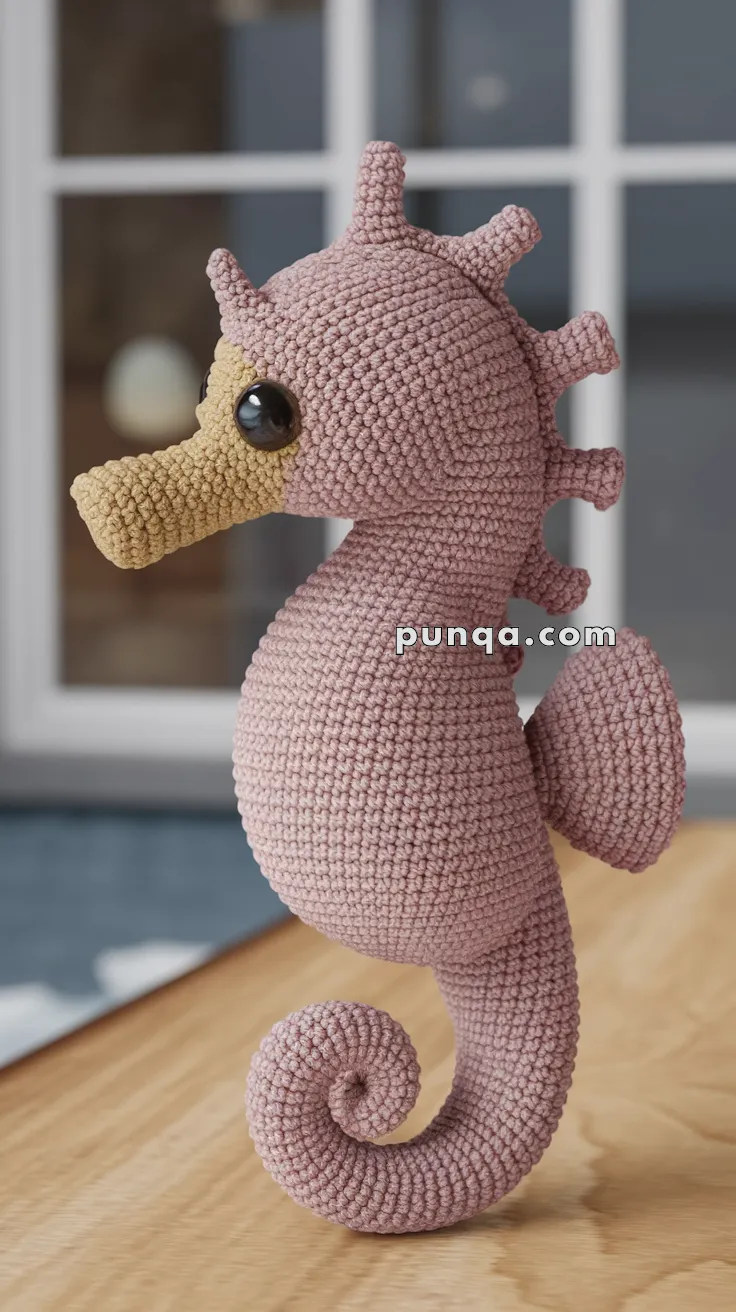
Bring a splash of ocean magic to your crochet collection with this adorable seahorse amigurumi. With its curly tail, spiky ridges, and wide back fin, this handmade sea creature makes the perfect gift, nursery decoration, or whimsical fridge magnet.
✨ Skill Level
Intermediate – You’ll need to be comfortable with shaping, working in the round, and assembling pieces.
📏 Finished Size
-
Standard version: 20–22 cm (8–9 in) tall with worsted yarn and 3.5 mm hook.
-
Mini fridge magnet version: 10–12 cm (4–5 in) tall with cotton sport weight yarn and 2.0–2.5 mm hook.
🧶 Materials
-
Yarn:
-
Dusty pink (main body & fins)
-
Beige (snout)
-
-
Hooks: 3.5 mm for large / 2.0–2.5 mm for mini
-
Eyes: 12–14 mm safety eyes (large) OR 6–8 mm for mini
-
Fiberfill stuffing
-
Stitch marker
-
Yarn needle & scissors
-
Optional for fridge magnet:
-
Small flat neodymium magnet discs (8–10 mm wide, 2–3 mm thick)
-
Hot glue or E6000 adhesive
-
🔤 Abbreviations (US Terms)
-
MR = Magic Ring
-
sc = Single Crochet
-
inc = Increase (2 sc in same stitch)
-
dec = Decrease (sc2tog)
-
ch = Chain
-
sl st = Slip Stitch
-
FO = Fasten Off
🧵 Pattern Instructions
Head & Body (one piece – dusty pink)
R1: MR, 6 sc (6)
R2: inc ×6 (12)
R3: (sc, inc) ×6 (18)
R4: (2 sc, inc) ×6 (24)
R5–7: sc around (24)
R8: (3 sc, inc) ×6 (30)
R9–12: sc around (30)
R13: (4 sc, inc) ×6 (36)
R14–17: sc around (36)
R18: (4 sc, dec) ×6 (30)
R19–20: sc around (30)
R21: (3 sc, dec) ×6 (24)
R22–23: sc around (24)
R24: (2 sc, dec) ×6 (18)
R25–28: sc around (18)
R29: (sc, dec) ×6 (12)
R30–45: sc around (12) – continue until tail is long enough to curl. Stuff as you go.
FO and shape into a spiral curl.
Snout (beige)
R1: MR, 6 sc (6)
R2: inc ×6 (12)
R3–10: sc around (12) – tube shape
FO, stuff lightly, and sew to head.
Back Fin (dusty pink)
Ch 16
R1: sc across (15)
R2: ch 1, turn, (inc, sc 1) repeat across (22)
R3: ch 1, turn, sc across (22)
R4: ch 1, turn, (inc, sc 2) repeat across (30)
FO, leave tail. Attach flat to back.
Head Ridges (make 7 – dusty pink)
R1: MR, 4 sc (4)
R2: (sc, inc) ×2 (6)
R3–5: sc around (6)
R6: (sc, dec) ×2 (4)
FO and sew evenly from forehead to neck.
Eyes
-
Large version: 12–14 mm safety eyes between R7–8.
-
Mini magnet version: 6–8 mm safety eyes.
Assembly
-
Sew snout to front of head.
-
Attach ridges along head/back.
-
Sew back fin flat at center back.
-
Curl and stitch tail securely.
-
Embroider small mouth line.
🧲 Fridge Magnet Notes
-
Use the mini version (cotton yarn, 2.0 mm hook).
-
When finishing the back of the body (before sewing tail shut), insert a small flat disc magnet into the stuffing near the back.
-
OR, once finished, hot glue a magnet directly to the back fin or tail spiral.
-
For extra strength: sandwich a magnet inside and glue another outside for double grip.
🎉 Final Look
Your seahorse will have:
-
A curled tail
-
A long beige snout
-
Seven bumpy ridges along its head/back
-
A large flat fan fin at the back
Standard size makes a cute plush, while the smaller version is perfect as a fridge magnet or keychain.


