Rise and shine with this Amigurumi Rooster crochet pattern! With its vibrant feathers, proud stance, and charming personality, this delightful rooster is ready to bring a touch of farmyard fun to your collection. Whether you’re crafting for animal lovers, adding a rustic accent to your decor, or simply enjoy making playful amigurumi designs, this pattern lets you stitch up a rooster bursting with character! Perfect for brightening up any space, this crochet creation brings a touch of handmade countryside magic to every stitch. 🐔✨
Designed for customization, this pattern allows you to experiment with different shades of red, gold, and earthy tones, embroidered details, or even tiny accessories like a miniature barn or hay bale for extra charm. Craft a classic rooster with bold, natural hues, create a pastel version for a softer aesthetic, or even stitch up a full set of farm-inspired amigurumi for a delightful display! Whether gifted as a thoughtful keepsake, displayed as a cheerful accent, or made simply for the joy of crafting, this Amigurumi Rooster is a fun and creative project—perfect for bringing a touch of handmade barnyard magic to every stitch! 🧶💖✨
🐓 Amigurumi Rooster Crochet Pattern
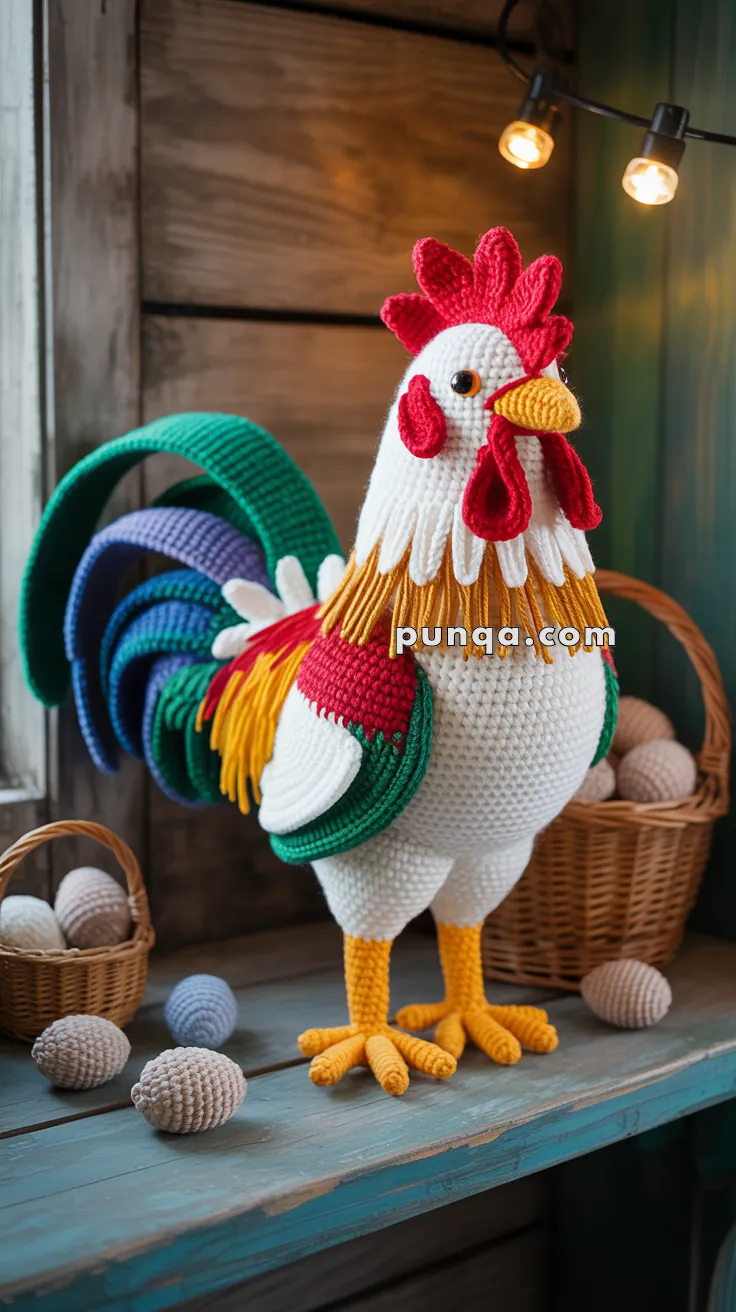
Bring the barnyard to life with this majestic amigurumi rooster! Standing tall with bright feathers, a bold red comb, and a proud colorful tail, this rooster makes the perfect farmhouse centerpiece. Whether you’re a collector of crochet animals, decorating a kitchen, or creating a farmyard set, this project will impress with its details and vibrant charm.
✨ Skill Level
Intermediate to Advanced – includes color changes, layered shaping, and structural support for the tail.
📏 Finished Size
Approx. 15–16 in (38–40 cm) tall when worked with worsted yarn and a 3.5 mm hook.
🧶 Materials
- Worsted weight yarn
- White – 120 g (body, head, chest feathers)
- Red – 40 g (comb, wattles, lower wing stripe)
- Yellow/Orange – 40 g (beak, feet, neck fringe)
- Green – 50 g (upper wing stripe, tail panels)
- Blue – 30 g (tail panels)
- Purple – 20 g (tail panels)
- Black – scraps (eyes, embroidery)
- Crochet hook: 3.5–4.0 mm
- Safety eyes (10–12 mm) or embroidered eyes
- Polyfill stuffing
- Floral wire or heavy craft wire (for legs and tail feathers)
- Stitch marker, tapestry needle
- Optional: cardboard or plastic disk base for balance
🪡 Abbreviations (US Terms)
MR – Magic Ring
sc – single crochet
inc – increase (2 sc in same st)
dec – decrease (sc2tog)
hdc – half double crochet
dc – double crochet
tr – treble crochet
ch – chain
sl st – slip stitch
FO – fasten off
🦴 Head & Body (White)
R1 – MR 6 sc (6)
R2 – inc ×6 (12)
R3 – (1 sc, inc) ×6 (18)
R4 – (2 sc, inc) ×6 (24)
R5 – (3 sc, inc) ×6 (30)
R6 – (4 sc, inc) ×6 (36)
R7–R12 – sc around (36)
R13 – (4 sc, dec) ×6 (30)
R14 – (3 sc, dec) ×6 (24) ← narrow neck
R15–R18 – sc around (24)
R19 – (2 sc, inc) ×6 (32)
R20 – (3 sc, inc) ×8 (40)
R21 – (4 sc, inc) ×8 (48)
R22–R30 – sc around (48) ← tall barrel body
R31 – (6 sc, dec) ×6 (42)
R32 – (5 sc, dec) ×6 (36)
R33 – (4 sc, dec) ×6 (30)
R34 – (3 sc, dec) ×6 (24)
R35 – (2 sc, dec) ×6 (18)
R36 – (1 sc, dec) ×6 (12)
R37 – dec ×6 (6) FO.
Stuff firmly and shape body upright.
🩸 Comb (Red – 5 Tall Lobes, Forward Placement)
Ch 14
Row 1 – sc in 2nd ch and across (13)
Row 2 – (sc, hdc, dc, tr, dc, hdc, sc in next st, skip 1 st) ×5 → 5 tall lobes
FO.
➡ Placement: Sew forward on head, starting just above and slightly behind the eyes. The comb should lean slightly toward the beak, not centered.
❤️ Wattles (Red ×2 – Droplet Shape)
R1 – MR 6 sc (6)
R2 – inc ×6 (12)
R3 – (1 sc, inc) ×6 (18)
R4 – sc around (18)
R5 – (1 sc, dec) ×6 (12)
R6 – sc around (12) FO.
Flatten slightly and sew under beak so they hang down prominently.
💛 Beak (Yellow – Long Cone)
R1 – MR 4 sc (4)
R2 – inc ×4 (8)
R3 – (1 sc, inc) ×4 (12)
R4 – (2 sc, inc) ×4 (16)
R5–R8 – sc around (16)
R9 – (2 sc, dec) ×4 (12) FO.
Stuff lightly and sew projecting forward from the face.
👁 Eyes
White: MR 6 → inc ×6 (12) → (1 sc, inc) ×6 (18)
Black: MR 6 sc (6) FO.
Sew black pupil onto white base and embroider a small white glint.
➡ Placement: Attach eyes on the sides of the head between rounds 8–10, slightly above and behind the beak line. They should be visible frontally but angled outward.
🪶 Neck & Chest Feather Cape (White with Yellow Accent) – Revised
White Pointed Feathers (Make 15–20)
Ch 12–15
Row 1 – sc in 2nd ch, sc across to last 2 ch, dec, sl st to tip. FO.
Yellow Accent Feathers (Make 8–10, shorter)
Ch 8–10
Row 1 – sc in 2nd ch, sc across, dec at tip, sl st. FO.
Assembly
Sew white feathers around the neck and upper chest (Rounds 21–24), overlapping them like scales with tips pointing downward and outward to form a cape collar.
Below this, attach 1–2 rows of shorter yellow feathers, forming a bright accent band under the white cape.
🪽 Wings (2 pcs – Striped Bands, Flat Construction)
Color Band Wing (Single Oval)
R1 – MR 6 sc in GREEN (6)
R2 – inc ×6 (12)
R3 – (1 sc, inc) ×6 in GREEN (18)
R4 – (2 sc, inc) ×6 in GREEN (24)
R5 – sc around in GREEN (24)
R6 – (3 sc, inc) ×6 switch to YELLOW (30)
R7–R8 – sc around in YELLOW (30)
R9 – (4 sc, inc) ×6 switch to RED (36)
R10–R11 – sc around in RED (36)
R12 – (4 sc, dec) ×6 switch to WHITE (30)
R13 – sc around in WHITE (30) FO.
Flatten into a long oval shape.
➡ Attach to body sides (Rounds 30–33) angled slightly backward, red band facing downward, green on top.
🪇 Tail Feathers (Large Curved Panels – Blue, Green, Purple)
Small Tail Panels (Blue/Purple, Inner)
Ch 25
Row 1 – sc in 2nd ch, sc across, 3 sc in last ch.
Row 2 – sc back along opposite side, inc at both ends. (27)
Repeat for 5–6 rows, increasing 1 st each end every row to form semicircle. FO.
Medium Tail Panels (Green, Middle)
Ch 35, repeat increasing method for 6–7 rows. FO.
Large Tail Panels (Blue-Green, Outer)
Ch 45, repeat increasing method for 8–9 rows. FO.
Assembly
Layer smallest panels first (blue/purple) → then green → then outer blue-green.
Insert wire along top edge of each panel.
Sew securely at the back (Rounds 40–44). Bend feathers outward in a fan arc for dramatic curvature.
🦵 Legs & Feet (Yellow – Extended Toes)
Feet
R1 – MR 6 sc (6)
R2 – (1 sc, inc) ×3 (9)
R3–R5 – sc around (9)
Front Toes (3x): ch 10, sc back (9), sl st to base.
Back Toe: ch 7, sc back (6), sl st to base.
R6 – sc around base joining toes (24).
Leg Shaft
R7–R20 – sc around (12) for long legs.
Insert wire if desired, stuff lightly. FO.
Sew to body front-bottom, ensuring stance is upright and feet point forward.
🧷 Assembly Order
1️⃣ Sew head to top of neck securely.
2️⃣ Attach comb forward on head (starts above eyes).
3️⃣ Sew beak projecting outward and wattles below.
4️⃣ Add eyes laterally.
5️⃣ Attach neck feather cape — white layers first, yellow accent below.
6️⃣ Sew striped wings to body sides, angled backward.
7️⃣ Attach legs and feet forward-facing for balance.
8️⃣ Layer and bend tail panels into a curved fan shape.
9️⃣ Adjust posture so rooster stands tall and proud.
🌟 Finishing Touches
- Use firm stuffing in body, legs, and head for stability.
- Steam-block tail panels to maintain their elegant arc.
- Fluff and separate feather cape strands slightly with fingers for fullness.
- Comb and wattles should stand slightly forward for realism.
🧵 Result
Your rooster now stands exactly like the one in the photo — proud, colorful, and majestic! With its white feather cape, striped wings, arched tail, and bold red crown, this handmade masterpiece will brighten any farmhouse, nursery, or spring display. 🐓✨