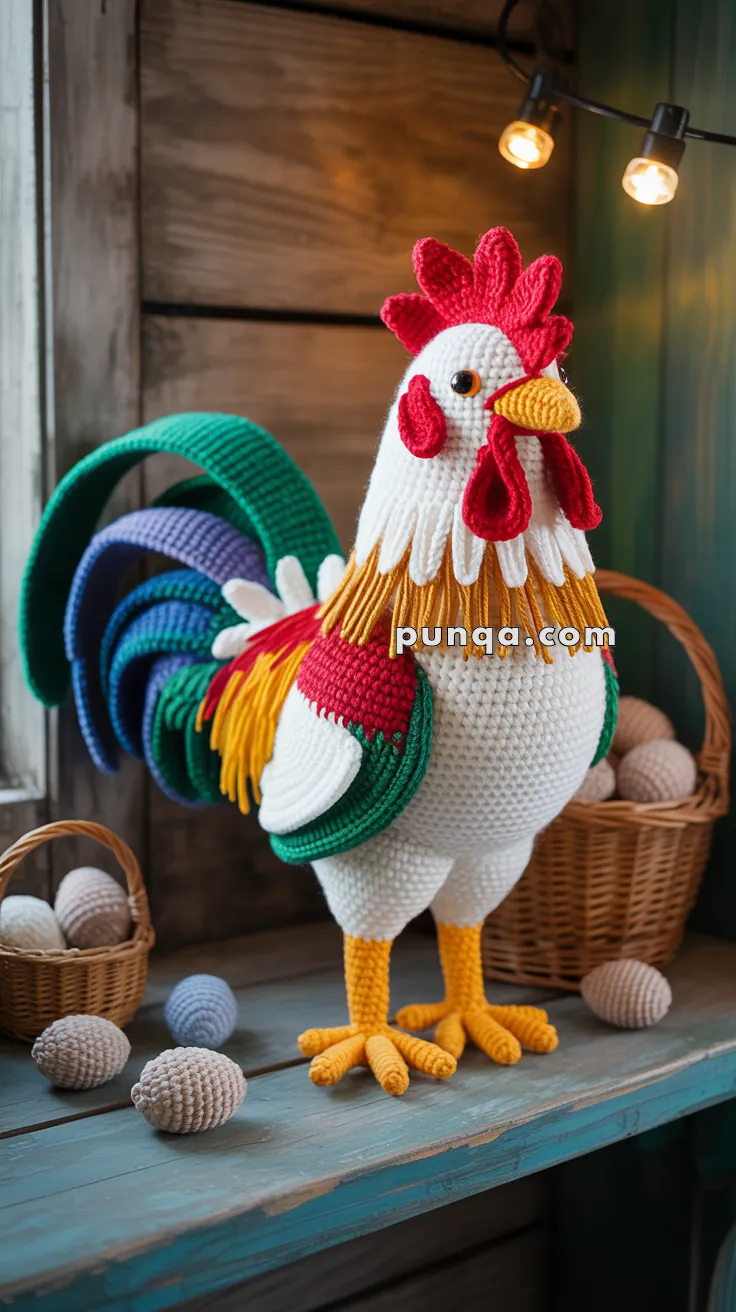
Rise and shine with this Amigurumi Rooster crochet pattern! With its vibrant feathers, proud stance, and charming personality, this delightful rooster is ready to bring a touch of farmyard fun to your collection. Whether you’re crafting for animal lovers, adding a rustic accent to your decor, or simply enjoy making playful amigurumi designs, this pattern lets you stitch up a rooster bursting with character! Perfect for brightening up any space, this crochet creation brings a touch of handmade countryside magic to every stitch. 🐔✨
Designed for customization, this pattern allows you to experiment with different shades of red, gold, and earthy tones, embroidered details, or even tiny accessories like a miniature barn or hay bale for extra charm. Craft a classic rooster with bold, natural hues, create a pastel version for a softer aesthetic, or even stitch up a full set of farm-inspired amigurumi for a delightful display! Whether gifted as a thoughtful keepsake, displayed as a cheerful accent, or made simply for the joy of crafting, this Amigurumi Rooster is a fun and creative project—perfect for bringing a touch of handmade barnyard magic to every stitch! 🧶💖✨
🐓 Amigurumi Rooster Crochet Pattern
Bring the barnyard to life with this majestic amigurumi rooster! Standing tall with bright feathers, a bold red comb, and a proud colorful tail, this rooster makes the perfect farmhouse centerpiece. Whether you’re a collector of crochet animals, decorating a kitchen, or creating a farmyard set, this project will impress with its details and vibrant charm.
🧵 Skill Level
Advanced – involves structural shaping, layered textures, fringe work, and precise assembly for a stable standing form.
📏 Finished Size
Height: approx. 42–48 cm (16.5–19 inches)
Length (chest to tail base): approx. 28–32 cm (11–12.5 inches)
➡️ Tall due to long legs, upright neck, and high comb
🧶 Materials & Yarn Amount
- White yarn (body, head, chest feathers): 150–180 g
- Red yarn (comb, wattles, wing band): 45–55 g
- Golden yellow yarn (beak, legs, feet, neck fringe): 60–80 g
- Green yarn (wings, tail): 40–50 g
- Teal / blue yarn (tail): 30–40 g
- Purple yarn (inner tail): 15–20 g
- Black yarn/thread (eyes detail): 5 g
Other:
- 10–12 mm safety eyes
- Polyester stuffing (600–800 g)
- 3.0–3.5 mm hook
- Yarn needle
- Stitch markers
Structure support (recommended):
- Wire for legs + tail shaping
✂️ Abbreviations (US Terms)
MR – magic ring
sc – single crochet
inc – increase
dec – invisible decrease
ch – chain
sl st – slip stitch
FO – fasten off
🐔 Head & Body (One Piece – Smooth & Upright)
With white yarn:
Round 1: MR, 6 sc (6)
Round 2: inc ×6 (12)
Round 3: (1 sc, inc) ×6 (18)
Round 4: (2 sc, inc) ×6 (24)
Round 5: (3 sc, inc) ×6 (30)
Round 6: (4 sc, inc) ×6 (36)
Rounds 7–11: sc around (36)
Insert eyes between Rounds 8–9, spaced 8–9 stitches apart
Neck shaping
Round 12: (4 sc, dec) ×6 (30)
Round 13: (3 sc, dec) ×6 (24)
Rounds 14–16: sc around (24)
➡️ Creates a slimmer upright neck
Body expansion
Round 17: (3 sc, inc) ×6 (30)
Round 18: (4 sc, inc) ×6 (36)
Round 19: (5 sc, inc) ×6 (42)
Round 20: (6 sc, inc) ×6 (48)
Rounds 21–30: sc around (48)
➡️ Body is rounded with a full chest and slightly tapered bottom
Round 31: (6 sc, dec) ×6 (42)
Round 32: (5 sc, dec) ×6 (36)
Round 33: (4 sc, dec) ×6 (30)
Round 34: (3 sc, dec) ×6 (24)
Round 35: (2 sc, dec) ×6 (18)
Round 36: (1 sc, dec) ×6 (12)
Round 37: dec ×6 (6)
FO.
Stuff firmly to maintain upright posture.
🐤 Beak (Short & Slightly Downward)
With golden yarn:
Round 1: MR, 4 sc (4)
Round 2: inc ×4 (8)
Round 3: (1 sc, inc) ×4 (12)
Round 4: sc around (12)
Round 5: (2 sc, inc) ×4 (16)
Rounds 6–7: sc around (16)
Round 8: (2 sc, dec) ×4 (12)
➡️ Light stuffing, flatten base slightly
➡️ Attach centered and slightly angled downward
❤️ Comb (Tall, Pointed, Upright)
Make 5 separate cone-shaped spikes:
Each spike:
Round 1: MR, 4 sc
Round 2: inc ×4 (8)
Rounds 3–6: sc around (8)
Round 7: dec ×4 (4)
FO.
➡️ Make:
- 1 tallest center
- 2 medium
- 2 smaller
Sew in a row from forehead to crown, tallest in center.
❤️ Wattles (Long & Flowing – Make 2)
With red yarn:
Round 1: MR, 6 sc
Round 2: inc ×6 (12)
Round 3: (1 sc, inc) ×6 (18)
Rounds 4–6: sc around (18)
Round 7: (1 sc, dec) ×6 (12)
Rounds 8–9: sc around (12)
➡️ Slightly elongated teardrop shape
➡️ Attach under beak, hanging freely
❤️ Side Face Lobes (Make 2)
Round 1: MR, 6
Round 2: inc ×6 (12)
Round 3: (1 sc, inc) ×6 (18)
Round 4: sc
Flatten and attach beside beak.
🪶 Neck Fringe (Key Detail)
White collar layer
Attach 20–24 short strands (8–10 cm)
Yellow lower fringe
Attach 30–40 longer strands (12–14 cm)
➡️ Dense and layered
➡️ Yellow strands extend further down chest
Trim evenly for clean drape.
🪽 Wings (Rounded & Layered – Make 2)
With green yarn:
Round 1: MR, 6
Round 2: inc ×6 (12)
Round 3: (1 sc, inc) ×6 (18)
Round 4: (2 sc, inc) ×6 (24)
Round 5: (3 sc, inc) ×6 (30)
Rounds 6–7: sc around (30)
Switch to red:
Rounds 8–10: sc around (30)
FO.
White inner feather
MR 6 → inc to 24 → 2 rounds sc
Flatten and sew onto lower wing.
➡️ Wings are rounded, not flat panels
🌈 Tail (Curved Thick Plumes)
Make:
- 2 large green plumes
- 2 medium teal plumes
- 2 medium green plumes
- 2 small purple plumes
Each plume:
Ch 18–28 depending on size
Work oval increases for 4–6 rows
➡️ Keep thick and slightly stuffed or wired
➡️ Curve into smooth arcs
Attach in layers:
- smallest inside
- largest outside
➡️ Tail forms a high curved fan
🦵 Legs (Slim & Straight – Make 2)
With yellow yarn:
Round 1: MR, 6
Round 2: (1 sc, inc) ×3 (9)
Rounds 3–18: sc around (9)
➡️ Insert wire
➡️ Keep legs thin and straight
🐾 Feet (Long Toes – Make 2)
Base:
MR 6 → inc to 12 → 1 round sc
Toes
- 3 front toes: ch 8–9, sl st back
- 1 back toe: ch 5–6
Secure with one round sc around base.
🧵 Assembly
- Attach beak, then face lobes and wattles
- Sew comb upright along head
- Add neck fringe layers
- Attach wings low and slightly angled
- Attach legs centered for balance
- Build tail layers from inside outward
✨ Final Shaping Tips
- Keep body upright and slightly forward
- Let fringe cover shoulder seam
- Shape tail into smooth arcs
- Ensure feet sit flat
💡 Pro Tips
- Tail structure defines silhouette
- Dense fringe gives realism
- Keep legs perfectly aligned
- Firm stuffing ensures stability
This elegant rooster amigurumi combines strong structure, flowing textures, and vibrant colors into a striking handmade piece. With its proud stance, layered feathers, and dramatic tail, it becomes a true centerpiece for any space 🐓✨


I love this ty for sharing the pattern with all of us I’m gonna make for my bestie
Dekuji za navod