Step back in time and crochet a charming piece of history with this Amigurumi Pilgrim pattern! Whether you’re inspired by Thanksgiving traditions or fascinated by historical figures, this free pattern lets you stitch up a tiny traveler ready for adventure. With signature details like a classic hat, collar, and traditional attire, this amigurumi pilgrim brings a cozy, old-world charm to your handmade collection. Perfect for festive displays, heartfelt gifts, or simply a unique project, this little figure is a delightful way to weave history into your stitches.
Designed for creativity and personalization, this pattern allows you to play with colors and accessories to make your pilgrim uniquely yours. Whether you craft a classic look or add playful details like a tiny satchel or embroidered embellishments, the possibilities are endless! Display it as part of a seasonal arrangement, gift it to a fellow history enthusiast, or enjoy the rewarding process of crocheting a timeless character. So grab your hook, gather your yarn, and let’s create a piece of the past—one stitch at a time! 🍂🧶✨
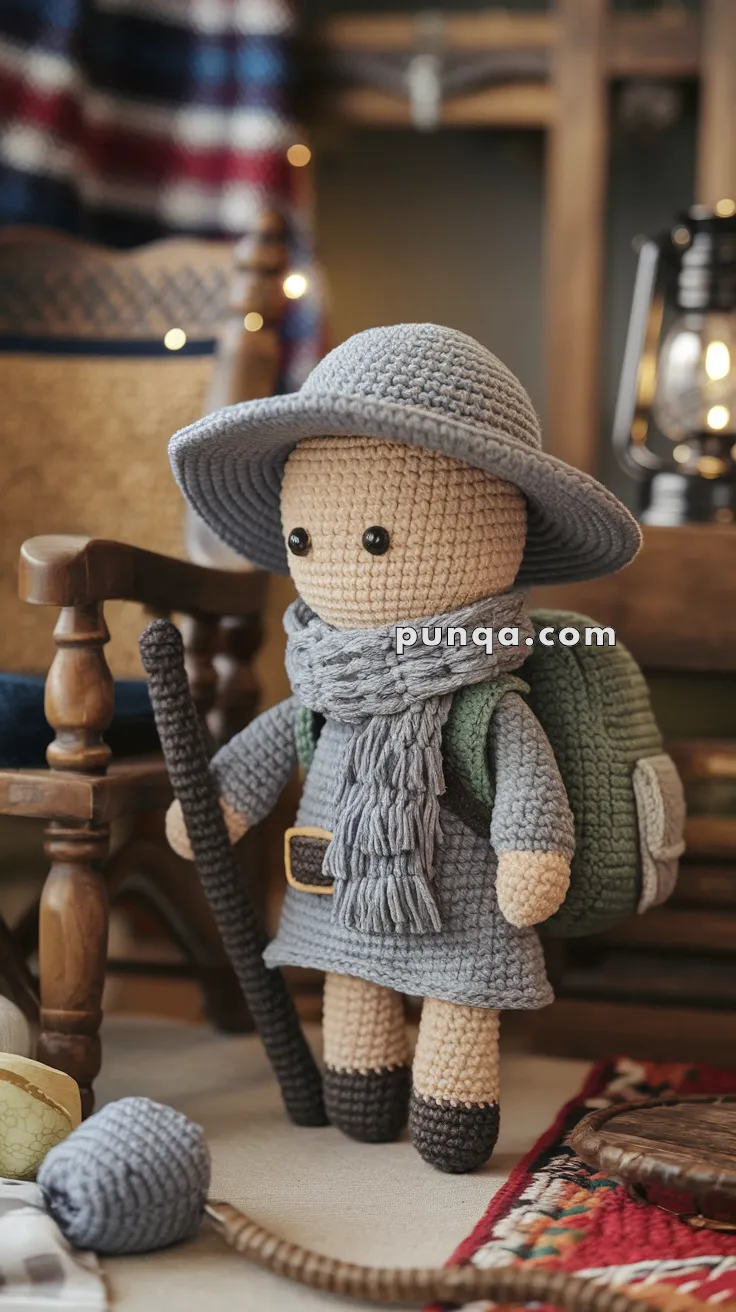
🧭 Amigurumi Pilgrim Doll Crochet Pattern
Take a journey back to simpler times with this beautifully detailed amigurumi pilgrim. Complete with a walking stick, scarf, wide-brimmed hat, satchel, boots, and a travel-ready backpack, this character is perfect for storytelling, decoration, or meaningful gifts.
✨ Skill Level
Intermediate – requires knowledge of working in the round, color changes, and assembling multiple pieces.
📏 Finished Size
Approx. 28–30 cm (11–12 in) tall when made with worsted weight yarn and a 3.5 mm hook.
🧶 Materials
-
Beige yarn (skin)
-
Dark brown yarn (boots & belt)
-
Grey yarn (hat, tunic, scarf)
-
Green yarn (backpack body)
-
Light grey yarn (backpack pockets & straps)
-
Black yarn (belt detail)
-
Safety eyes (10–12 mm)
-
Polyester stuffing
-
Yarn needle, scissors, stitch markers
-
Optional: thin craft wire for hat brim structure
🔑 Abbreviations (US Terms)
-
MR = Magic Ring
-
sc = single crochet
-
inc = increase (2 sc in same st)
-
dec = decrease (sc2tog)
-
sl st = slip stitch
-
ch = chain
-
st(s) = stitch(es)
-
FO = fasten off
🧵 Pattern Instructions
🟤 Head (Beige)
-
MR, 6 sc (6)
-
inc ×6 (12)
-
(sc, inc) ×6 (18)
-
(2 sc, inc) ×6 (24)
-
(3 sc, inc) ×6 (30)
-
(4 sc, inc) ×6 (36)
7–16. sc around (36)
👉 Insert safety eyes between rounds 10–11, about 8 sts apart. -
(4 sc, dec) ×6 (30)
-
(3 sc, dec) ×6 (24)
-
(2 sc, dec) ×6 (18)
-
(sc, dec) ×6 (12)
-
dec ×6 (6), FO.
Stuff firmly.
⚪ Body / Tunic (Grey)
-
MR, 6 sc (6)
-
inc ×6 (12)
-
(sc, inc) ×6 (18)
-
(2 sc, inc) ×6 (24)
-
(3 sc, inc) ×6 (30)
-
(4 sc, inc) ×6 (36)
7–20. sc around (36)
👉 To lengthen tunic as in photo, add 3–4 extra rounds. -
(5 sc, dec) ×6 (30)
-
(3 sc, dec) ×6 (24)
-
(2 sc, dec) ×6 (18)
FO, stuff firmly.
Optional flare: At round 20, work (3 sc, inc) ×6 for one round to widen slightly before decreasing.
🟤 Legs (Make 2 – Brown boots, Beige skin)
Start with brown (boots):
-
MR, 6 sc (6)
-
inc ×6 (12)
-
(sc, inc) ×6 (18)
4–6. sc around (18)
7–12. sc around (18) (make boots taller, as in photo)
Switch to beige:
13–24. sc around (18)
FO, stuff.
✋ Arms (Make 2 – Beige hands, Grey sleeves)
Start with beige:
-
MR, 6 sc (6)
-
inc ×6 (12)
3–5. sc around (12)
Switch to grey:
6–15. sc around (12)
FO, stuff lightly.
👒 Hat (Grey, broad brim)
-
MR, 6 sc (6)
-
inc ×6 (12)
-
(sc, inc) ×6 (18)
-
(2 sc, inc) ×6 (24)
-
(3 sc, inc) ×6 (30)
-
(4 sc, inc) ×6 (36)
-
(5 sc, inc) ×6 (42)
-
(6 sc, inc) ×6 (48)
-
(7 sc, inc) ×6 (54)
-
(8 sc, inc) ×6 (60)
-
(9 sc, inc) ×6 (66)
-
(10 sc, inc) ×6 (72)
👉 Work 8–10 rounds even (72 sts). This forms the tall crown.
Brim:
13. (11 sc, inc) ×6 (78)
14. sc in BLO around (78)
15–17. sc around (78)
FO. Insert thin wire in brim edge if desired to keep it flat.
🧣 Scarf (Grey)
Ch 95, sc across, turn.
Row 2: sc across.
FO.
Fringe: Cut ~20 strands, 8–10 cm each. Latch-hook 10 strands per end.
🎒 Backpack (Green with light grey details)
Body (Green):
-
MR, 6 sc (6)
-
inc ×6 (12)
-
(sc, inc) ×6 (18)
-
(2 sc, inc) ×6 (24)
-
(3 sc, inc) ×6 (30)
6–20. sc around (30)
Flap (Green):
Ch 20, sc across for 5 rows. FO.
Pockets (Light Grey, Make 2):
Ch 8, sc across for 6 rows. Fold in half, sew to sides.
Attach flap and pockets.
🪵 Walking Stick (Brown)
-
MR, 4 sc (4)
2–40. sc around (4)
Stuff lightly for sturdiness.
🪡 Assembly
-
Sew legs to bottom of body, ensuring stability.
-
Attach arms slightly forward on body.
-
Sew head to body.
-
Place hat on head — brim should cover upper face slightly.
-
Wrap scarf twice around neck, add fringe.
-
Sew backpack on back, add straps over shoulders.
-
Place walking stick in hand.
🌟 Finishing Touches
-
Keep face simple with only safety eyes (no nose/mouth embroidery).
-
Adjust scarf fringe for even length.
-
Block hat brim flat if needed.
This amigurumi pilgrim doll is ready to journey far and wide with charm and character. A great project for autumn, storytelling sets, or heartfelt handmade gifts. 🌄🧵🗺️