Welcome to the Hundred Acre Wood of amigurumi! 🌸✨ Today, I’m delighted to share my free crochet pattern for Amigurumi Piglet—Winnie the Pooh’s timid but big-hearted best friend in perfectly pocket-sized form! Whether you’re a fan of classic children’s stories, love crafting sweet animal characters, or simply want to add some gentle charm to your handmade collection, this pattern will guide you through stitching your very own pink-hued friend with his signature striped shirt, floppy ears, and adorably worried expression.
This design captures Piglet’s delicate sweetness through soft curves and tiny details! 🧶💕 I’ve carefully outlined each step to ensure your little Piglet turns out just right—complete with his tiny trotters, oversized ears that flop with personality, and optional hunny pot or Pooh bear companion. Perfect for display, gifting to fellow A.A. Milne fans, or keeping as a reminder that even the smallest creatures have the biggest hearts! So grab your hooks, pick out the softest pink yarn, and let’s stitch up a friend who’s always brave in the end! ✨
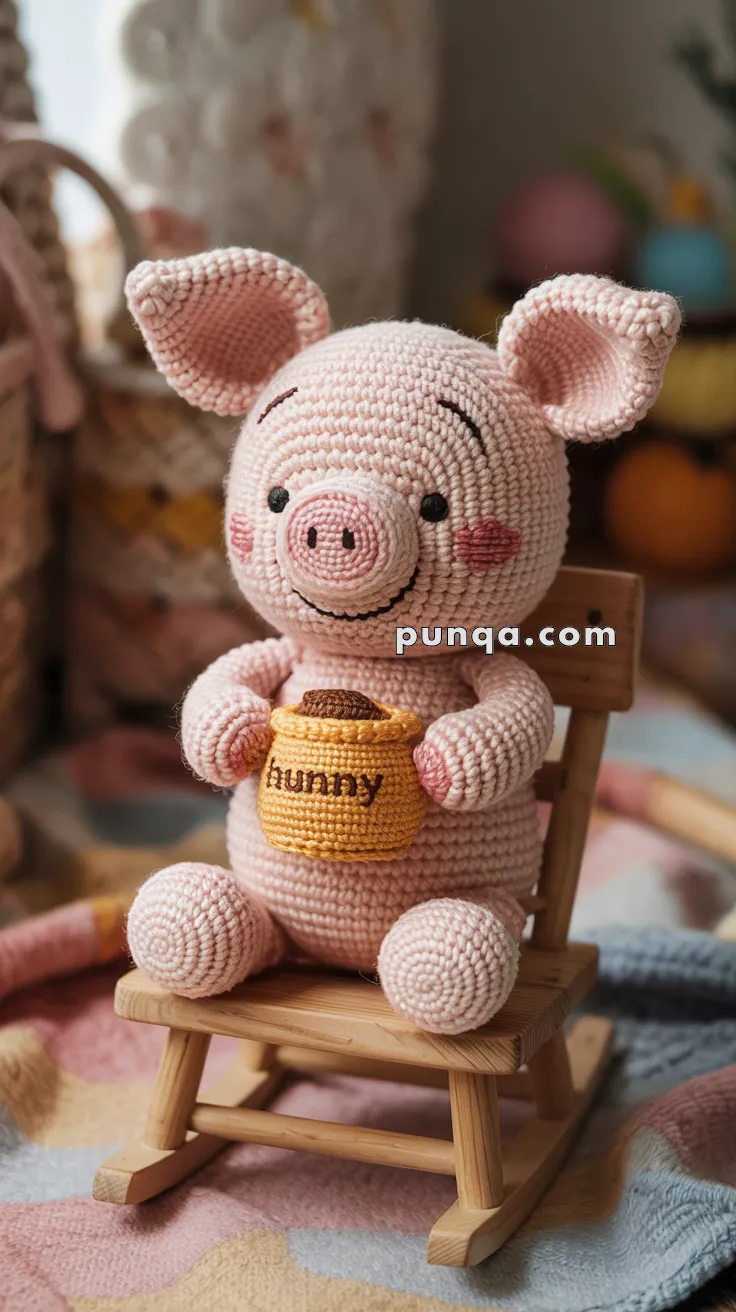
🐷 Amigurumi Piglet with “Hunny” Pot Crochet Pattern
Sweet, snuggly, and full of joy — this Amigurumi Piglet holding a tiny “hunny” pot is the ultimate cozy companion! 🧶
With floppy ears, rosy cheeks, and a gentle smile, this soft toy brings warmth to any space — perfect for gifting, nursery decor, or a handmade hug for someone special. 💕
✨ Skill Level
Intermediate – Includes shaping, embroidery, and assembling accessories.
📏 Finished Size
Approx. 8–10 inches (20–25 cm) tall when made with DK or worsted-weight yarn and a 2.75–3.5 mm hook.
🧶 Materials
- Light pink yarn – 60 g (head, body, limbs, ears)
- Darker pink yarn – small amount (nose detail, cheeks)
- Yellow yarn – 15 g (hunny pot)
- Brown yarn – 10 g (honey top and lettering)
- Black yarn – small amount (eyes, nostrils, mouth, eyebrows)
- Crochet hook: 2.75–3.5 mm
- 8 mm safety eyes or black embroidery yarn
- Polyfill stuffing
- Embroidery needle
- Stitch markers
🧵 Abbreviations (US Terms)
MR – Magic Ring
sc – Single Crochet
inc – Increase (2 sc in same stitch)
dec – Decrease (sc 2 together)
sl st – Slip Stitch
ch – Chain
BLO – Back Loop Only
FO – Fasten Off
🐽 Head (Light Pink)
1️⃣ MR, 6 sc
2️⃣ inc x6 (12)
3️⃣ (1 sc, inc) x6 (18)
4️⃣ (2 sc, inc) x6 (24)
5️⃣ (3 sc, inc) x6 (30)
6️⃣ (4 sc, inc) x6 (36)
7–13️⃣ sc around (36)
14️⃣ (4 sc, dec) x6 (30)
15️⃣ (3 sc, dec) x6 (24)
16️⃣ (2 sc, dec) x6 (18)
17️⃣ (1 sc, dec) x6 (12)
18️⃣ dec x6 (6)
Stuff firmly and close.
Insert safety eyes between R9–10, spaced about 6–7 stitches apart.
Embroider a gentle smile and short dark eyebrows above the eyes.
🐷 Snout (Light Pink)
1️⃣ MR, 6 sc
2️⃣ inc x6 (12)
3️⃣ (1 sc, inc) x6 (18)
4️⃣ sc around (18)
FO and lightly stuff.
Sew centered between eyes.
Embroider two vertical black nostrils.
👂 Ears (Make 2 – Light Pink)
1️⃣ MR, 6 sc
2️⃣ inc x6 (12)
3️⃣ (1 sc, inc) x6 (18)
4–6️⃣ sc around (18)
7️⃣ (1 sc, dec) x6 (12)
8️⃣ dec x6 (6)
Flatten slightly and sew to sides of head, angled slightly outward for a floppy look.
🧍 Body (Light Pink)
1️⃣ MR, 6 sc
2️⃣ inc x6 (12)
3️⃣ (1 sc, inc) x6 (18)
4️⃣ (2 sc, inc) x6 (24)
5️⃣ (3 sc, inc) x6 (30)
6–14️⃣ sc around (30)
15️⃣ (3 sc, dec) x6 (24)
16️⃣ (2 sc, dec) x6 (18)
17️⃣ (1 sc, dec) x6 (12)
Stuff firmly and FO.
Sew to head.
🐾 Arms (Make 2 – Light Pink)
1️⃣ MR, 6 sc
2️⃣ inc x6 (12)
3–4️⃣ sc around (12)
5️⃣ (1 sc, dec) x4 (8)
6–10️⃣ sc around (8)
Stuff lightly and FO.
Sew angled forward so the arms can “hold” the hunny pot.
🦵 Legs (Make 2 – Light Pink)
1️⃣ MR, 6 sc
2️⃣ inc x6 (12)
3️⃣ (1 sc, inc) x6 (18)
4–6️⃣ sc around (18)
7️⃣ (1 sc, dec) x6 (12)
8–10️⃣ sc around (12)
Stuff firmly and FO.
Sew slightly forward and outward to allow a seated position.
🐷 Cheeks (Make 2 – Darker Pink)
MR, 6 sc. FO.
Sew below eyes and slightly toward sides for blush spots.
🍯 “Hunny” Pot
Base (Yellow)
1️⃣ MR, 6 sc
2️⃣ inc x6 (12)
3️⃣ (1 sc, inc) x6 (18)
4️⃣ (2 sc, inc) x6 (24)
5–8️⃣ sc around (24)
9️⃣ BLO sc around (24) – creates rim line
10–11️⃣ sc around (24)
FO.
Honey Top (Brown)
1️⃣ MR, 6 sc
2️⃣ inc x6 (12)
3️⃣ sc around (12)
Stuff lightly, FO, and sew inside rim.
Lettering
Use brown or black yarn to embroider “hunny” on the front with a backstitch.
Attach pot between both arms using invisible sewing.
🐖 Tail (Optional – Light Pink)
Ch 6, sl st in each back to create a curly tail.
Sew to back center.
✂️ Assembly & Details
- Sew head firmly to body.
- Attach arms holding the pot securely to the front.
- Position legs for seated balance.
- Lightly blush cheeks with pink yarn or safe pastel.
- Add tiny eyebrows and a curved embroidered mouth.
💡 Customization Ideas
- Add a bow tie, shirt, or bib for a storybook touch.
- Use velvet or plush yarn for extra softness.
- Make a mini honey dipper as an accessory! 🍯
🌸 Outro
Your Amigurumi Piglet with Hunny Pot is ready to spread smiles! 🐷🍯
This adorable piglet is perfect for cozy storytelling corners, nursery decor, or heartfelt handmade gifts.
Each stitch brings a little sweetness — a reminder that simple things, like honey and hugs, make life wonderful. 💕