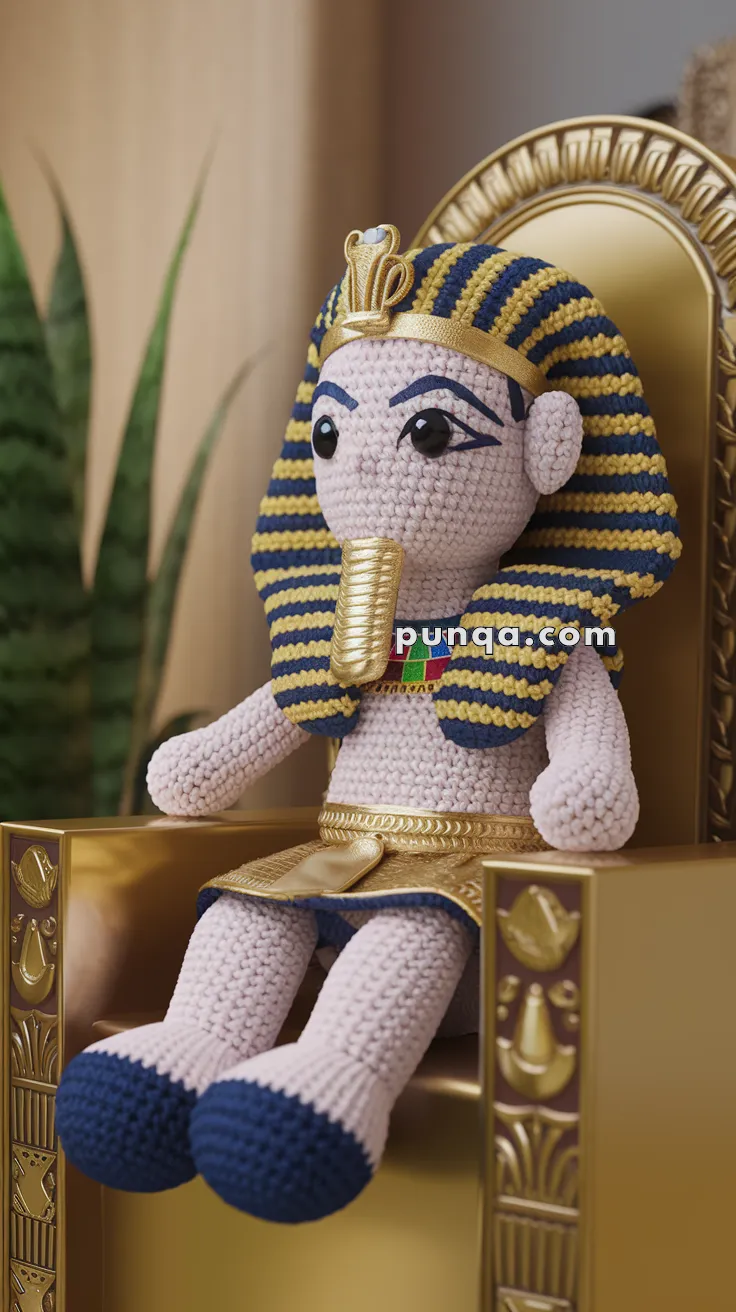
Step into the grandeur of ancient Egypt with this Amigurumi Pharaoh crochet pattern! Whether you’re inspired by history, mythology, or simply love regal figures, this free pattern lets you stitch up a majestic ruler. With its iconic headdress, intricate details, and stately presence, this amigurumi Pharaoh brings a touch of timeless elegance to your handmade collection. Perfect for history lovers, themed displays, or unique gifts, this project is a creative way to honor the rich legacy of the ancient world.
Designed for customization, this pattern allows you to explore different color palettes, embellishments, and decorative features to craft a Pharaoh fit for the ages. Add tiny embroidered jewelry, textured robes, or golden accents to enhance its royal aura! Whether displayed proudly, gifted as a special keepsake, or created as part of an ancient civilization-themed set, this amigurumi Pharaoh is a rewarding project that celebrates artistry and culture—one stitch at a time! 👑🧶✨
👑 Amigurumi Pharaoh Crochet Pattern
Step back into the glory of ancient Egypt with this majestic Pharaoh Amigurumi! With his striped gold-and-navy nemes headdress, ceremonial ribbed beard, ornate golden kilt, and iconic cobra emblem, this handmade figure is truly fit for a throne.
This project combines crochet with creative non-yarn embellishments for a regal finish, making it a showpiece you’ll be proud to display.
✨ Skill Level
Intermediate to Advanced – Requires shaping, color changes, and assembly. Includes non-yarn craft elements (explained step by step).
📏 Finished Size
Approx. 12–13 inches (30–33 cm) tall using DK or worsted yarn and a 2.5–3.5 mm hook.
🧶 Materials
-
Yarn (DK or Worsted)
-
Light beige/pale pink – skin
-
Navy blue – headdress & shoes
-
Gold – headdress stripes, belt, beard
-
Black – eyebrows, eyeliner, eye details
-
Red, green, blue – collar accents
-
-
Other Supplies
-
2.5–3.5 mm crochet hook
-
10 mm safety eyes
-
Polyester fiberfill stuffing
-
Tapestry needle
-
Stitch markers & scissors
-
Gold metallic ribbon (for kilt waistband)
-
Gold craft foam/felt (for cobra emblem)
-
Thin wire (for shaping cobra & beard curve)
-
Fabric glue or hot glue (to attach non-yarn details)
-
Optional: gold acrylic paint for extra shine
-
🧵 Abbreviations (US Terms)
-
MR = Magic Ring
-
sc = single crochet
-
inc = increase (2 sc in same st)
-
dec = decrease (invisible decrease)
-
sl st = slip stitch
-
ch = chain
-
BLO = back loop only
-
FO = fasten off
🧍 Body & Legs
Make 2 legs first (start with shoes).
Legs (x2 – start navy blue):
-
MR, 6 sc (6)
-
inc ×6 (12)
-
(1 sc, inc) ×6 (18)
4–6. sc around (18) -
Switch to skin color, sc around (18)
8–18. sc around (18)
FO 1st leg. For 2nd leg, don’t FO.
Join Legs → Body
-
Ch 4, sl st to join first leg, sc around both legs + chain (44 sts).
-
R2–15: sc around (44)
-
R16: (5 sc, dec) ×6 (38)
-
R17: (4 sc, dec) ×6 (32)
-
R18–20: sc around (32)
-
FO, stuff firmly.
🧠 Head
Skin color yarn
-
MR, 6 sc
-
inc ×6 (12)
-
(1 sc, inc) ×6 (18)
-
(2 sc, inc) ×6 (24)
-
(3 sc, inc) ×6 (30)
-
(4 sc, inc) ×6 (36)
7–16. sc around (36)
👉 Place safety eyes between R10–11, spaced ~8 sts apart. -
(4 sc, dec) ×6 (30)
-
(3 sc, dec) ×6 (24)
-
(2 sc, dec) ×6 (18)
Stuff firmly. -
(1 sc, dec) ×6 (12)
-
dec ×6 (6) → close.
💪 Arms (x2 – skin color)
-
MR, 6 sc
-
(1 sc, inc) ×3 (9)
3–16. sc around (9)
FO, stuff lightly, sew to shoulders.
🥿 Shoes (optional detail)
With black thread, embroider sandal-style lines across the navy shoe section.
👑 Nemes Headdress (Gold & Navy)
-
Ch 42 (wider than standard for shoulder drape).
-
Starting in 2nd ch, sc across (41).
3–40. Work in rows, alternating 2 rows navy, 2 rows gold for stripes.
👉 Shape: Slightly widen bottom corners by adding 1 inc at both ends of every 3rd row.
👉 Finish with gold trim along front edge (sc border).
Attach: Drape over head, secure at sides with sewing or glue.
🐍 Cobra Emblem (Non-Yarn)
-
Cut cobra shape from gold craft foam/felt (approx. 1.5 in tall).
-
Add wire backing so it stands upright.
-
Curve the hood and crown shape.
-
Optional: paint or glue a tiny blue bead for cobra eyes.
-
Glue/secure at center front of headdress.
👃 Pharaoh Beard (Photo-Accurate Ribbed)
Option 1 (crochet)
-
With gold yarn, ch 12.
-
Sc across (11).
3–10. Work sc rows in FLO → creates ridges. -
Roll into a tube, insert thin wire, curve slightly.
-
Sew under chin.
Option 2 (non-yarn)
-
Use stiff gold ribbon.
-
Wrap around wire, glue edges.
-
Score horizontal ridges with a blunt tool for texture.
🧣 Royal Collar
-
With red, blue, green yarn:
-
Ch 28, sc across (27).
-
Work 2–3 rows, switching colors for stripes.
-
-
FO and sew around neck.
🩳 Golden Kilt (with waistband)
Yarn Version:
-
Ch 24, sc across (23).
-
R2–10: sc across, work BLO rows every 2nd row to create pleats.
-
FO, wrap around waist, sew in place.
-
Add gold ribbon at top for waistband.
Non-Yarn Version (photo-accurate):
-
Cut a rectangle from metallic gold fabric.
-
Pleat manually and stitch/glue pleats.
-
Add a waistband strip of gold ribbon or foam with embossed detail.
🖌 Facial Embroidery
-
Eyebrows: With black yarn, embroider thick angled brows above eyes.
-
Eyeliner: Extend a long black line from eye corners outward.
-
Mouth: Optional small stitched smile.
✨ Assembly
-
Sew head to body.
-
Attach arms.
-
Place headdress over head → secure.
-
Attach ribbed beard under chin.
-
Add cobra emblem to headdress.
-
Dress with collar & golden kilt.
🌟 Final Touch
Your Pharaoh is now complete! Regal, detailed, and historically inspired — perfect for display on a throne or as the centerpiece of an ancient Egyptian crochet set.
💡 Pro Tip: Make a cardboard or foam throne wrapped in gold paper for the ultimate display scene.