Step into the ring with yarn and flair using this Amigurumi Hulk Hogan Wrestler crochet pattern! With his iconic mustache, bandana, and championship-ready pose, this miniature wrestling legend is ready to body-slam his way into your handmade collection. Whether you’re crafting for a wrestling fan, adding to a pop culture display, or simply love bringing bold personalities to life in yarn, this project packs a punch of nostalgia and fun. 🧶💪🎤
Designed for charisma and detail, this pattern invites you to explore sculpted shaping, expressive features, and playful extras like tiny sunglasses, a belt, or even a crocheted microphone. Customize his outfit with classic red and yellow or go wild with your own wrestling-inspired palette. Whether perched on a shelf, nestled in a gift basket, or starring in a handmade wrestling ring scene, this Hulk Hogan Amigurumi is a joyful and satisfying project—perfect for stitching up a little handmade showmanship, one loop at a time! 💖✨🏆
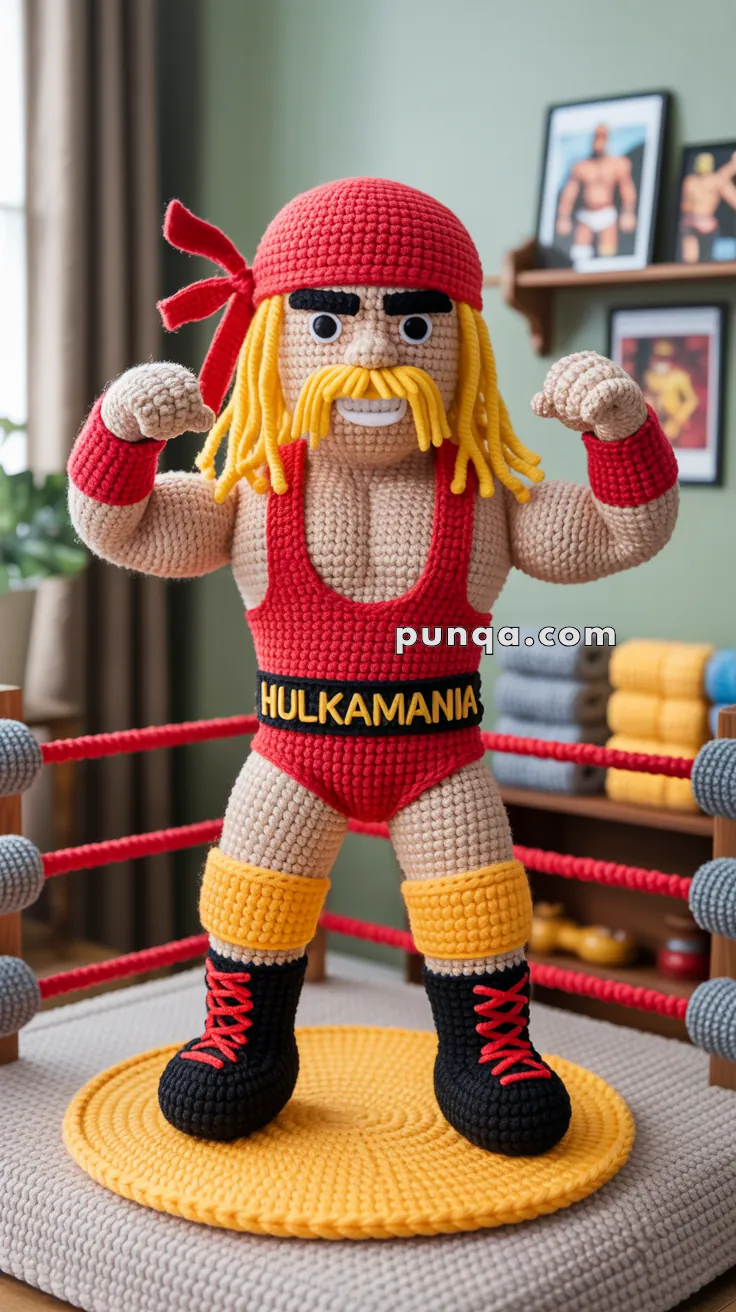
💪 Amigurumi Hulk Hogan Wrestler Crochet Pattern
Bring iconic wrestling energy to your collection with this powerful amigurumi Hulk Hogan-inspired doll! From the trademark mustache to the bold red outfit and flexed arms, he’s ready for action in the ring. Whether you’re a wrestling fan or love making statement dolls, this one’s a real showstopper!
✨ Skill Level
Intermediate – includes color changes, shaping, and assembling small parts.
📏 Finished Size
Approximately 10–12 inches (25–30 cm) tall using DK or worsted weight yarn and a 2.5–3.5 mm hook.
🧶 Materials
- Yarn (Worsted weight or DK):
- Skin tone (Body)
- Red (Outfit, wristbands, headband)
- Yellow (Hair, mustache, knee pads, belt lettering)
- Black (Boots, belt)
- White (Teeth, eye whites)
- Crochet hook: 2.5–3.5 mm
- Safety eyes (10–12 mm) or black yarn
- Fiberfill stuffing
- Tapestry needle
- Stitch marker
- Scissors
- Hot glue (optional for secure assembly)
🧵 Abbreviations (US Terms)
- MR – Magic Ring
- sc – Single Crochet
- inc – Increase (2 sc in one stitch)
- dec – Decrease (single crochet 2 together)
- sl st – Slip Stitch
- ch – Chain
- st – Stitch
- FO – Fasten Off
- BLO – Back Loop Only
🧍♂️ Head
With skin tone yarn:
- R1: MR, 6 sc (6)
- R2: inc around (12)
- R3: (sc, inc) x6 (18)
- R4: (2 sc, inc) x6 (24)
- R5: (3 sc, inc) x6 (30)
- R6–14: sc around (30)
- R15: (3 sc, dec) x6 (24)
- R16: (2 sc, dec) x6 (18)
- Add safety eyes between R10–11, about 6–7 sts apart.
- R17: (sc, dec) x6 (12)
- R18: dec around (6), FO and close.
Stuff firmly.
🧔 Mustache
With yellow yarn:
Make 2 strands:
- Ch 7, sc in each chain across (6), FO.
- Sew both just under the nose area, curving downward.
😁 The Hulk Hogan Smile Teeth
🧶 Option 1: Crocheted Teeth (for full-yarn dolls)
This method keeps it all yarn and is ideal for crochet purists.
Materials:
- White yarn (same weight as body)
- Crochet hook (same size as rest of doll)
- Tapestry needle
- Stitch marker
Pattern:
- Ch 7
- R1: Starting in 2nd ch from hook, sc in each ch (6)
- R2–3: sc across (6)
- FO and leave long tail for sewing
➡️ This creates a flat rectangle that looks like a toothy strip.
➡️ For extra realism, embroider a single vertical line or two to mimic tooth divisions if desired.
Attach:
- Position horizontally just under the mustache or above the lower lip.
- Lightly sew it into the space between upper and lower lip.
- Curve the ends slightly to match the rounded smile.
🧵 Option 2: Felt Teeth (easy & clean)
Materials:
- Thin white felt sheet
- Small scissors
- Fabric glue or invisible thread
- Optional: black embroidery thread for tooth lines
Steps:
- Cut a rounded rectangle about 1 cm x 2.5 cm (or sized to face)
- Optional: Stitch or draw 1–2 vertical lines for tooth divisions
- Carefully glue or stitch it into the face opening
➡️ This method gives the cleanest comic-style “grin” look—perfect for character dolls like this one.
✂️ Optional: Crochet Lip Frame
To frame the teeth like in the image:
- Use light pink or skin-tone yarn
- Embroider or crochet a thin strip (ch 7, sc across) and sew above and below the teeth to define the lips
📌 Final Tip
Always pin the teeth first and preview the grin before attaching. This lets you adjust the curve or trim the shape for the perfect Hulk Hogan smirk!
💇 Hair (Strips)
With yellow yarn:
Make about 15–20 hair strands.
- Ch 10–14, sl st back down. FO.
- Attach strands along the sides and back of the head, leaving the top bare for the headband.
🧣 Headband
With red yarn:
- Ch 40, sc in each st across. FO.
- Wrap around head and tie to one side.
- Optional: Crochet two small triangle pieces for tails and attach.
💪 Arms (Make 2)
With skin tone yarn:
- R1: MR, 6 sc (6)
- R2: inc around (12)
- R3–6: sc around (12)
- R7–8: switch to red for wristbands, sc around (12)
- R9–18: skin tone, sc around (12)
- FO and stuff lightly.
- Bend slightly at wrist before attaching.
✋ Fingers and Hands
Each hand has 4 fingers + 1 thumb, all curled into a fist shape. Here’s how to replicate that exactly:
🖐 Finger (Make 4 per hand)
Use skin tone yarn.
- R1: MR, 5 sc (5)
- R2–3: sc around (5)
- FO, leave a long tail.
➡️ Do not stuff or stuff very lightly. You want them to stay flexible to curl into a fist. Weave the tail through to help curve it slightly.
👍 Thumb (Make 1 per hand)
- R1: MR, 4 sc (4)
- R2: sc around (4)
- FO, leave a long tail.
This piece is shorter and placed on the side of the palm.
✊ Palm / Hand Base
- R1: MR, 6 sc (6)
- R2: inc around (12)
- R3: (sc, inc) x6 (18)
- R4–5: sc around (18)
- FO and leave tail for attaching to the arm.
🧷 Assembly Fingers
- Arrange 4 fingers in a curved row to resemble a curled fist.
- Use the long tails to tack them onto the top front half of the palm, side by side.
- Curve them inward slightly and stitch in place, one by one.
- Attach the thumb on the side of the palm, curling slightly upward and inward as in a classic cartoon fist.
- Lightly stuff the palm if needed and sew the whole hand securely to the arm.
🛠 Tips for Shaping
- You can lightly block or bend the fingers before attaching to give a more lifelike pose.
- For extra curl, run the yarn tail through the finger and pull slightly to curve it before stitching.
- Use invisible or whip stitch for finger-to-palm joining so the seam disappears.
🧍 Body
Start at torso with red yarn:
- R1: MR, 6 sc (6)
- R2: inc around (12)
- R3: (sc, inc) x6 (18)
- R4: (2 sc, inc) x6 (24)
- R5: (3 sc, inc) x6 (30)
- R6–12: sc around (30)
- Switch to skin tone:
- R13–20: sc around (30)
- FO and stuff firmly.
🦵 Legs (Make 2)
Start with black yarn for boots:
- R1: MR, 6 sc
- R2: inc around (12)
- R3: (sc, inc) x6 (18)
- R4–6: sc around (18)
- Switch to yellow for sock top:
- R7–8: sc around (18)
- FO and stuff.
Sew both legs to the bottom of the body.
🧵 Boot Laces
With red yarn:
- Embroider or surface-crochet criss-cross laces on front of boots.
🟨 Belt
With black yarn:
- Ch 30, sl st to form a band
- FO, wrap around waist and stitch in place.
For “HULKAMANIA” letters:
- Embroider with yellow yarn or use felt cutouts glued in place.
🩲 Outfit Bottom
- With red yarn, sc a small triangular shape to fill between the legs.
- Optional: Stitch red to the back like wrestling trunks coverage.
💪 Assembly
- Sew arms to the side of the body in flexed pose.
- Attach head to top of body securely.
- Add eyebrows with black yarn.
- Add white rectangle (teeth) under mustache.
- Attach hair and headband as described above.
- Wrap belt around waist.
- Sew legs and boots flat for stable standing.
🎉 Final Touches
Pose him in a classic flexed stance in a mini crochet wrestling ring or on a round yellow base like shown in the photo. This eye-catching wrestler is bound to steal the show!
Let your imagination run wild—add a crochet microphone, championship belt, or mini fans for a full wrestling scene!