Amigurumi Green Frog – FREE Crochet Pattern

Amigurumi Green Frog – FREE Crochet Pattern
Spread the love

Crafting an amigurumi green frog is one of the most delightful experiences for any crochet enthusiast, and I can’t help but share my excitement about it! 🐸 The charm of these whimsical little creatures lies in their ability to bring a touch of playfulness and joy into our lives. When I think about creating one, I picture its big, friendly eyes and a cheeky grin that seems to invite endless adventures. Amigurumi, a Japanese art form, combines creativity with meticulous technique, allowing me to sculpt these adorable characters using just yarn and a crochet hook. There’s something magical about watching a simple ball of yarn transform into a whimsical frog that can brighten anyone’s day.

The process of creating a green frog amigurumi starts with choosing the perfect shade of green yarn, which somehow always feels like the first step of a grand adventure. 🧢 As I crochet, each stitch becomes a part of the frog’s personality, with its body taking shape as I work through the pattern. It’s a meditative journey that requires patience and precision but offers immense satisfaction as the pieces come together. The best part? Adding those final touches, like the characteristic eyes and a little smile, is when the frog truly comes to life. Each completed frog is a testament to the joy of crafting and the endless possibilities of what a few skeins of yarn can become.
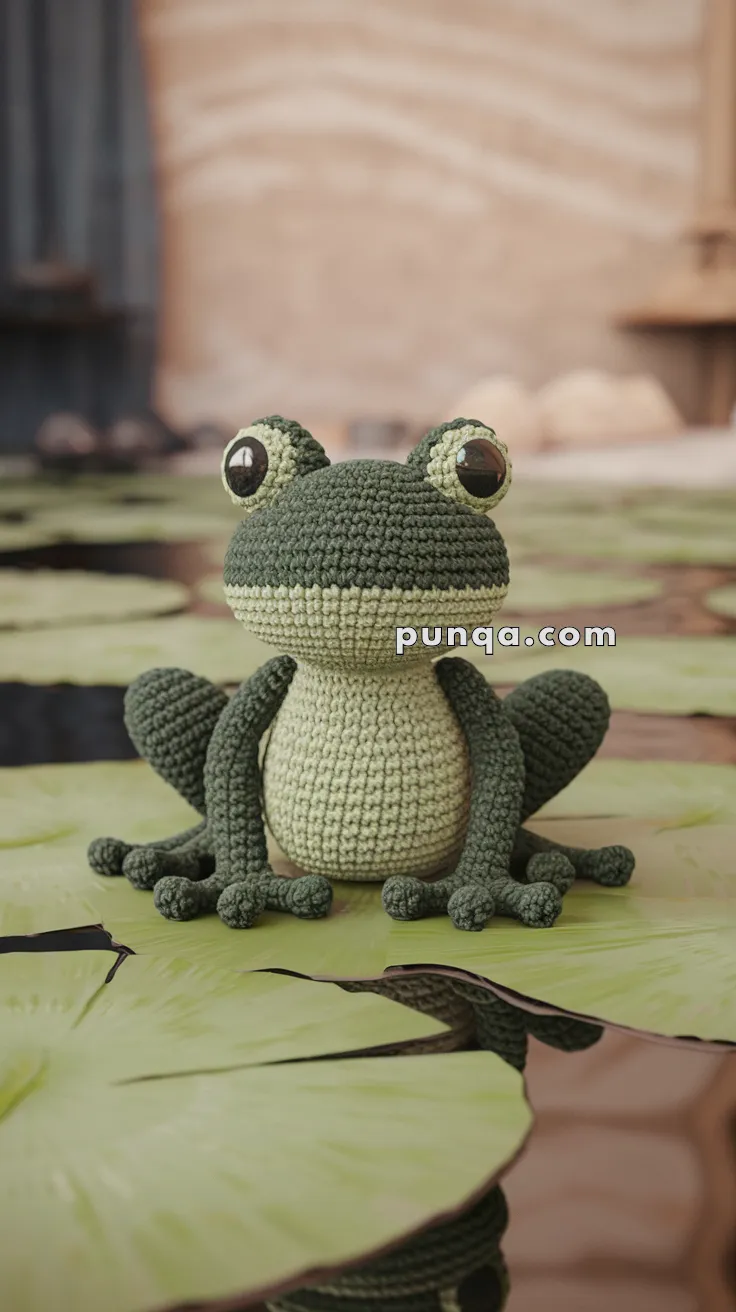
Realistic crochet image for Amigurumi Green Frog - FREE Crochet Pattern

🐸 Adorable Amigurumi Frog Pattern

Crochet your very own adorable frog friend with this detailed amigurumi pattern! With its big shiny eyes, squat little body, and long limbs, this frog is ready to hop right into your heart. Perfect as a nature-inspired gift or charming decor for your desk or shelf!


πŸ“ Finished Size

Approximately 16–18 cm (6–7 inches) tall using DK yarn and a 2.5 mm hook.

🧢 Skill Level

Intermediate – Includes shaping, color changes, and assembly of separate limbs and eyes.


🧡 Materials Needed

  • DK weight cotton yarn:

    • Dark green (main color)

    • Light green (belly and eye ridges)

  • 2.5 mm crochet hook

  • Safety eyes (12 mm or embroidered if preferred)

  • Stuffing

  • Yarn needle

  • Stitch markers

  • Scissors

  • Optional: Black embroidery thread (mouth line)


πŸͺ‘ Abbreviations (US Terms)

  • MR – Magic Ring

  • ch – Chain

  • sc – Single crochet

  • inc – Increase (2 sc in 1 stitch)

  • dec – Decrease (sc 2 together)

  • BLO – Back loops only

  • FO – Fasten off


✨ Pattern Instructions


🐸 Head & Body (worked in one piece)

Start with light green (belly):

  1. MR, 6 sc [6]

  2. inc Γ— 6 [12]

  3. (sc, inc) Γ— 6 [18]

  4. (2 sc, inc) Γ— 6 [24]

  5. (3 sc, inc) Γ— 6 [30]
    6–10. sc around [30]
    Switch to dark green (top):

11–17. sc around [30]
18. (3 sc, dec) Γ— 6 [24]
19. (2 sc, dec) Γ— 6 [18]
20. (sc, dec) Γ— 6 [12]
21. dec Γ— 6 [6]
Stuff firmly, FO and close.


πŸ‘ Eye Bulges (Make 2)

With light green:

  1. MR, 6 sc [6]

  2. inc Γ— 6 [12]
    3–4. sc around [12]
    Insert safety eyes in center of each, stuffing lightly. FO, leaving tail for sewing.


πŸ‘‚ Eye Ridges (Optional Eyelid Bump)

With light green:

  1. ch 6

  2. sc in 2nd ch from hook and across [5]
    FO and sew along upper eye edge.


🦡 Back Legs (Make 2)

With dark green:

  1. MR, 6 sc [6]

  2. inc Γ— 6 [12]
    3–5. sc around [12]

  3. (2 sc, dec) Γ— 3 [9]
    7–9. sc around [9]

  4. Flatten and sc across both sides to close [4]
    FO, leave tail. Stuff and sew toward bottom back corners of the body.


🀲 Front Legs (Make 2)

With dark green:

  1. MR, 6 sc [6]

  2. inc Γ— 6 [12]
    3–4. sc around [12]

  3. (sc, dec) Γ— 4 [8]
    6–8. sc around [8]

  4. Flatten and sc across [4]
    Stuff lightly, FO, and sew toward the front of the belly.


🐾 Toes (Make 3 toes per foot)

With dark green:

  1. MR, 5 sc [5]
    2–3. sc around [5]
    FO. Sew each toe to bottom of legs, arranging in a Y-shape. Repeat for all 4 limbs.


πŸ˜„ Face

  • Use black embroidery thread to stitch a small smile line if desired.

  • Sew eye bulges to the top sides of the head, slightly raised.

  • Attach eyelid ridges if making them.

  • Weave in all loose ends securely.


🌟 Assembly Tips

  • Use pins to position legs and eyes before sewing to ensure symmetry.

  • Keep stuffing firm in the body and softer in the limbs for natural posing.


🐸 Your Froggy Friend is Ready!

Whether he’s relaxing on a lily pad or sitting proudly on your shelf, this froggy companion is sure to make everyone smile. πŸͺ·


Spread the love