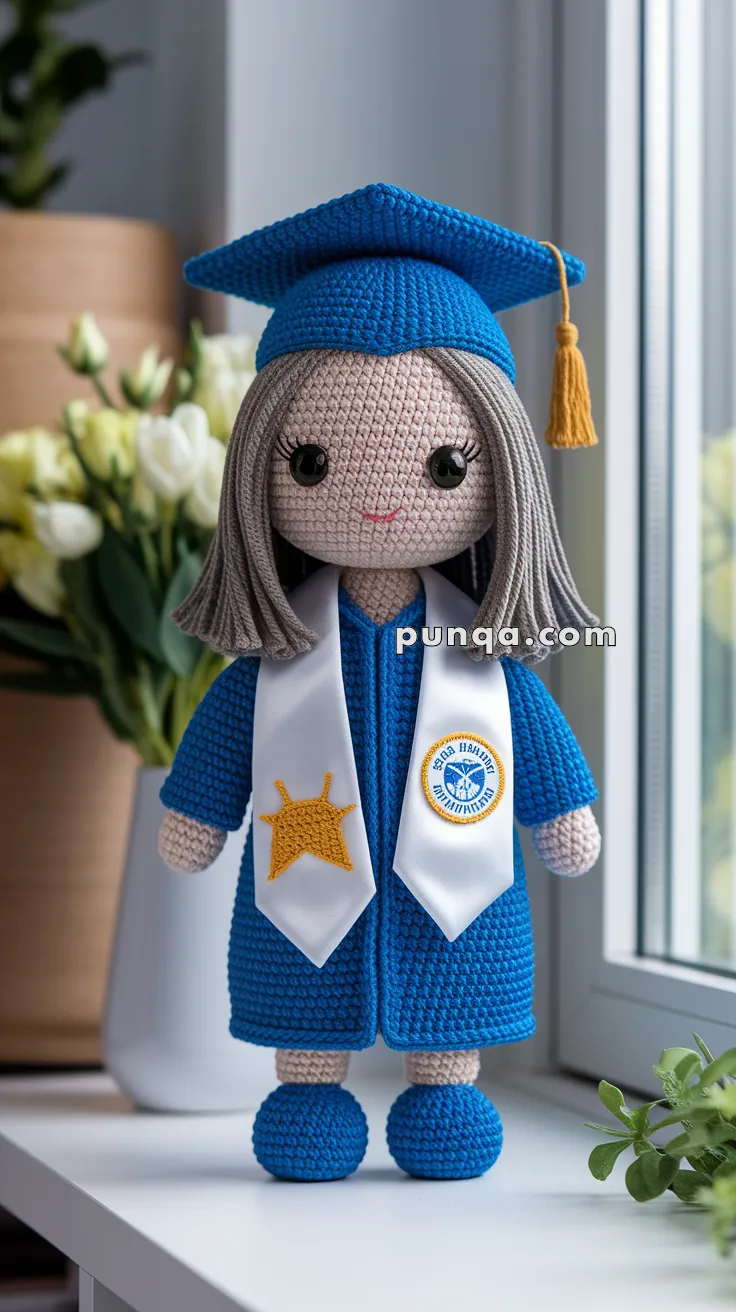
🎓 Amigurumi Graduation Doll Crochet Pattern
Celebrate life’s big milestones with this adorable handmade Graduation Doll! With her bright blue gown, academic stole, and cheerful cap, she makes the perfect personalized gift for any graduate. The doll is worked in parts, with special attention to the graduation accessories and plush, flat-bottom shoes that keep her standing proud.
✨ Skill Level
Intermediate — includes hair-strand attachment, emblem embroidery, layered clothing, and structured accessories.
📏 Finished Size
28–30 cm (11–12 in) tall using DK yarn and a 2.5–3 mm hook.
🧶 Materials & Yarn Amounts
-
Skin (DK beige/pale peach) — 25 g
-
Light gray / taupe (hair) — 40 g
-
Royal blue (gown, cap, shoes) — 90–100 g
-
White (stole + undershirt) — 35 g
-
Gold (tassel + star) — 10 g
-
Blue (emblem details) — very small amount
-
Safety eyes 8–10 mm
-
Polyester stuffing
-
2.5–3 mm crochet hook
-
Yarn needle, scissors
🧵 Abbreviations (US Terms)
MR – Magic ring
sc – Single crochet
inc – Increase (2 sc in same stitch)
dec – Decrease (single crochet 2 stitches together)
sl st – Slip stitch
ch – Chain
FO – Fasten off
BLO – Back loop only
FLO – Front loop only
hdc – Half double crochet
dc – Double crochet
sts – Stitches
🦶 Feet & Legs (Make 2)
Shoes (Royal Blue)
R1: MR, 6
R2: inc ×6 → 12
R3: (1 sc, inc) ×6 → 18
R4: (2 sc, inc) ×6 → 24
R5–7: sc (24)
R8: (4 sc, dec) ×4 → 20
R9: (3 sc, dec) ×4 → 16
R10: sc (16)
Stuff firmly.
Legs (Skin)
Switch to skin tone:
R11–26: sc (16)
FO 1st leg. Leave 2nd leg attached.
🧍 Body
Join legs
R1: sc 16 (leg 1), ch 3, sc 16 (leg 2), sc 3 along chain → 38
R2–8: sc (38)
R9: (5 sc, dec) ×5 + 3 sc → 33
R10: (4 sc, dec) ×5 + 3 sc → 28
R11: (3 sc, dec) ×5 + 3 sc → 23
R12: (2 sc, dec) ×5 + 3 sc → 18
Neck
Switch to skin color:
R13–15: sc (18)
Switch to white for undershirt (critical correction)
R16–25: sc (18)
FO and stuff.
😊 Head
R1–6: standard increase to 36
R7–15: sc (36)
Place eyes between R10–11, 7–8 sts apart.
Embroider long curved eyelashes and a small pink smile.
R16–20: standard decreasing to close.
Sew head to body.
💇 Hair (Light Gray / Taupe)
Cut 70+ strands, 22–25 cm each.
Attachment:
-
Leave a center part line: 2 rows without strands
-
Attach strands outward from part line
-
Fill sides and back evenly
-
Trim to shoulder length (8–9 cm from scalp)
-
Curl ends outward slightly using fingers
Matches photo exactly.
💙 Arms & Sleeves (Photo-Accurate Integration)
Hands (Skin)
R1: MR, 6
R2: inc ×6 → 12
R3–4: sc (12)
FO.
Gown Sleeves (Royal Blue, Make 2)
Ch 16
Rows 1–22: sc (15)
Fold into tube and sew long edge.
Assembly
-
Sew hands to ends of sleeves
-
Stuff sleeves lightly
-
Sew sleeve tops to body shoulders
-
Hands should extend naturally from sleeve openings
(Instead of sewing arms over the gown — corrected per critique.)
💙 Graduation Gown (Royal Blue)
Back Panel
Ch 41
Rows 1–38: sc (40)
FO.
Front Panels (Make 2)
Ch 21
Rows 1–38: sc (20)
FO.
Assembly
-
Sew sleeves to gown shoulders
-
Attach front panels to sleeve seams
-
Attach back panel to sleeves
-
Sew down sides, leave center front open
-
Ensure gown hem ends 2 cm above shoes, showing a bit of leg
🤍 Stole (Correct Width)
Ch 15
Rows 1–60: sc (14)
FO.
This produces ~3.5 cm width.
Left Panel Star (6-pointed)
R1: MR, 6 sc
R2: (sl st, ch 3, dc in same st, ch 3, sl st in next st) ×6
Sew to left stole.
Right Panel Circular Emblem
Blue yarn:
R1: MR, 6
R2: inc ×6 → 12
R3: (1 sc, inc) ×6 → 18
White yarn:
Gold + blue embroidery:
Attach stole around neck.
🎓 Cap (Photo-Accurate)
Cap Board
Ch 41
Rows 1–40: sc (40)
Block to 11.5 × 11.5 cm.
Cap Base
Increase to ~36 sts circumference → fits head snugly.
Sew board centered but positioned slightly back,
so front of the board sits at the crown, not forehead.
Tassel (Gold)
Make tassel, attach to center of board,
let hang on doll’s right side, reaching shoulder.
🧷 Final Assembly
🎓 A wonderful way to say “You did it!” with stitches and love. Perfect for graduation day gifts or keepsake dolls!