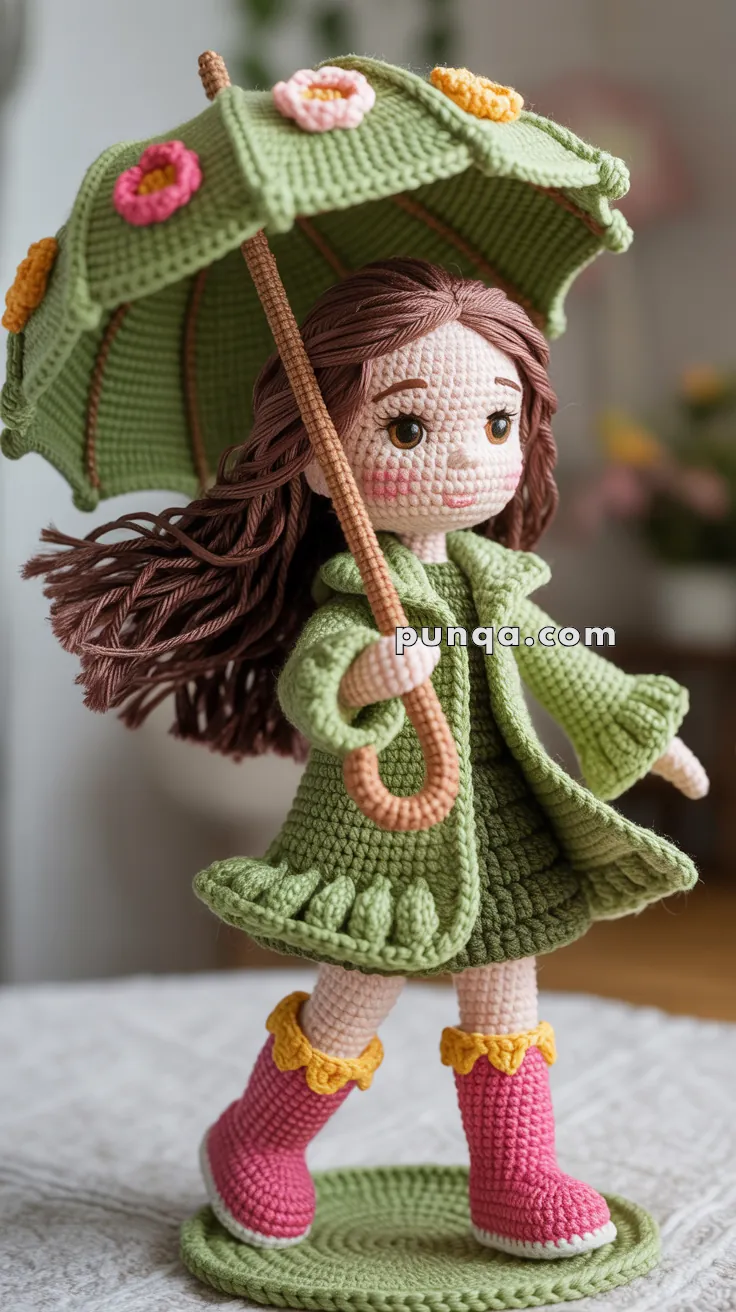
Step into a rainy day fairytale with this Amigurumi Girl with Umbrella crochet pattern! Dressed in a cozy outfit and holding her dainty umbrella high, this sweet little doll is ready to brighten even the cloudiest skies. With her gentle smile, rosy cheeks, and whimsical charm, she’s perfect for seasonal décor, heartfelt gifts, or simply adding a touch of storybook magic to your handmade collection. 🧶☔👧
Designed for detail and delight, this pattern invites you to explore soft textures, expressive features, and fun extras like rain boots, a matching hat, or even a tiny puddle to splash in. Customize her umbrella with cheerful colors or add embroidered raindrops for a playful twist. Whether perched on a shelf, nestled in a gift basket, or starring in a handmade rainy day scene, this Girl with Umbrella Amigurumi is a joyful and satisfying project—perfect for stitching up a little handmade sunshine, one loop at a time! 💖✨🌧️
☔ Amigurumi Girl with Umbrella Crochet Pattern
Create this enchanting rainy-day companion with flowing windswept hair, an open-front ruffled green coat over a dress, cheerful pink boots with yellow trim, and a flower-adorned umbrella!
✨ Skill Level
Advanced Intermediate – Includes shaping, ruffles, surface work, and multi-part assembly
📏 Finished Size
Approximately 10–12 inches (25–30 cm) tall including umbrella
🧶 Materials Needed
Yarn: Sport or DK weight cotton or acrylic (50g ≈ 130-150m)
- Light peach/beige (skin): 45g
- White or cream (legs): 30g
- Auburn/reddish-brown (hair): 65g
- Olive green (coat/dress/base): 140g
- Light green (umbrella): 70g
- Hot pink (boots): 40g
- Yellow (boot trim): 20g
- Tan/brown (umbrella handle): 15g
- Pink, yellow, orange (flowers): 10g each
- Black (embroidery): 5g
Other Supplies:
- 2.25 mm crochet hook (doll)
- 2.5–3.0 mm crochet hook (umbrella)
- 8–9 mm black safety eyes (2)
- Polyester fiberfill stuffing
- Tapestry needle
- Stitch markers
- Wooden dowel or thick wire (20 cm)
- Heavy cardboard or wooden disc (12 cm diameter)
- Hot glue gun
- Pink blush or embroidery thread
- Black embroidery thread
🧵 Abbreviations
US terminology:
- MR – Magic ring
- ch – Chain
- sc – Single crochet
- inc – Increase (2 sc in same stitch)
- dec – Decrease (sc 2 together)
- sl st – Slip stitch
- BLO – Back loop only
- FLO – Front loop only
- hdc – Half double crochet
- dc – Double crochet
🎀 Pattern Instructions
🧍 Head
Yarn: Light peach
Hook: 2.25 mm
- MR, 6 sc (6)
- inc around (12)
- (sc, inc) x6 (18)
- (2 sc, inc) x6 (24)
- (3 sc, inc) x6 (30)
- (4 sc, inc) x6 (36)
- sc around (36)
- sc around (36)
- sc around (36)
- sc around (36)
- sc around (36)
- sc around (36)
- (4 sc, dec) x6 (30)
- (3 sc, dec) x6 (24)
Insert 8–9mm safety eyes between rounds 8 and 9, about 7–8 stitches apart. Stuff head very firmly.
- (2 sc, dec) x6 (18)
- (sc, dec) x6 (12)
- dec around (6)
Fasten off, leaving long tail. Weave through remaining stitches and pull tight to close.
Face Embroidery:
- Eyebrows: Brown yarn, curved shape above eyes (3–4 short stitches each)
- Eyelashes: Black thread, 4–6 radiating stitches at outer corner of each eye
- Nose: Peach yarn, small vertical line (3–4 tiny stitches) between and below eyes
- Mouth: Brown or pink yarn, small curved smile
- Cheeks: Pink blush or embroidered circles
👂 Ears
Yarn: Light peach
Make 2
- MR, 4 sc, sl st (4)
Fasten off with long tail. Sew to sides of head at eye level, between rounds 8–10.
💇 Hair
Yarn: Auburn/reddish-brown (warm reddish tones)
Cut 160–200 strands, each 26–32 cm long for dramatic flowing effect.
Attachment (fringe method):
Insert hook through stitch from front to back, fold strand in half, pull loop through, pull ends through loop, tighten.
Coverage:
- Rounds 2–4: Every stitch across front (hairline/bangs)
- Rounds 5–8: Every stitch around entire head
- Rounds 9–13: Every stitch for length and volume
- Extra volume: Go through crown stitches (rounds 6–8) twice with additional strands
Styling:
Separate strands gently. Sweep entire mass of hair dramatically to one side (left side in photo) and forward over shoulder. Dampen with water mixed with a few drops of fabric stiffener, arrange in flowing waves cascading down, let air dry completely.
👗 Body and Inner Dress
Yarn: Olive green
Hook: 2.25 mm
Work from neck down in continuous rounds
- ch 20, join with sl st to form ring (20)
- sc around (20)
- sc around (20)
- sc around (20)
- (3 sc, inc) x5 (25)
- sc around (25)
- sc around (25)
- (4 sc, inc) x5 (30)
- sc around (30)
- sc around (30)
- sc around (30)
- BLO – sc around (30) creates waist definition
- sc around (30)
- sc around (30)
- sc around (30)
- (3 sc, dec) x6 (24)
- sc around (24)
- (2 sc, dec) x6 (18)
Stuff body very firmly. Fasten off with long tail for sewing to head.
Dress ruffle at waist:
Return to round 12, work into unused FLO. Join green yarn, work (hdc, ch 1) in each st around. Sl st to first hdc. Fasten off.
🦵 Legs with White Tights
Yarn: White or cream
Hook: 2.25 mm
Make 2
- MR, 6 sc (6)
- sc around (6) 3–15. sc around (6) work 15 rounds total
Stuff lightly for flexibility. Fasten off with long tail. Sew to bottom of body, positioning legs slightly apart.
✋ Hands
Yarn: Light peach
Hook: 2.25 mm
Make 2
- MR, 5 sc (5)
- sc around (5)
- sc around (5)
- inc around (10)
- sc around (10)
Stuff lightly. Fasten off with long tail.
For umbrella-holding hand: Before completely closing, insert umbrella handle through center (rounds 2–3). Wrap peach yarn around handle inside hand 10–12 times to create secure grip. Then finish stuffing and close.
Set both hands aside.
🧥 Open-Front Coat with Sleeves
Yarn: Olive green
Hook: 2.25 mm
This coat is worked FLAT (in rows) to create the open front visible in the photo.
Coat Body:
Foundation: ch 30
Row 1: hdc in 2nd ch from hook and across (29), ch 1, turn
Row 2: hdc across (29), ch 1, turn
Row 3: hdc across (29), ch 1, turn
Row 4: hdc across (29), ch 1, turn
Row 5: hdc across (29), ch 1, turn
Row 6: hdc across (29), ch 1, turn
Creating armholes:
Row 7: hdc in first 6 sts, ch 7 (armhole), skip 6 sts, hdc in next 11 sts (back), ch 7 (armhole), skip 6 sts, hdc in last 6 sts, ch 1, turn
Row 8: hdc across, working hdc in each chain and stitch (35 total), ch 1, turn
Row 9: hdc across (35), ch 1, turn
Row 10: hdc across (35), ch 1, turn
Flaring the skirt:
Row 11: 2 hdc in first st, hdc across to last st, 2 hdc in last st (37), ch 1, turn
Row 12: hdc across (37), ch 1, turn
Row 13: 2 hdc in first st, hdc across to last st, 2 hdc in last st (39), ch 1, turn
Row 14: hdc across (39), ch 1, turn
First ruffle tier:
Row 15: (hdc, ch 1, hdc) in each st across, ch 2, turn
Second ruffle tier (bottom edge):
Row 16: Working into hdc sts from previous row (skip chains), work (2 dc, ch 1, 2 dc) in each hdc across for dramatic ruffle
Fasten off.
Collar and front edge ruffles:
Attach green yarn to top right corner of coat. Work (hdc, ch 1) across the neckline edge. Then work (sc, ch 1) down the right front edge, across the bottom ruffle edge, and up the left front edge. Sl st at top left corner. Fasten off.
Sleeves (make 2):
Round 1: Attach green yarn to one armhole opening, work 20 sc evenly around armhole (20)
Rounds 2–7: sc around (20)
Round 8: (sc, inc) x10 (30)
Sleeve ruffle:
Round 9: (hdc, ch 1, hdc) in each st around (30)
Sl st to first hdc. Fasten off. Repeat for second sleeve.
Attaching hands to sleeves:
Insert hands into sleeve openings from inside, fingers pointing forward. Stitch hands securely around sleeve edge, ensuring natural positioning.
👢 Pink Boots with Yellow Ruffle
Yarn: Hot pink, yellow
Hook: 2.25 mm
Make 2
Sole:
Round 1: With hot pink, ch 9. In 2nd ch from hook: 7 sc, 3 sc in last ch. On opposite side: 6 sc, 2 sc in last ch (18)
Round 2: inc, 6 sc, 3 inc, 6 sc, 2 inc (24)
Round 3: sc, inc, 6 sc, (sc, inc) x3, 6 sc, (sc, inc) x2 (30)
Round 4: BLO – sc around (30) creates sole definition
Shaping:
Round 5: sc around (30)
Round 6: 9 sc, (dec) x6, 9 sc (24)
Round 7: 8 sc, (dec) x4, 8 sc (20)
Round 8: sc around (20)
Boot shaft:
Rounds 9–13: sc around (20) work 5 rounds
Switch to yellow for top ruffle:
Round 14: FLO – (hdc, ch 1, hdc) in each st around (20)
Sl st to first hdc. Fasten off with long tail.
Stuff boots firmly in foot area only. Insert white legs deep into boots and stitch securely around top opening.
☂️ Umbrella Dome with Ribs
Yarn: Light green
Hook: 2.5–3.0 mm
Dome base:
- MR, 8 sc (8)
- inc around (16)
- (sc, inc) x8 (24)
- (2 sc, inc) x8 (32)
- (3 sc, inc) x8 (40)
- (4 sc, inc) x8 (48)
- (5 sc, inc) x8 (56)
- (6 sc, inc) x8 (64)
- (7 sc, inc) x8 (72)
- (8 sc, inc) x8 (80)
Dome shaping:
- BLO – sc around (80) creates ridge
- sc around (80)
- sc around (80)
- sc around (80)
Fasten off with long tail.
Creating raised ribs (8 panels):
The ribs create dimensional raised lines that divide the umbrella into sections.
Using light green yarn (can double the yarn for extra dimension):
- Mark 8 evenly-spaced points around center (every 10 stitches)
- Thread tapestry needle with 70 cm of yarn
- For each rib: Starting at center, create a raised line to edge using one of these methods:
Method A – Surface chain:
- Insert hook from back to front at center
- Pull up loop, insert hook at next stitch toward edge, yarn over, pull through fabric and through loop on hook
- Repeat from * to edge
- Work over same path 2 more times for pronounced rib
Method B – Backstitch:
- Stitch a line from center to edge using backstitch
- Go over the same line 2–3 times for raised effect
- Repeat for all 8 ribs to create distinct panel divisions
🌸 Umbrella Flowers
Yarn: Pink, yellow, orange/coral
Make 10–12 flowers total in assorted colors and sizes
Small flowers (make 6–7):
MR, (ch 2, 2 dc, ch 2, sl st) x5 into ring (5 petals)
Pull tight, fasten off with tail
Medium flowers (make 3–4):
MR, (ch 3, 3 dc, ch 3, sl st) x5 into ring (5 petals)
Pull tight, fasten off with tail
Large flowers (make 1–2):
MR, (ch 3, 4 dc, ch 3, sl st) x5 into ring (5 petals)
Pull tight, fasten off with tail
Flower centers:
Using contrasting yellow yarn, stitch through center 5–6 times for visible detail, or attach small yellow bead.
Placement:
Distribute flowers randomly across umbrella surface, placing some on ribs and some on flat panel areas. Mix colors and sizes. The photo shows some flowers grouped in clusters of 2–3. Sew securely with matching thread.
🎋 Umbrella Handle
Materials: Wooden dowel or thick wire (18–20 cm), tan/brown yarn
Preparation:
If using wire, bend one end into J-curve for handle grip. If using wooden dowel, carefully heat and bend slightly, or attach pre-curved piece.
Covering:
Tie tan/brown yarn at top. Wrap tightly down entire length, adding hot glue dabs every 2–3 cm to secure. Alternatively, use continuous surface slip stitch technique around dowel for smooth coverage.
Attachment:
Insert straight end through center of umbrella (the magic ring opening). Secure with generous hot glue on inside and stitch green yarn through umbrella fabric around handle multiple times. Handle must be very stable.
Curved end should already be threaded through doll’s hand.
🟢 Display Base
Yarn: Olive green
Hook: 2.5–3.0 mm
- MR, 6 sc (6)
- inc around (12)
- (sc, inc) x6 (18)
- (2 sc, inc) x6 (24)
- (3 sc, inc) x6 (30)
- (4 sc, inc) x6 (36)
- (5 sc, inc) x6 (42)
- (6 sc, inc) x6 (48)
- (7 sc, inc) x6 (54)
- (8 sc, inc) x6 (60)
- (9 sc, inc) x6 (66)
- (10 sc, inc) x6 (72)
Insert heavy cardboard circle or wooden disc (approximately 12 cm diameter) for weight and stability.
- BLO – sc around (72) creates raised edge
- sc around (72)
Fasten off with long tail.
🔧 Assembly Instructions
Step 1: Attach head to body
Sew head securely to top of body, stitching all around neck joint. Head should sit straight and centered.
Step 2: Attach legs to body
Sew white legs to bottom of body with legs positioned slightly apart for balance.
Step 3: Wrap coat around body
Position the flat coat piece around the body with the back centered on the body’s back. The coat should wrap around with the open front edges meeting at center front (or slightly overlapped). Pin in place.
Stitch coat to body at:
- Neckline/shoulders
- Upper back
- Under arms where coat meets body
The front edges should hang open naturally, revealing the dress underneath. You can add a tiny snap or stitch to hold the front edges in desired position if needed.
Step 4: Attach boots to base
Position boots on base with proper balance (slightly apart, toes pointing slightly outward). Stitch boots firmly to base, going through boot sole into base multiple times in several locations for maximum stability.
Step 5: Insert legs into boots
The white legs should already be attached to body. Insert leg ends deep into boot openings and stitch securely all around.
Step 6: Position umbrella
The umbrella should angle above and slightly behind the head. The handle is already gripped in one hand. Secure umbrella by:
- Hot gluing or stitching umbrella edge to back of head/hair
- Adding stitches from umbrella to coat shoulder if needed for extra support
- Ensuring handle is firmly held in hand
Step 7: Style hair
Arrange all hair dramatically to one side (left in photo) and forward over shoulder. Some strands can flow down in front of body. Use water mixed with fabric stiffener, arrange in flowing waves, and let air dry completely for windswept effect.
Step 8: Final arm positioning
The umbrella-holding arm should look natural. The other arm should hang naturally at side or be slightly bent. The coat sleeves should drape naturally.
🎨 Finishing Touches
- Fluff all coat ruffles for maximum volume
- Check that doll stands securely without tipping
- Trim any loose yarn ends carefully
- Add extra blush to cheeks if desired
- Adjust umbrella angle for best visual effect
- Ensure hair flows naturally with movement
- Make sure coat front edges are positioned attractively
💚 Care and Display
- This is a decorative display piece, not suitable for young children
- Keep away from moisture to preserve hair styling
- Dust gently with soft brush or cloth
- Display away from direct sunlight to prevent fading
- Store in cool, dry place when not displayed
✨ Customization Ideas
- Try different umbrella colors for seasons (red/orange for autumn, pastels for spring, blue for winter)
- Add embroidered details to coat like tiny buttons or pockets
- Experiment with different hair colors and textures
- Change boot colors to coordinate with different themes
- Add tiny accessories like a crocheted purse or scarf
- Make seasonal flower varieties for umbrella
Your enchanting umbrella girl is complete! She captures a magical rainy-day moment and brings charm and whimsy to any space. Display her proudly! ☔💕✨