Add a touch of humor to your home with this Amigurumi Funny Man Tissue Box Cover crochet pattern! Designed to turn an ordinary tissue box into a hilarious character, this quirky creation features a playful face, expressive details, and a fun way to dispense tissues. Whether you’re crafting for a cheerful home accent, adding a whimsical touch to your decor, or simply enjoy making amusing amigurumi designs, this pattern lets you stitch up a tissue box cover bursting with personality! Perfect for brightening up any space, this crochet creation brings a touch of handmade joy to every sniffle. 🤧✨
Designed for customization, this pattern allows you to experiment with different facial expressions, embroidered details, or even tiny accessories like glasses or a hat for extra charm. Craft a classic funny man with bold features, create a pastel version for a softer aesthetic, or even stitch up a full set of humorous tissue box covers for a delightful display! Whether gifted as a quirky keepsake, displayed as a cheerful accent, or made simply for the joy of crafting, this Amigurumi Funny Man Tissue Box Cover is a fun and creative project—perfect for bringing a touch of handmade laughter to every stitch! 🧶💖✨
🧻 Amigurumi Funny Man Tissue Box Cover Crochet Pattern
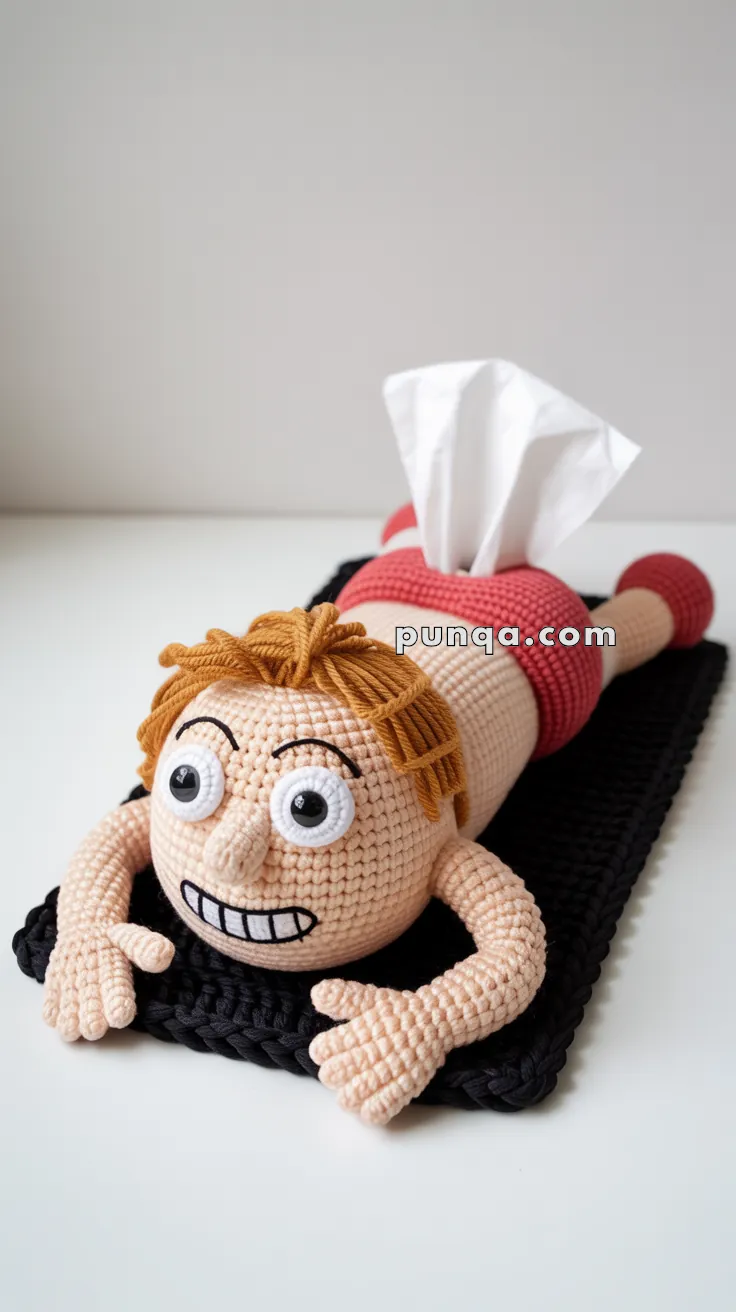
Meet your new favorite conversation piece: a crochet tissue box cover that’s equal parts hilarious and functional! This cheeky fellow lies belly-down on a black mat, eyes wide, grin huge — with tissues comically emerging from his shorts. It’s guaranteed to make anyone smile every time they reach for a tissue.
✨ Skill Level
Intermediate – Involves shaping, color changes, and assembly.
📏 Finished Size
Fits a standard rectangular tissue box (approx. 9.5 × 4.5 × 3 in / 24 × 11 × 7.5 cm)
🧶 Materials and Yarn Amounts
Use DK cotton yarn for structure and durability.
- Skin tone: ≈ 60 g (head, arms, legs, torso)
- Red: ≈ 30 g (shorts)
- Brown-orange: ≈ 15 g (hair)
- White: ≈ 10 g (eyes)
- Black: ≈ 40 g (mat, mouth details)
- Small amount of black embroidery thread (eyebrows, mouth lines)
Other Supplies
- 2.5–3 mm crochet hook
- 10 mm safety eyes (or felt circles)
- Polyfill stuffing
- Tapestry needle
- Stitch marker
- Scissors
- Standard tissue box for fitting
🧵 Abbreviations (US Terms)
MR – Magic Ring
sc – Single Crochet
inc – Increase (2 sc in same stitch)
dec – Decrease (sc 2 tog)
ch – Chain
sl st – Slip Stitch
BLO – Back Loops Only
FO – Fasten Off
🧍♂️ Body Cover (Skin Tone)
Ch 31, sc in 2nd ch from hook and across (30).
Ch 1, turn. sc across (30).
Repeat until rectangle wraps around your tissue box (≈ 40 rows).
FO and sew short edges together to form a tube.
Bottom Opening for Tissue Box:
On one long side, leave a central slit 10–12 st wide; whip stitch around the slit to reinforce.
This will be the opening where tissues emerge.
🍑 Buttocks (Make 2 – Red)
R1: MR, 6 sc
R2: inc × 6 (12)
R3: (1 sc, inc) × 6 (18)
R4: (2 sc, inc) × 6 (24)
R5: (3 sc, inc) × 6 (30)
R6: (4 sc, inc) × 6 (36)
R7–9: sc around (36)
Stuff lightly and FO.
Sew both hemispheres to the back top of the body tube, leaving a narrow gap between them for the tissue slot.
😊 Head (Skin Tone)
R1: MR, 6 sc
R2: inc × 6 (12)
R3: (1 sc, inc) × 6 (18)
R4: (2 sc, inc) × 6 (24)
R5: (3 sc, inc) × 6 (30)
R6: (4 sc, inc) × 6 (36)
R7: (5 sc, inc) × 6 (42)
R8–13: sc around (42)
R14: (5 sc, dec) × 6 (36)
R15: (4 sc, dec) × 6 (30)
R16: (3 sc, dec) × 6 (24)
R17: (2 sc, dec) × 6 (18)
Stuff firmly.
R18: (1 sc, dec) × 6 (12)
R19: dec × 6 (6)
FO and close.
👀 Eyes (White, Make 2)
R1: MR, 6 sc
R2: inc × 6 (12)
R3: (1 sc, inc) × 6 (18)
FO, leaving a tail.
Attach safety eyes (10 mm) or embroider pupils.
Sew eyes close together on upper face, slightly bulging.
👂 Ears (Make 2)
R1: MR, 6 sc
R2: (1 sc, inc) × 3 (9)
R3: sc around (9)
Flatten and sew to sides of head at eye level.
😃 Facial Features
Mouth: Embroider a wide grin using black thread. Outline the mouth, then stitch white vertical “teeth” lines.
Eyebrows: With black thread, embroider thin curved lines above each eye — short and slightly arched upward for a comic expression.
Nose: Embroider or lightly stitch a small 3D bump centered between the eyes.
💇 Hair (Brown / Orange)
To recreate the chunky looped fringe style:
Join yarn at the front hairline.
Front Fringe Row: [sl st in next st, ch 6, sl st in same st] repeat across the forehead.
Crown Fill: Work a row behind fringe – [sl st, ch 5, sl st in same st] around crown.
Back & Sides: Add scattered loop clusters (ch 4–6) down the temples and around the back until the head looks full.
Steam lightly to relax the loops and trim evenly.
💪 Arms (Make 2 – Skin Tone)
R1: MR, 6 sc
R2: (1 sc, inc) × 3 (9)
R3–10: sc around (9)
FO and stuff lightly.
✋ Mitten Hands (Simple Rounded Style)
R1: MR, 6 sc
R2: inc × 6 (12)
R3–R6: sc around (12)
R7: optional small thumb bump – sc 4, (sc, hdc, sc) in next st, sc 7 (12)
R8: sc around (12)
Stuff lightly and FO.
Sew one mitten to each arm end.
Attach arms under the head so the hands rest flat on the mat in front of him.
🦵 Legs (Make 2 – Red and Skin Tone)
R1 (Red shorts): MR, 6 sc
R2: (1 sc, inc) × 3 (9)
R3–R5: sc around (9)
Change to skin tone:
R6: (2 sc, inc) × 3 (12)
R7–R10: sc around (12)
Stuff lightly, FO.
Attachment: Sew each leg to the sides of the red shorts at hip level, not the back corners.
Angle them outward and back slightly to match the photo’s natural pose.
🦶 Rounded Feet (Red)
R1: MR, 6 sc
R2: inc × 6 (12)
R3: (1 sc, inc) × 6 (18)
R4–R7: sc around (18)
R8: (1 sc, dec) × 6 (12)
Stuff firmly, FO and close.
Sew each foot to the end of a leg so they extend straight back — rounded and cylindrical, not flat.
🧺 Base Mat (Black)
Ch 42, sc in 2nd ch from hook and across (40).
Ch 1, turn, sc across.
Repeat until rectangle measures ≈ 9.5 × 7 in (≈ 30 rows).
Add a border: work 1 round of sc around edges for a clean raised edge.
FO and weave ends.
🧩 Assembly & Finishing
- Lay the black mat flat.
- Position the body tube in the center and stitch securely to mat.
- Attach the buttocks above the tissue slot with a narrow gap for tissues.
- Sew the head onto front of body, tilted slightly upward to lift his face.
- Attach arms beneath the head so the hands rest forward on the mat.
- Sew legs to the hip area of the shorts, angled out slightly.
- Add feet to leg ends.
- Insert a tissue box through the underside opening and pull the first tissue between the “cheeks.”
🧶 Optional Finishing Touches
- Lightly blush cheeks with fabric paint or pastel dust.
- Add Velcro or snaps under the mat to secure the box.
- Use matte safety eyes for extra cartoon realism.
🎉 Your Funny Man is Ready!
You’ve just created the world’s most entertaining tissue box cover — a handmade piece of comic art that’s impossible to ignore. 😂
With his looped hair, wild expression, and comedic pose, he’s a perfect conversation starter and a joy to gift. Customize his hair color or shorts for a personal touch, and let every tissue pull bring a laugh!
Happy Crocheting and keep your hooks humorous! 🧶🧻