Hey there! 🎉 Have you ever stumbled upon amigurumi and just couldn’t resist the charm of those adorable little crochet creatures? I sure have, and one of my all-time favorites has to be Felix the Cat. There’s something about bringing a beloved character to life with yarn and a hook that sparks joy and creativity. Amigurumi combines the art of crochet with the whimsical world of stuffed toys, making it a perfect hobby for those of us who love crafting and adore all things cute. Plus, it’s a fantastic way to unwind and let your imagination run wild as you turn a simple ball of yarn into a cuddly creation that you can cherish or gift to someone special. 🎁
Now, let’s talk about the process! Crocheting an amigurumi Felix the Cat might seem daunting at first, but trust me, it’s a delightful adventure. 🐱 Starting with a pattern, you’ll work your way through creating each part of Felix, from his iconic round head to his playful tail. The key is patience and a love for detail. With each stitch, you’ll see Felix’s personality come to life, and soon enough, you’ll have a little cat friend with those big, expressive eyes and cheeky grin. Whether you’re a crochet newbie or a seasoned pro, the satisfaction of completing such a project is truly unparalleled. So grab your hook and yarn, and let’s dive into this magical world of amigurumi together! 🎨✨
🐱 Amigurumi Felix the Cat Crochet Pattern
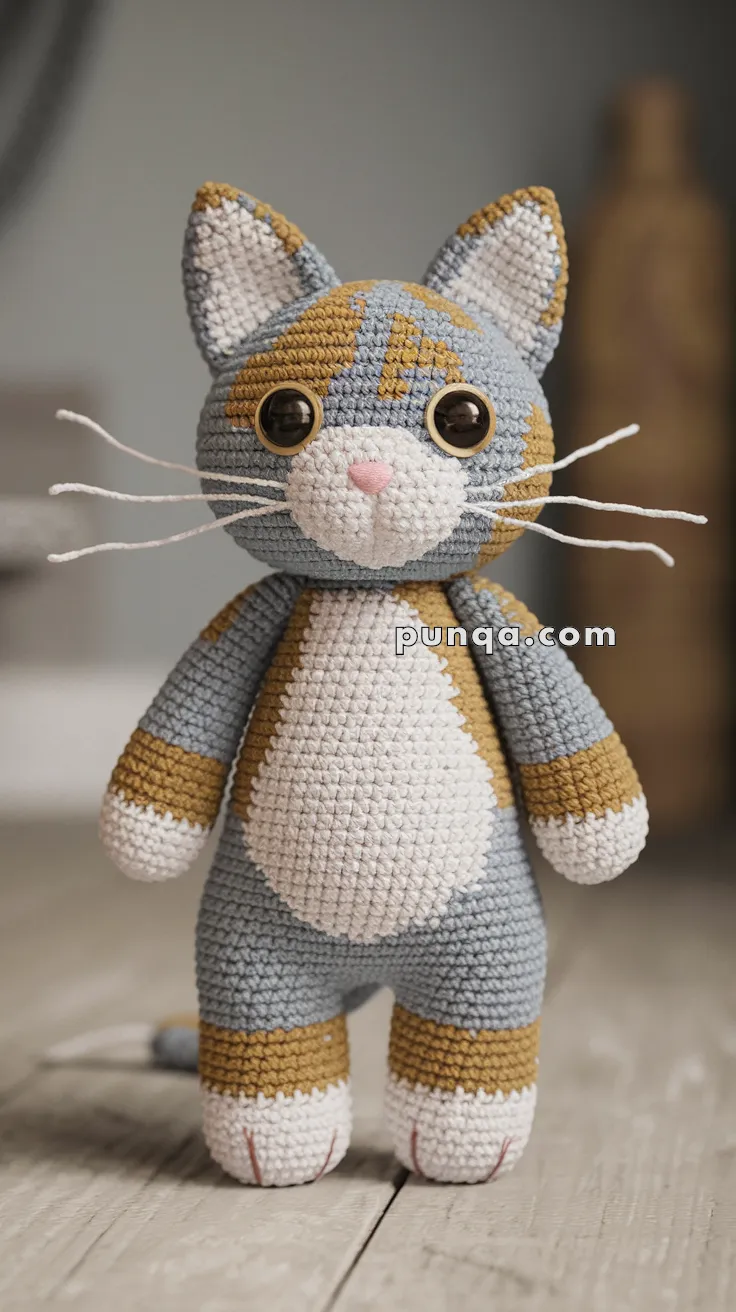
This sweet calico cat amigurumi features a softly rounded head, upright ears with pale inner panels, a large oval white belly patch, gentle facial expression, long white whiskers, and perfectly balanced standing proportions. The body is smooth and slightly elongated, with simple rounded limbs and subtle color blocking that matches the reference photo precisely.
This pattern is designed as a display plush rather than a toy with exaggerated features, giving it a calm, modern, and timeless look.
✨ Skill Level
Intermediate
(Color changes, shaping, clean embroidery, assembly)
📏 Finished Size
Approx. 22–25 cm (8.5–10 in) tall
(using DK or light worsted yarn with a 2.75–3.0 mm hook)
🧶 Materials
Yarn (DK or light worsted):
-
Soft grey-blue – main body, head, limbs
-
Warm tan / light brown – calico patches, limb bands, ear edges
-
Cream / off-white – belly, muzzle, paws, inner ears
-
Pink – nose
-
White embroidery thread or yarn – whiskers
Notions:
-
2.75–3.0 mm crochet hook
-
10–12 mm safety eyes (brown or dark amber)
-
Polyester fiberfill
-
Yarn needle
-
Stitch marker
-
Scissors
🧵 Abbreviations (US Terms)
MR – magic ring
sc – single crochet
inc – increase
dec – decrease
ch – chain
sl st – slip stitch
FO – fasten off
( ) × n – repeat instructions n times
Work in continuous rounds unless stated otherwise.
🐾 HEAD
Base color: Grey-blue
R1: MR, 6 sc (6)
R2: inc ×6 (12)
R3: (sc, inc) ×6 (18)
R4: (2 sc, inc) ×6 (24)
R5: (3 sc, inc) ×6 (30)
R6: (4 sc, inc) ×6 (36)
R7–R11: sc around (36)
Insert safety eyes between R8–R9, spaced 8–9 sts apart.
Add tan color patches using surface crochet or color changes to mirror the photo:
• One patch over the left forehead
• One patch behind the right ear
R12: (4 sc, dec) ×6 (30)
R13: (3 sc, dec) ×6 (24)
R14: (2 sc, dec) ×6 (18) – stuff firmly
R15: (sc, dec) ×6 (12)
R16: dec ×6 (6)
FO and close.
🐽 MUZZLE
Cream
R1: MR, 6 sc (6)
R2: inc ×6 (12)
R3: (sc, inc) ×6 (18)
R4: sc around (18)
FO lightly stuff.
Sew centered on lower face.
Embroider a small pink triangle nose and a simple vertical mouth line.
👂 EARS (Make 2)
Outer Ear (Grey-blue with Tan Tip)
R1: MR, 4 sc
R2: (sc, inc) ×2 (6)
R3: (2 sc, inc) ×2 (8)
R4–R5: sc around (8)
Change to tan for final round.
R6: sc around (8)
FO.
Inner Ear (Cream)
R1: MR, 4 sc
R2: inc ×4 (8)
FO.
Sew inner ear flat inside outer ear.
Attach ears high on head, upright and slightly angled outward.
🧍 BODY
Base color: Grey-blue
R1: MR, 6 sc (6)
R2: inc ×6 (12)
R3: (sc, inc) ×6 (18)
R4: (2 sc, inc) ×6 (24)
R5: (3 sc, inc) ×6 (30)
R6: (4 sc, inc) ×6 (36)
R7–R12: sc around (36)
Belly Panel (Cream Oval)
From R7 onward, maintain a 12-stitch cream panel centered on the front.
R13: (4 sc, dec) ×6 (30)
R14–R15: sc around (30)
R16: (3 sc, dec) ×6 (24)
R17: sc around (24)
Stuff firmly, shaping into a gentle oval.
R18: (2 sc, dec) ×6 (18)
FO.
🐾 ARMS (Make 2)
Grey-blue
R1: MR, 6 sc (6)
R2–R5: sc around (6)
Change to tan
R6–R7: sc around (6)
Change to cream
R8–R9: sc around (6)
FO lightly stuff.
Arms are short and rounded, hanging straight down.
🦵 LEGS (Make 2)
Grey-blue
R1: MR, 6 sc (6)
R2: inc ×6 (12)
R3–R5: sc around (12)
Change to tan
R6–R7: sc around (12)
Change to cream
R8–R9: sc around (12)
FO stuff firmly.
Flatten slightly at base so the cat stands securely.
🐾 TAIL
Grey-blue with tan tip
R1: MR, 6 sc
R2–R8: sc around (6)
Change to tan
R9–R10: sc around (6)
FO lightly stuff.
Attach low at back, angled gently downward.
🧵 WHISKERS
Cut six lengths of white yarn (7–8 cm each).
Insert three on each side of muzzle using a needle, spacing evenly.
Do not pull tight — whiskers should extend outward naturally.
🪡 ASSEMBLY
-
Sew head securely to body
-
Attach arms just below head seam
-
Attach legs evenly so cat stands upright
-
Sew tail at lower back
-
Add whiskers and final facial details
-
Shape gently with hands for balance
🌟 FINISHED CALICO CAT
Your calico cat now stands proudly with its soft color-blocked coat, gentle expression, and balanced proportions. The neutral palette and smooth stitches give it a modern, cozy look that fits beautifully on shelves, desks, or nursery décor.
A timeless handmade companion — calm, sweet, and full of quiet charm. 🐾💛