Leap into creativity with this lively Amigurumi Acrobat Girl Doll—a high-flying crochet project full of energy, charm, and playful flair! 🤸♀️🧶 With her flexible limbs, vibrant costume, and confident smile, she’s ready to dazzle in your handmade circus or gymnastics-themed display. Whether you’re crafting for a little performer, adding movement to your amigurumi collection, or simply love dolls with dynamic personality, this acrobat girl is sure to steal the show.
Designed with expressive shaping and colorful details, this pattern invites you to customize her look with striped leggings, sparkly accents, or even a tiny ribbon for her routine. Pose her mid-cartwheel, perched on a trapeze, or standing tall with arms raised in triumph—she’s as versatile as she is adorable. Whether gifted to a gymnastics fan or starring in a whimsical crochet scene, this Acrobat Girl Doll is a joyful and satisfying project—perfect for stitching up a little handmade motion, one loop at a time! 🎪💖✨
🤸 Amigurumi Acrobat Girl Doll Crochet Pattern
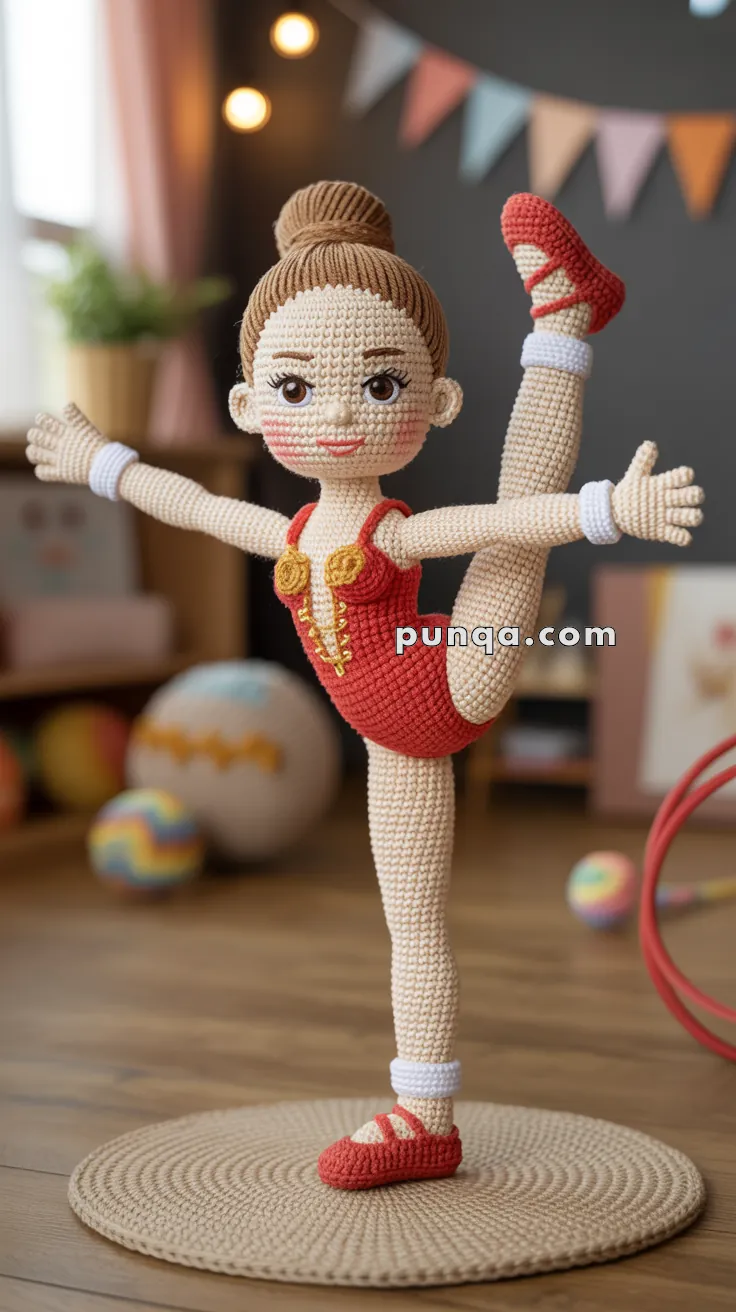
This stunning acrobat doll is full of elegance and balance, with her red leotard, ballet shoes, and graceful raised-leg pose. Perfect for gymnastic lovers and doll collectors alike!
✨ Skill Level
Intermediate to Advanced – Knowledge of amigurumi, sewing doll parts, and shaping for poses recommended.
📏 Finished Size
Approx. 28–30 cm (11–12″) tall when made with DK yarn and a 2.5–3 mm hook.
🧶 Materials
- Beige yarn (skin tone) – body, head, arms, legs
- Red yarn – leotard and shoes
- White yarn – wristbands and ankle bands
- Brown yarn – hair bun
- Gold/yellow yarn – leotard embroidery
- 2.5–3.0 mm crochet hook
- Fiberfill stuffing
- Yarn needle & stitch markers
- Safety eyes 8–10 mm
- Embroidery thread (black for eyelashes, pink for blush cheeks if desired)
- Optional: thin wire for poseable leg
🧾 Abbreviations (US Terms)
- MR = Magic Ring
- sc = single crochet
- inc = increase (2 sc in same st)
- dec = decrease (sc2tog)
- ch = chain
- sl st = slip stitch
- st = stitch
👩 Head
Beige yarn
- MR, 6 sc (6)
- inc × 6 (12)
- (sc, inc) × 6 (18)
- (2 sc, inc) × 6 (24)
- (3 sc, inc) × 6 (30)
- (4 sc, inc) × 6 (36)
7–14. sc around (36) - (4 sc, dec) × 6 (30)
- (3 sc, dec) × 6 (24)
👉 Insert safety eyes between R10–R11, ~7 sts apart. - (2 sc, dec) × 6 (18)
- (sc, dec) × 6 (12)
- dec × 6 (6). Fasten off. Stuff firmly.
Details:
- Embroider nose with 2–3 horizontal stitches between eyes.
- Add lashes and brows with black thread.
- Blush with pink embroidery or fabric paint.
👂 Ears (make 2)
Beige yarn
- MR, 6 sc (6).
- sc around (6). Flatten and sew to sides of head.
💇 Hair Bun
Brown yarn
- MR, 6 sc (6)
- inc × 6 (12)
- (sc, inc) × 6 (18)
- (2 sc, inc) × 6 (24)
- (3 sc, inc) × 6 (30)
6–8. sc around (30)
Fasten off, stuff lightly, sew on top of head.
🦴 Body + Leotard
Red yarn
- MR, 6 sc (6)
- inc × 6 (12)
- (sc, inc) × 6 (18)
- (2 sc, inc) × 6 (24)
5–10. sc around (24)
👉 Switch to beige yarn for upper torso:
11–15. sc around (24) - (2 sc, dec) × 6 (18)
- (sc, dec) × 6 (12)
Stuff and attach to head.
Leotard straps: With red yarn, ch ~12, sew from front to back shoulders.
Gold embroidery: Use surface slip stitch or backstitch to create swirls and lines on leotard front.
🦵 Legs
Beige yarn
- MR, 6 sc (6)
- inc × 6 (12)
3–18. sc around (12)
👉 Switch to red yarn for shoes: - (sc, inc) × 6 (18)
20–22. sc around (18)
Fasten off, stuff.
Details:
- Add white ankle bands (ch 14, join, sc around).
- Embroider red criss-cross straps on shoes.
Assembly:
- Sew one leg straight down for balance.
- Sew one leg lifted up (attach wire if desired for firmness).
💪 Arms (make 2)
Beige yarn
- MR, 6 sc (6)
- (sc, inc) × 3 (9)
3–12. sc around (9)
Fasten off, stuff lightly.
Add wristbands: With white yarn, ch 12, join, sc around, slide onto wrists.
🖐 Hands
- Shape fingers by sewing through stitches to define thumb.
- Position one arm extended sideways, the other up for balance.
🧶 Base Mat
Beige yarn
- MR, 6 sc (6)
- inc × 6 (12)
- (sc, inc) × 6 (18)
- (2 sc, inc) × 6 (24)
Continue increasing in this pattern until desired size (approx. 18–20 cm).
👉 This provides stability so she can stand in her acrobatic pose.
🧩 Assembly
- Sew head to body securely.
- Attach arms: one outstretched, one forward.
- Position legs: one straight, one lifted high. Secure with stitches or wire.
- Sew doll to mat for stability.
- Embroider details: eyebrows, lashes, lips.
✨ Final Touches
Your acrobat doll is now complete! She can strike a standing split pose, perfect for a gymnastics or ballerina-inspired décor. Her leotard details and bun hairstyle give her a polished performance look.