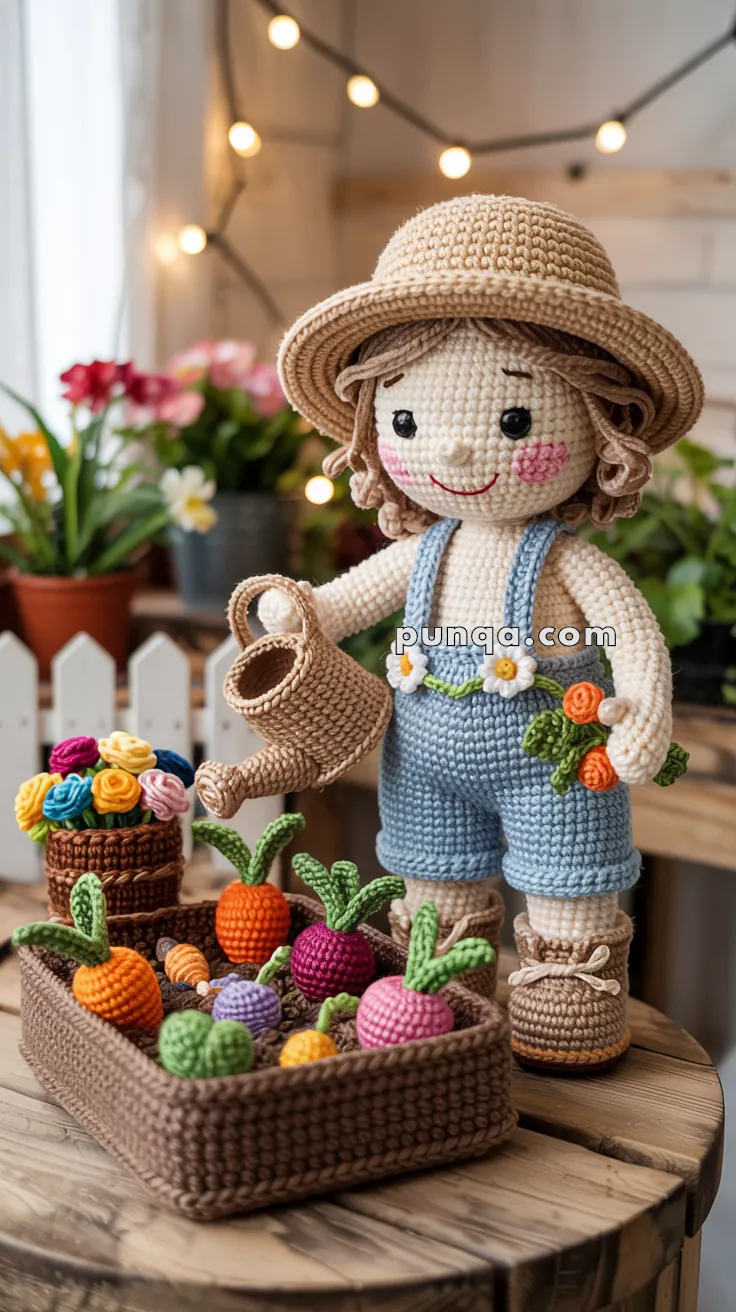
Celebrate the joy of growing and crafting with this Amigurumi Gardener Girl & Vegetable Garden crochet pattern! Featuring a cheerful gardener doll and a delightful assortment of tiny veggies, this set brings the charm of a backyard harvest to your yarn adventures. With her sunhat, apron, and green-thumbed spirit, the gardener girl is ready to tend to her patch of plush carrots, cabbages, and more—making this project perfect for springtime decor, imaginative play, or gifting to your favorite plant lover. 🌱🧶👩🌾
Designed for whimsy and detail, this pattern invites you to mix earthy tones, playful textures, and sweet extras like a raised garden bed, tiny tools, or even a mini watering can. Customize the vegetables to match your favorite produce or add accessories like a basket or garden sign for extra flair. Whether displayed on a shelf, used in storytelling, or tucked into a gift box, this Gardener Girl & Vegetable Garden Amigurumi is a joyful and satisfying project—perfect for stitching up a little handmade harvest, one sprout at a time! 💖✨🥕
🌱Amigurumi Gardener Girl & Vegetable Garden Crochet Pattern
Create this charming gardener doll exactly as shown in the photo, complete with flowing hair, detailed boots, dimensional vegetables, and a beautifully shaped garden bed!
✨ Skill Level
Advanced Intermediate – Includes detailed shaping, dimensional accessories, and fine finishing techniques.
📏 Finished Size
- Gardener doll: ~10 in / 25 cm tall
- Garden bed: ~6×4 in / 15×10 cm (oval shape)
- Vegetables: ~1–2 in tall (highly dimensional)
🧶 Materials
Yarn (DK Weight recommended for best detail)
ItemColorSkinLight beige/creamHairLight brownOverallsDenim blueShirt/UndershirtWhite or creamBootsTan/beigeHatNatural tan/beigeWatering CanTan/beigeGarden BedDark brownVegetablesOrange, pink, purple, yellow, green, lavenderFlowersPink, yellow, magenta, orange, white
Other Supplies:
- Crochet hook: 2.5 mm (for tight, neat stitches)
- Safety eyes: 8 mm black
- Tapestry needle, stitch markers
- Polyfill stuffing
- Embroidery thread: black, pink, red
- Pink blush or chalk for cheeks
- Thin wire or pipe cleaners (for vegetable stems)
- Yarn stiffener or diluted glue (optional, for hat structure)
- Small amount of tan embroidery floss (for boot laces)
🧵 Abbreviations (US Terms)
- MR – Magic Ring
- sc – Single Crochet
- inc – Increase (2 sc in one stitch)
- dec – Invisible Decrease
- sl st – Slip Stitch
- ch – Chain
- hdc – Half Double Crochet
- dc – Double Crochet
- FLO/BLO – Front/Back Loops Only
- FO – Fasten Off
👧 GARDENER DOLL
HEAD (Skin Color)
Rounds 1-9:
- MR, 6 sc (6)
- inc ×6 (12)
- (1 sc, inc) ×6 (18)
- (2 sc, inc) ×6 (24)
- (3 sc, inc) ×6 (30)
- (4 sc, inc) ×6 (36) 7-11. sc around (36)
- (4 sc, dec) ×6 (30)
- (3 sc, dec) ×6 (24)
- (2 sc, dec) ×6 (18)
Insert safety eyes between Rounds 9-10, approximately 7 sts apart.
- (1 sc, dec) ×6 (12)
- dec ×6 (6)
Stuff firmly. FO, weave through remaining stitches and close.
Face Details:
- Nose: Use matching skin yarn to embroider a small triangle or oval between and slightly below the eyes
- Mouth: Red embroidery thread – make a curved smile
- Cheeks: Apply pink blush or embroider small pink circles
HAIR (Light Brown)
Base Cap:
- MR, 6 sc (6)
- inc ×6 (12)
- (1 sc, inc) ×6 (18)
- (2 sc, inc) ×6 (24)
- (3 sc, inc) ×6 (30)
- (4 sc, inc) ×6 (36) 7-9. sc around (36)
FO with long tail. Sew to head.
Wavy Hair Strands (Make 20-25):
For flowing, wavy hair as shown in photo:
Method 1 – Loose Curls:
- Ch 25-30
- Starting in 2nd ch from hook: sl st, sc, hdc, dc across, varying the stitches to create texture
- FO with long tail
Method 2 – Tighter Waves:
- Ch 20
- 2 sc in each chain back
- FO with long tail
Attachment:
- Arrange strands around entire head, focusing on sides and back
- Create side-swept bangs across forehead
- Sew each strand at the base only, leaving ends loose and wavy
- Layer strands for fullness
- Gently brush and separate the yarn fibers for a softer, more natural look
BODY
WHITE UNDERSHIRT:
Start with white yarn:
- MR, 6 sc (6)
- inc ×6 (12)
- (1 sc, inc) ×6 (18)
- (2 sc, inc) ×6 (24) 5-8. sc around (24)
Switch to skin color for neck: 9. (2 sc, dec) ×6 (18)
FO. Set aside.
LEGS & BOOTS (Make 2)
Start with white yarn (sock):
- MR, 6 sc (6)
- inc ×6 (12)
- BLO – sc around (12) 4-5. sc around (12)
Switch to tan (boot):
- BLO – sc around (12) 7-8. sc around (12)
- sc 4, dec ×2, sc 4 (10) (slight shaping) 10-12. sc around (10)
FO first leg. Make second leg but don’t FO.
JOINING LEGS TO BODY:
Continue with second leg:
- Ch 3, join to first leg with sc
- Round 1: sc around both legs and across chain (26 sts total)
Switch to denim blue (overalls):
2-3. sc around (26) 4. (11 sc, dec) ×2 (24) 5-8. sc around (24) 9. (2 sc, dec) ×6 (18)
Place body piece (white shirt) over this section and crochet through both layers for next round:
- sc around through both shirt and pants (18)
Continue with body only:
- (1 sc, dec) ×6 (12)
Stuff body and legs firmly.
- dec ×6 (6)
FO and close.
ARMS (Make 2)
Start with skin color:
- MR, 6 sc (6)
- (1 sc, inc) ×3 (9) 3-10. sc around (9)
Add white sleeve edge:
- Switch to white: sc around (9)
Add blue overall sleeve (if showing):
- Switch to blue: sc around (9)
FO with long tail. Stuff lightly, keeping arms flexible.
Fingers (optional detail):
- With skin color, make tiny chain stitches at end of hand to suggest finger definition
- Or embroider 3-4 small vertical lines
Sew arms to body at shoulder level, slightly to the sides.
OVERALL STRAPS
Make 2 straps:
- With blue yarn, ch 18
- sc across (17)
- FO with long tails
Position:
- Attach one end to back of overalls (around Round 4-5 of blue section)
- Cross over shoulders
- Attach to front of overalls
Daisy Decorations (Make 2):
Center:
- With yellow: MR, 6 sc, sl st, FO
Petals:
- With white: join to any st of center
- (ch 3, sl st in next st) ×6
- FO
Sew one daisy to each strap where it meets the front of overalls.
BOOTS – LACES & DETAILS
For each boot:
With tan embroidery floss or thin yarn:
- Create 4-5 horizontal stitches across front of boot (Rounds 8-10)
- Thread laces through these stitches in criss-cross pattern
- Tie small bow at top
- Secure bow with tiny stitch
Boot soles:
- With tan yarn, embroider or crochet small oval pieces
- Sew to bottom of each boot for dimensional effect
FLOPPY SUN HAT (Tan/Beige)
Crown:
- MR, 6 sc (6)
- inc ×6 (12)
- (1 sc, inc) ×6 (18)
- (2 sc, inc) ×6 (24)
- (3 sc, inc) ×6 (30) 6-10. sc around (30)
Brim attachment: 11. BLO – sc around (30)
Wide Brim: 12. In the front loops from Round 11: (4 sc, inc) ×6 (36) 13. (5 sc, inc) ×6 (42) 14. (6 sc, inc) ×6 (48) 15-16. sc around (48)
FO.
Optional: Apply diluted fabric stiffener to brim and shape while drying for authentic floppy look.
Hatband Detail:
- With contrasting tan or brown, ch long enough to wrap around crown
- Weave through stitches of Round 10
- Or simply tie a ribbon
Place hat on doll’s head. Can be sewn down or left removable.
🪣 WATERING CAN (Tan/Beige)
Main Body:
- MR, 6 sc (6)
- inc ×6 (12)
- (1 sc, inc) ×6 (18)
- (2 sc, inc) ×6 (24) 5-6. sc around (24)
- (2 sc, dec) ×6 (18) 8-10. sc around (18)
- (1 sc, dec) ×6 (12)
Stuff lightly.
- dec ×6 (6)
FO and close.
Spout:
- Ch 8
- Starting in 2nd ch from hook: sc across (7)
- FO with long tail
- Sew to side of can body in curved position
Handle:
- Ch 16
- FO with long tails
- Sew to opposite sides of can (top area), creating arched handle
Spout holes (optional):
- With black thread, make tiny stitches at spout end to suggest holes
Position watering can in doll’s hands.
🥕 DIMENSIONAL VEGETABLES
CARROTS (Orange) – Make 3-4
Carrot body:
- MR, 6 sc (6)
- (1 sc, inc) ×3 (9)
- (2 sc, inc) ×3 (12) 4-5. sc around (12)
- (2 sc, dec) ×3 (9)
- sc around (9)
- (1 sc, dec) ×3 (6)
- dec ×3 (3)
FO. Stuff firmly.
Leafy tops:
- With green: ch 8, sl st in 2nd ch from hook, sc, hdc, dc, hdc, sc, sl st
- Make 3-4 leaves
- Insert pipe cleaner through center if desired
- Sew to top of carrot, splaying outward
Detail lines:
- With darker orange or brown, embroider horizontal lines around carrot
RADISHES/BEETS (Pink/Purple) – Make 3-4
Round body:
- MR, 6 sc (6)
- inc ×6 (12)
- (1 sc, inc) ×6 (18) 4-5. sc around (18)
- (1 sc, dec) ×6 (12)
- dec ×6 (6)
FO. Stuff into round ball shape.
Root tail:
- With same color, ch 6, sl st back
- Sew to bottom
Leafy tops:
- With green: Make 2-3 small leaves (ch 6-8, sc back with texture)
- Sew to top
TURNIPS/ONIONS (White/Cream with purple top) – Make 2-3
Body (start with white):
- MR, 6 sc (6)
- inc ×6 (12)
- (1 sc, inc) ×6 (18)
- sc around (18)
- Switch to light purple for top
- (1 sc, dec) ×6 (12)
- dec ×6 (6)
FO. Stuff.
Green shoots:
- Ch 10-12, make thin and floppy
- Sew to top
PUMPKIN/SQUASH (Yellow/Orange) – Make 1-2
Body:
- MR, 6 sc (6)
- inc ×6 (12)
- (1 sc, inc) ×6 (18) 4-5. sc around (18)
- (1 sc, dec) ×6 (12)
- dec ×6 (6)
FO. Stuff.
Pumpkin ridges:
- With yarn needle and same color, thread from top to bottom in 5-6 places around pumpkin, pulling slightly to create vertical indentations
Stem:
- With brown/tan: ch 4, sc back
- Sew to top
Leaf:
- With green: ch 6, sc back with increases/decreases for leaf shape
- Sew next to stem
ADDITIONAL VEGGIES
Purple/Lavender rounded vegetables:
- Follow radish pattern in purple/lavender
- Add small green tops
Create variety with 12-15 total vegetables for abundant garden look.
🧺 FLOWER BASKET (Brown)
Basket base:
- MR, 6 sc (6)
- inc ×6 (12)
- (1 sc, inc) ×6 (18)
- (2 sc, inc) ×6 (24)
- BLO – sc around (24) 6-8. sc around (24)
FO.
Handle:
- Ch 20
- FO with long tails
- Sew to opposite sides of basket
Texture detail:
- With tapestry needle, weave contrasting brown yarn vertically through stitches for woven basket look
ROLLED ROSES (Make 8-10 in various colors)
For each rose:
- Ch 25-30
- Row 1: 2 dc in each chain across
- FO with long tail
To form rose:
- Roll the ruffled strip tightly from one end
- Secure with stitches as you roll
- Stitch base firmly
Leaves (Green) – Make 4-6:
- Ch 6
- Starting in 2nd ch: sl st, sc, hdc, dc, hdc, sl st
- FO
Assembly:
- Arrange roses tightly in basket
- Tuck leaves between roses
- Sew in place to fill basket completely
🌱 GARDEN BED (Dark Brown)
Oval-shaped raised bed:
Base – Oval:
Ch 16
- Round 1: Starting in 2nd ch from hook: 14 sc, 3 sc in last ch (working around), 13 sc on opposite side, 2 sc in same ch as first sc (32)
- Round 2: inc, 13 sc, inc ×3, 13 sc, inc ×2 (38)
- Round 3: sc around (38)
Sides (work in continuous rounds): 4. BLO – sc around (38) 5-9. sc around (38) (creates 5-round tall sides)
FO.
Optional texture:
- Slightly stuff bottom for dimensional base
- Leave top open for placing vegetables
“Soil” effect:
- Lightly brush dark brown or black yarn across surface
- Or leave natural brown
🌼 ASSEMBLY & FINISHING
Doll:
- Ensure hair is full and flowing
- Position hat at slight angle
- Place watering can in right hand (or as desired)
- Optionally hold a small vegetable bouquet in other hand
- Add small white stitches to boot laces if needed
Garden Scene:
- Arrange vegetables in garden bed with variety of colors
- Place taller vegetables (with greens) toward back
- Cluster similar colors for visual appeal
- Position flower basket to one side
- Place doll standing next to garden
Optional extras:
- Small white picket fence sections (white yarn, chain and posts)
- Additional scattered vegetables
- Tiny tools (shovel, rake)
- Butterfly or ladybug embellishments
💡 Pro Tips for Photo Accuracy
- Hair: The key to the flowing hair is making many individual strands and attaching at base only
- Vegetables: Make them plump and dimensional – don’t understuff
- Garden bed: The oval shape is crucial for the authentic look
- Colors: Use slightly muted, natural tones rather than bright primaries
- Roses: Roll tightly for compact, realistic flowers
- Details: Small touches like boot laces and daisy appliques make the difference
🎨 Customization Ideas
- Add name tag sign to garden bed
- Create companion pieces: bunny, bird, or cat
- Make seasonal vegetables (tomatoes, corn, lettuce)
- Add tiny garden tools as separate pieces
- Create matching mini watering can for display
This adorable gardener and her bountiful garden will bring handmade charm and joy to any space! Happy crocheting! 🌸🥕🌱


I so love this project!!! I’m definitely going to make it and then I’ll post the photo for you to see and share. thank you for making it available to other amigurumi lovers like me. Regards Ana Gomes South Africa