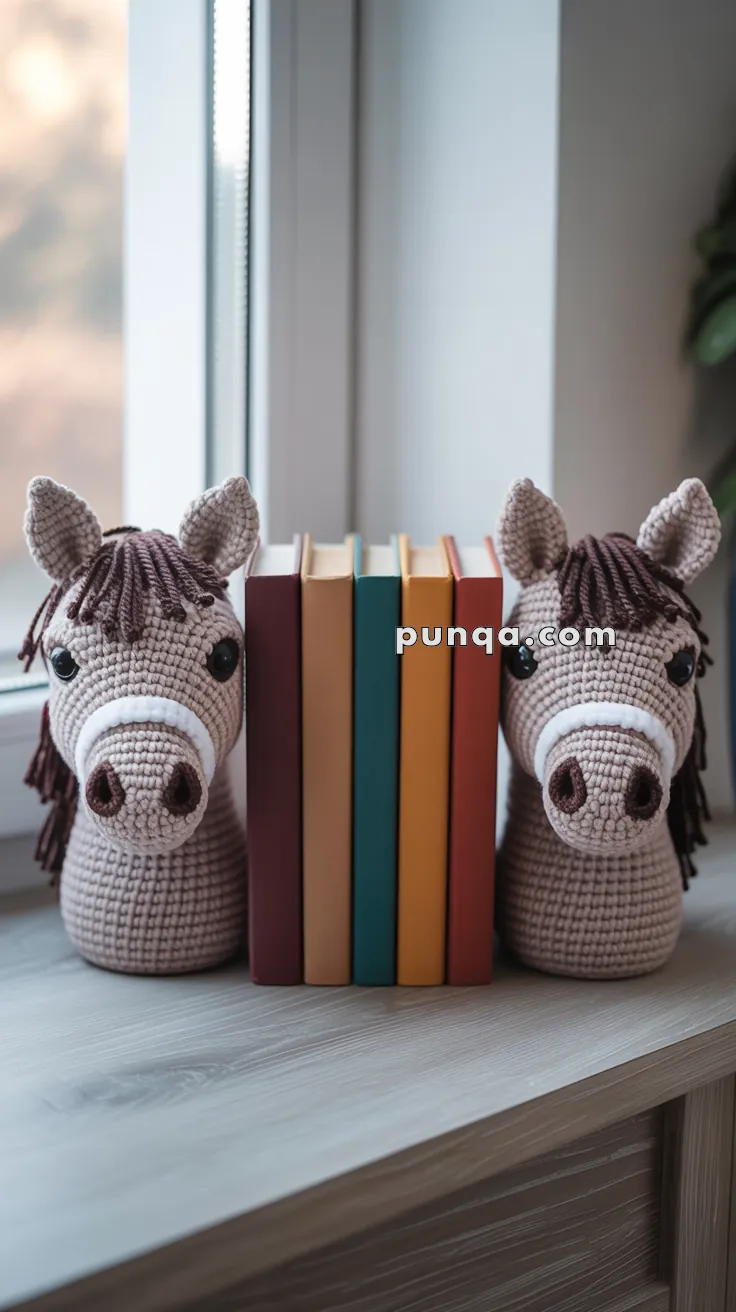
Add a touch of equestrian charm to your bookshelf with this Amigurumi Horse Head Bookend crochet pattern! Designed to bring both functionality and personality to your space, this majestic horse head serves as a sturdy bookend while showcasing the beauty of handcrafted details. Whether you’re crafting for horse lovers, adding a rustic accent to your decor, or simply enjoy making unique amigurumi designs, this pattern lets you stitch up a striking horse head bursting with character! Perfect for organizing your favorite reads while adding a cozy handmade touch, this crochet creation is a delightful blend of practicality and artistry. 🐴✨
Designed for customization, this pattern allows you to experiment with different shades of brown, embroidered details, or even tiny accessories like a miniature bridle or decorative mane for extra flair. Craft a classic horse head with rich earthy tones, create a whimsical version with bold colors, or even stitch up a full set of equestrian-inspired amigurumi for a charming display! Whether gifted as a thoughtful keepsake, used as a practical home accent, or made simply for the joy of crafting, this Amigurumi Horse Head Bookend is a fun and creative project—perfect for bringing a touch of handmade equine magic to every stitch! 🧶💖✨

🐴 Amigurumi Horse Head Bookend – Crochet Pattern
These charming amigurumi horse head bookends are the perfect blend of function and cuteness for any bookshelf or kid’s room. Designed with sturdy shaping and an optional weighted base, they help keep books upright while adding a cozy, handmade touch.
✨ Skill Level
Intermediate – shaping, color changes, and structural reinforcement.
📏 Finished Size
Each head measures approx. 7–8 inches (18–20 cm) tall and 4 inches (10 cm) wide, depending on yarn and stuffing.
🧶 Materials
- Yarn (Worsted or DK weight):
- Color A: Beige or Light Brown (head, ears)
- Color B: Dark Brown (mane, nostrils)
- Color C: White (nose stripe)
- 3.0–3.5 mm crochet hook
- 10 mm safety eyes (or black felt)
- Fiberfill stuffing
- Weights for sturdiness:
- Poly pellets in a sealed pouch OR
- Flat stones, rice bags, bean bags, or washers in a sewn pouch
- Cardboard/plastic canvas discs (optional for flat base)
- Yarn needle, stitch markers
- Stitch glue or hot glue (optional to secure weights)
🧵 Abbreviations (US Terms)
MR – Magic Ring
sc – Single Crochet
inc – Increase (2 sc in one stitch)
dec – Invisible Decrease
sl st – Slip Stitch
ch – Chain
FO – Fasten Off
BLO – Back Loops Only
🐴 Horse Head (Color A)
- MR, 6 sc (6)
- inc × 6 (12)
- (1 sc, inc) × 6 (18)
- (2 sc, inc) × 6 (24)
- (3 sc, inc) × 6 (30)
- (4 sc, inc) × 6 (36)
- (5 sc, inc) × 6 (42)
8–22. sc around (42) - (5 sc, dec) × 6 (36)
- (4 sc, dec) × 6 (30)
- (3 sc, dec) × 6 (24)
26–28. sc around (24)
FO, leave long tail. Stuff firmly, especially near base.
🐽 Nose (Color A with Color C Stripe)
- MR, 6 sc (6)
- inc × 6 (12)
- (1 sc, inc) × 6 (18)
- (2 sc, inc) × 6 (24)
5–7. sc around (24) - Switch to White (Color C) – sc around
9–11. sc around in Color C
Stuff lightly
FO, stitch securely to front of head, centered 5 rounds above base.
🦴 Nostrils (Make 2, Color B)
- MR, 6 sc (6)
- (1 sc, inc) × 3 (9)
- sc around (9)
Flatten slightly, sew to nose sides.
👁 Eyes
Attach safety eyes or stitch black ovals approx. 6–7 rounds below the top, spaced about 12 stitches apart.
👂 Ears (Make 2, Color A)
- MR, 4 sc (4)
- (1 sc, inc) × 2 (6)
- sc around (6)
- (1 sc, inc) × 3 (9)
5–6. sc around (9) - Flatten ear and sl st across top.
FO and sew to sides of head, just behind eye line.
🧵 Mane (Color B)
- Cut 25–30 strands of 10–12 cm yarn.
- Loop and attach to center top of head and toward back using a latch-hook method.
- Trim and shape.
🔳 Base/Neck (Flat, Weighted)
- MR, 6 sc
- inc × 6 (12)
- (1 sc, inc) × 6 (18)
- (2 sc, inc) × 6 (24)
- (3 sc, inc) × 6 (30)
- (4 sc, inc) × 6 (36)
- (5 sc, inc) × 6 (42)
- (6 sc, inc) × 6 (48)
- (7 sc, inc) × 6 (54)
10–14. sc around (54) – create a short cylinder
FO.
🪨 Adding Weight (Essential for bookend function)
- Sew a pouch filled with poly pellets, beans, rice, or sand.
- Insert flat inside bottom cylinder base and glue to a plastic canvas circle or cut cardboard disc.
- Place pouch + cardboard inside the base before sewing closed.
- Stuff upper part of neck firmly and stitch to horse head bottom.
🧷 Assembly
- Attach nose with white stripe to lower front of head.
- Sew nostrils to nose sides.
- Stitch ears and mane to top of head.
- Attach safety eyes and embroider or sew detail if needed.
- Sew base to bottom of head.
- Insert weights inside base if not done yet.
- Secure base with strong stitches for balance and reinforcement.
💡 Optional Stability Upgrades
- Glue small rubber pads underneath
- Use sock-filled gravel bags inside for extra grip
- Use 2–3 layers of plastic canvas disks in the base
These bookends are not only decorative but also functional. Perfect for horse lovers, farm-themed rooms, or even playful adult spaces. Create a matching pair to keep your books standing tall! 📚🐴


