Step into a fairy tale world with this Amigurumi Princess Castle & Doll crochet pattern! Designed to bring a touch of royal charm to your handmade collection, this enchanting set features a beautifully detailed castle and an adorable princess doll. With its turrets, elegant windows, and whimsical accents, the castle creates the perfect backdrop for imaginative play. The princess, dressed in a lovely gown, completes the magical scene, making this crochet creation a delightful addition to any collection. Whether you’re crafting for little dreamers, adding a regal touch to your decor, or simply enjoy making intricate amigurumi designs, this pattern lets you stitch up a miniature kingdom bursting with personality! 👑✨
Designed for customization, this pattern allows you to experiment with different colors, embroidered details, or even tiny accessories like a miniature crown or castle flags for extra charm. Craft a classic princess castle with soft pastel tones, create a vibrant version with bold hues, or even stitch up a full set of fairy tale-inspired amigurumi for a breathtaking display! Whether gifted as a cherished keepsake, displayed as a whimsical accent, or made simply for the joy of crafting, this Amigurumi Princess Castle & Doll is a fun and creative project—perfect for bringing a touch of handmade enchantment to every stitch! 🧶💖
🏰 Amigurumi Princess Castle & Doll Crochet Pattern
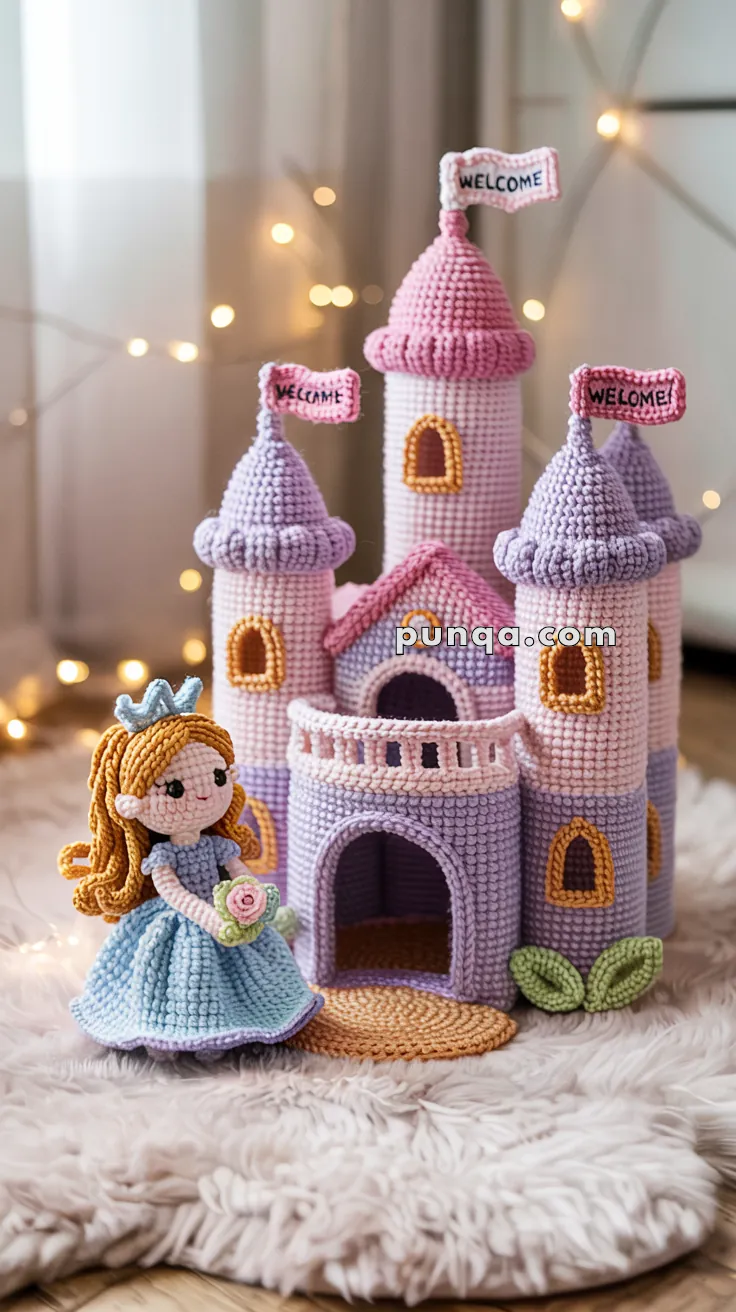
This pattern recreates the exact scene in the photo: three front-facing towers joined into one pastel castle, with pink scalloped roofs, tall gold-framed windows, a semi-circular balcony and a curly-haired princess in a blue dress with a scalloped pink hem and rose bouquet.
✨ Skill Level
High-intermediate – structural work with plastic canvas, doorway shaping, semicircular balcony, and doll shaping.
🧶 Yarn, Hook & Size Notes
The castle in the photo is made with soft chenille/bulky yarn (Dolphin Baby style). Using DK will give a much smaller castle and less plump texture.
- Yarn weight for photo-like result: bulky chenille
- Hook: 4.0–4.5 mm
Approximate finished sizes with bulky yarn:
- Castle height (to top of center flag): 35–40 cm
- Princess doll: 15–16 cm
🧵 Materials
- Bulky chenille yarn in:
- Lavender – side towers & parts of walls
- Light pink – center tower body, balcony, some roof sections
- Dusty pink – scallop roof rims, balcony top edge
- Mustard / soft gold – window frames
- Soft green – leaves at base
- Peach / tan – ground mat
- Soft blue – princess dress & headband crown
- Skin tone – princess face/arms
- Golden – princess hair
- Black embroidery thread (eyes, lashes, mouth)
- Small pink yarn or blush (cheeks)
- Fiberfill stuffing
- Plastic canvas sheet(s) for inside towers, walls & balcony
- Crochet hook 4.0–4.5 mm
- Yarn needle, scissors
- Optional: thin wire for flagpoles
Abbreviations (US Terms)
MR – magic ring
sc – single crochet
inc – increase (2 sc in same st)
dec – decrease (invisible decrease)
ch – chain
sl st – slip stitch
BLO – back loop only
FO – fasten off
Work in continuous rounds unless stated.
🏰 Castle – Overview & Layout
Photo-accurate structure:
- Exactly 3 towers, all front-facing and joined at their bases:
- Left tower: lavender body, dusty pink scallop ring, lavender cone, “WELCOME” flag
- Center tower (tallest): light pink body, dusty pink scallop ring, pink cone, “WELCOME” flag
- Right tower: lavender body, dusty pink scallop ring, lavender cone, “WELCOME” flag
- Towers sit on a connected front wall with an arched doorway cut into the base of the center tower, not a separate cylinder.
- A semi-circular pink balcony sits on the front of the center tower above the door, with 8–10 white vertical posts along the curved front edge.
- Windows: tall vertical gold frames appliquéd to tower fronts (approx. 2 per side tower, 1–2 on center tower).
- Peach oval mat under the front door; a small cluster of green leaves on the left side of the entrance.
Everything below is designed for that layout.
🌅 Ground Mat (Peach / Tan)
Peach/tan
R1: MR, 6 sc
R2: inc x6 (12)
R3: (1 sc, inc) x6 (18)
R4: (2 sc, inc) x6 (24)
R5: (3 sc, inc) x6 (30)
R6: (4 sc, inc) x6 (36)
R7: (5 sc, inc) x6 (42)
R8: (6 sc, inc) x6 (48)
FO.
You’ll place the castle on the back half of this mat so the doorway edge touches the mat’s front.
🗼 Shared Tower Notes
All towers are cylinders with plastic canvas inside for straight sides.
Gauge varies; focus on:
- Side towers: 18 sts circumference
- Center tower: 24 sts circumference and taller
You can adjust height with extra plain rounds.
🗼 Side Towers (Left & Right – Lavender)
Make 2.
Lavender
R1: MR, 6 sc
R2: inc x6 (12)
R3: (1 sc, inc) x6 (18)
R4–R28: sc around (18) – about 14–15 cm tall with chenille.
(If your rounds are shorter, continue to R32.)
FO, leave long tail for sewing.
Cut a plastic canvas rectangle and roll into a tube to fit snugly inside. Insert and lightly stuff (do not overstuff or they will bulge).
🗼 Center Tower (Light Pink – with Doorway)
Light pink
R1: MR, 6 sc
R2: inc x6 (12)
R3: (1 sc, inc) x6 (18)
R4: (2 sc, inc) x6 (24)
R5–R11: sc around (24) – solid base under doorway.
Doorway Opening
We’ll work straight rounds but leave a 10-stitch gap centered at the front.
Mark 12th stitch of the round as “front center.”
R12: sc to 5 sts before center mark, ch 10, skip 10 sts, sc to end (24 total including chains).
R13–R14: repeat R12 (sc over chains as normal sts). You now have a rectangular opening.
Continue Height
R15–R32: sc around (24) until tower is clearly taller than side towers (by ~4–6 cm).
FO, leave long tail.
Insert plastic canvas cylinder inside, aligning doorway cut-out with opening. Stuff firmly.
Doorway Edge
With dusty pink, join at lower right corner of opening.
Round doorway with sc evenly around edge (work up one side, across top arch in small sts, down other side). Keep shape slightly pointed/rounded like the photo.
🌸 Roof Scallop Rings (All 3 Towers – Dusty Pink)
For each tower, join dusty pink at top edge of body.
(Skip 1 st, in next st work: sc, hdc, dc, hdc, sc) – this makes one scallop.
Repeat around the full circumference, adjusting by occasionally skipping 2 sts if needed to keep fabric flat.
- Side towers: ~9–10 scallops
- Center tower: ~12 scallops
FO and weave in.
🎀 Cone Roofs
Side Tower Cones (Lavender) – Make 2
Lavender
R1: MR, 4 sc
R2: sc around (4)
R3: (1 sc, inc) x2 (6)
R4–5: sc around (6)
R6: (2 sc, inc) x2 (8)
R7–8: sc around (8)
R9: (3 sc, inc) x2 (10)
R10–11: sc around (10)
R12: (4 sc, inc) x2 (12)
R13–14: sc around (12)
R15: (5 sc, inc) x2 (14)
Test on tower; add one more increase round if needed so cone base matches tower top snugly.
Lightly stuff the tip only. Sew cone center to scallop ring (the scallops flare under the cone).
Center Tower Cone (Pink)
Same pattern but continue increases:
After R15 (14 sts):
R16–17: sc around
R18: (6 sc, inc) x2 (16)
R19–20: sc around
R21: (7 sc, inc) x2 (18)
R22–24: sc around
Check against tower; add another increase round if needed to cover full diameter. Attach as above.
🪟 Tall Gold Windows (Appliqué Frames)
Mustard/gold
Ch 9
R1: sc in 2nd ch, sc 6, 3 sc in last ch; continue on opposite side of chain, sc 6, 2 sc in first st (18)
R2: sc 7, inc x3, sc 7, inc x2 (23)
R3: sc 8, inc x3, sc 8, inc x2 (28)
FO leaving long tail.
You now have a tall oval/pointed arch frame. Lightly pinch top to sharpen the arch.
Make:
- 2 windows for each side tower (total 4)
- 1–2 for center tower (front and/or sides)
Sew to tower fronts. If desired, sew a darker lilac patch behind the center opening before attaching for depth.
🚩 Flags & Poles
Flag Poles (Make 3)
Pink (or matching roof)
Ch 24
R1: sl st in back bump of each ch (23) – work tightly.
Optional: Thread a thin wire through to stiffen.
FO.
Flags (Make 3 – White or light pink)
Ch 14
R1: sc in 2nd ch and across (13)
R2–4: ch 1, turn, sc across (13)
Border: switch to dusty pink, sl st evenly around, adding tiny waves by doing (sl st, ch 1, sl st) occasionally along the free edge.
Embroider “WELCOME” in black across center.
Fold one short side of flag around top of pole and sew in place. Attach poles to roof tips (one per tower).
🌿 Leaves Cluster (Left Side Only)
Soft green – make 3
Ch 14
R1: starting in 2nd ch, sc 1, hdc 3, dc 6, hdc 3, sc 1
R2: sl st along center spine for a faint vein (optional)
FO with tail.
Later, sew leaves together in a small fan and attach to left of front door on the ground mat.
🧱 Semi-Circular Balcony (Pink with White Posts)
Balcony sits on front of center tower above doorway, projecting forward in a U-shape.
Balcony Platform (Pink)
Ch 30
R1: sc in 2nd ch and across (29)
R2: ch 1, turn, inc, sc 27, inc (31)
R3: ch 1, turn, sc across (31)
R4: repeat R2 (33)
R5: ch 1, turn, sc across (33)
R6: repeat R2 (35)
You now have a slightly curved strip.
FO. Cut a matching semi-circular piece of plastic canvas and whipstitch underneath for stiffness.
Balcony Edge Trim (Dusty Pink)
Join dusty pink along front curved edge:
(sc, ch 2, sc in same st, skip next st) repeat along edge to form tiny scallops.
Balcony Posts (White – Make 8–10)
Ch 6
R1: sl st back along chain (5)
FO with tail.
Sew posts vertically at equal spacing along the front curved edge of the balcony, from platform edge upward (≈1.5–2 cm tall), mimicking solid little columns.
To mount balcony: position it directly over doorway on center tower, flat back edge against the tower, and sew all along back edge.
👑 Princess Doll (Photo-Accurate)
Head (Skin Tone)
R1: MR, 6 sc
R2: inc x6 (12)
R3: (1 sc, inc) x6 (18)
R4: (2 sc, inc) x6 (24)
R5–R8: sc around (24)
R9: (2 sc, dec) x6 (18)
R10: (1 sc, dec) x6 (12)
Stuff firmly. FO leaving tail for attaching to body.
Safety eyes on R6, 5–6 sts apart.
Embroider small mouth and lashes; add pink cheeks.
Hair Cap & Ringlets (Golden)
Cap
R1: MR, 6
R2: inc x6 (12)
R3: (1 sc, inc) x6 (18)
R4: (2 sc, inc) x6 (24)
R5: sc around (24)
FO and sew to head.
Ringlets
For each curl:
Ch 30
R1: 3 sc in each ch back to start – this gives tight spiral ringlets.
Make 8–10 ringlets:
- 4–5 around back
- 2–3 on each side framing the face
Sew securely.
Crown Headband (Soft Blue)
Ch long enough to fit snugly around hairline (≈26–28 ch).
R1: sl st in each ch.
R2: (sl st, ch 3, sl st in same st, skip 1) repeat to make small crown points.
Join ends into a ring and sew in place.
Body & Arms
Body
Skin tone
R1: MR, 6
R2: inc x6 (12)
R3–R4: sc (12)
Switch to soft blue (bodice):
R5: (1 sc, inc) x6 (18)
R6–R8: sc (18)
Lightly stuff, then attach head.
Arms (Make 2)
Skin tone
R1: MR, 5
R2–R4: sc (5)
Switch to soft blue:
R5–R7: sc (5)
FO, do not stuff heavily; just a little in the hand. Sew at shoulders.
Full Skirt with Scalloped Pink Hem
Soft blue
Join yarn around bottom of body in FLO.
R1: (1 sc, inc) x9 (27)
R2: (2 sc, inc) x9 (36)
R3: (3 sc, inc) x9 (45)
R4–R7: sc around (45) – skirt length as in photo.
Switch to dusty pink.
R8 (scalloped edge): (sc in next st, ch 2, sc in same st, skip 1 st) repeat around.
FO and weave in. This creates the clearly visible pink scalloped hem from the photo.
Bouquet
Soft pink (rose)
Ch 15
R1: hdc in 2nd ch and in each ch across. FO.
Roll strip tightly from one end to form a rose; stitch base.
Leaves (soft green – make 2):
Ch 7
R1: sc, hdc, dc, dc, hdc, sc in last, then sl st down center if desired.
Arrange leaves behind rose and sew into one of her hands.
🌟 Assembly & Layout
- Place Castle on Mat
- Position center tower on back center of mat, aligned so doorway touches front edge.
- Sew or glue base down.
- Attach left and right towers snugly to each side of the center tower, slightly forward so fronts form one line.
- Attach Balcony
- Place balcony above doorway on center tower, back edge flat, curve projecting forward.
- Sew fully across back edge and add a few stitches from balcony base to side towers for stability.
- Add Windows & Leaves
- Sew gold windows to towers as in photo.
- On the left side of doorway, attach the small cluster of three green leaves overlapping slightly on the mat.
- Add Roofs & Flags
- Sew scalloped cone roofs to each tower.
- Attach flagpoles: one at tip of each cone, leaning slightly outward.
- Princess Placement
- Sit princess on mat in front-left of doorway, skirt spread, bouquet visible.
- You can sew her in place or leave her removable for play.
🌙 A Finished Fairytale
When you’ve worked through the last stitch, you’ll have a castle that truly mirrors the photo: three front-facing pastel towers joined into a single structure, scalloped pink roof rims and cone tops waving “WELCOME” flags, tall golden windows, a soft peach mat and green leaves, and a princess whose blue skirt ends in a delicate pink scallop edge as she holds her rose bouquet.
It’s a scene that feels like it stepped out of a storybook — built entirely from your yarn, your hands, and a little bit of magic.