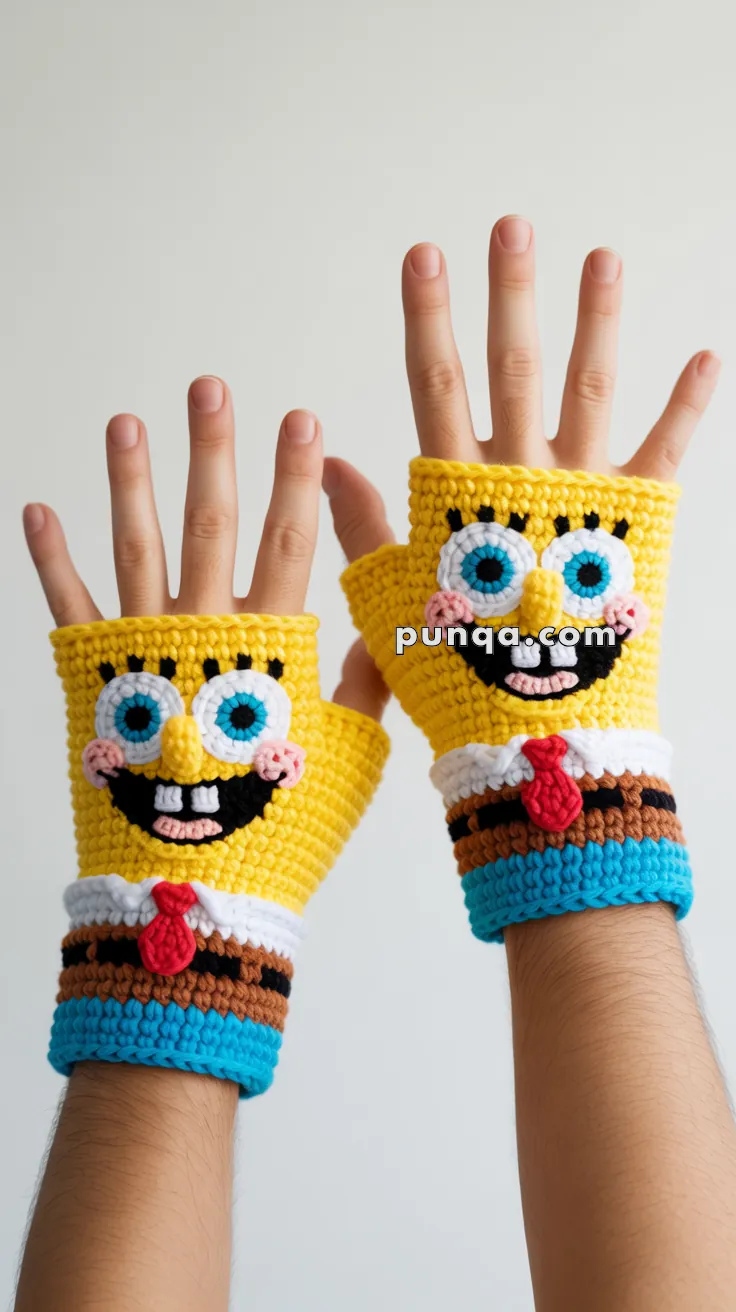
Add a splash of cartoon fun to your wardrobe with the SpongeBob-Inspired Fingerless Gloves, a cheerful crochet project that’s as playful as it is practical! 🧶🌊 Bright yellow stitches capture the quirky charm of everyone’s favorite sponge, while the fingerless design keeps your hands cozy yet free to move. Perfect for fans of the show or anyone who loves adding a touch of whimsy to their everyday accessories, these gloves are sure to bring smiles with every wear.
Ideal for crocheters who enjoy mixing functionality with personality, this pattern lets you stitch up gloves that are both fun and useful. Whether you’re crafting them as a gift, wearing them for a pop of cartoon flair, or pairing them with other handmade pieces, the SpongeBob-Inspired Fingerless Gloves are a joyful way to crochet comfort, character, and a sprinkle of handmade magic—one loop at a time! 🧵✨💛
🧶 SpongeBob-Inspired Crochet Fingerless Gloves (Kids & Adults)
Add a burst of cartoon joy to your wardrobe with these SpongeBob-inspired fingerless gloves! Designed to closely match the reference photo, this pattern features tall yellow cuffs, oversized layered eyes, a wide upward-curved smile with two large teeth, subtle eyebrows, rosy cheeks placed below the eyes, a crisp white shirt collar, a red tie, a clear black pants stripe, and bright blue pant cuffs. Fun, expressive, and cozy, these gloves are guaranteed to turn heads and spark smiles.
✨ Skill Level
Intermediate
Includes flat construction, sewn assembly, and multiple crocheted appliqué elements.
📏 Finished Sizes
Kids (approx. ages 5–10)
• Width (flat): 7.5–8 cm
• Length: 13–14 cm
Adult
• Width (flat): 9.5–10 cm
• Length: 16–17 cm
Fit is stretchy and forgiving.
🧶 Materials
Worsted-weight yarn:
• Yellow – main glove
• White – eyes, teeth, shirt collar
• Light blue – eye irises
• Black – eye outlines, eyelids, mouth, pants stripe
• Brown – pants
• Blue – pant cuffs
• Red – tie and tongue
• Cream or soft pink – cheeks
Tools:
• 4.0 mm crochet hook (adults)
• 3.5 mm crochet hook (kids)
• Yarn needle
• Scissors
• Stitch marker
🧵 Abbreviations (US Terms)
ch – chain
sc – single crochet
dc – double crochet
sl st – slip stitch
inc – increase
dec – decrease
FO – fasten off
🟨 PART 1 — Glove Base (Flat Rectangle)
The glove base is crocheted flat, then sewn into a tube with a thumb opening.
Kids size:
Chain 26
Work until rectangle measures 13–14 cm
Adult size:
Chain 32
Work until rectangle measures 16–17 cm
Pattern (both sizes):
With yellow yarn, single crochet in the second chain from the hook and across. Turn.
Continue working single crochet rows until the desired length is reached.
Fasten off, leaving a long tail.
Assembly:
Fold the rectangle in half vertically. Sew from the bottom upward, leaving a thumb opening.
• Kids: 4 cm opening
• Adults: 5 cm opening
Turn right side out.
🟦 PART 2 — Pants, Shirt & Cuffs
(Worked directly onto the glove)
Blue Pant Cuff
Attach blue yarn to the lower edge.
Work 3 rounds of single crochet evenly around the opening.
Fasten off.
Pants Section with Black Stripe
Attach brown yarn above the blue cuff.
Rounds 1–2: single crochet around in brown.
Change to black.
Round 3: single crochet around in black to form the visible stripe.
Fasten off.
Shirt Collar (White Scallops)
Attach white yarn at the top edge.
Repeat around: single crochet, skip one stitch, five double crochets in the next stitch, skip one stitch.
Fasten off.
👀 PART 3 — Eyes (Make 2 per glove)
White eye base:
Magic ring with 6 single crochets.
Increase around to 12.
Work (single crochet, increase) around to 18.
Work (2 single crochet, increase) around to 24.
Fasten off.
Blue iris:
Magic ring with 6 single crochets.
Increase around to 12.
Fasten off.
Black pupil:
Magic ring with 4 single crochets.
Fasten off.
Eyelid line:
Chain 8.
Single crochet in the second chain from the hook and across (7 stitches).
Fasten off.
Eye assembly:
Sew pupil to iris.
Sew iris centered on the white eye base.
Sew eyelid along the upper outer edge at a slight angle.
Optionally add a tiny white highlight stitch.
Attach eyes high and close together on the glove front.
🟡 PART 4 — Facial Features
Nose (3D, Centered)
With yellow yarn:
Magic ring with 6 single crochets.
Rounds 2–4: single crochet around.
Round 5: (single crochet, increase) three times (9 stitches).
Stuff lightly and sew centered between the eyes.
Cheeks (Make 2)
With cream or soft pink yarn:
Magic ring with 6 single crochets.
Slip stitch and fasten off.
Flatten gently.
Placement:
Sew each cheek directly below the outer corner of each eye, slightly offset downward.
Teeth (Make 2)
With white yarn:
Chain 5.
Row 1: single crochet 4 stitches.
Row 2: single crochet 4 stitches.
Fasten off.
Sew side by side beneath the smile.
Mouth (Wide, Upward Curve)
With black yarn:
Chain 18.
Row 1: single crochet 17.
Row 2: decrease, single crochet 13, decrease.
Row 3: decrease, single crochet 11, decrease.
Fasten off.
Sew with corners angled upward to form the smile.
Tongue
With red yarn:
Chain 4.
Single crochet 3.
Fasten off and stitch inside the lower center of the mouth.
Eyebrows
With black yarn, embroider 2–3 very short diagonal stitches just above each eye, extremely close to the eyelid line. Keep them subtle.
👔 PART 5 — Shirt Collar & Tie Appliqué
Optional collar strip for extra depth:
With white yarn, chain 24.
Repeat across: single crochet, skip one stitch, four double crochets in next stitch, skip one stitch.
Fasten off and sew directly under the face.
Tie:
Knot: magic ring with 5 single crochets. Fasten off.
Tail: chain 5, slip stitch back to the knot. Fasten off.
Attach tie centered beneath the collar with the tail pointing downward.
🧵 Final Assembly Order
- Sew glove seam
- Add blue cuff
- Add brown pants section
- Add black stripe
- Add shirt collar
- Attach eyes
- Add eyebrows
- Sew mouth
- Attach teeth
- Add cheeks
- Stuff and sew nose
- Attach tie
- Weave in all ends
Repeat for the second glove.
🎁 Finished SpongeBob-Inspired Gloves
Your fingerless gloves are now complete — bright, expressive, and instantly recognizable. With oversized eyes, a joyful grin, and iconic colors, they’re perfect for kids, playful adults, cosplay lovers, or anyone who enjoys a little cartoon magic in everyday life.
Slip them on and let the smiles begin! 🧶💛🍍