Welcome the holiday season with a hearty dose of handmade cheer thanks to the Santa Christmas Wreath, a jolly crochet project that’s bursting with festive flair! 🎅🎄 Featuring Santa’s iconic red suit, fluffy white beard, and playful belt detail, this wreath is a merry way to dress up your door, mantel, or craft space. Whether you’re decking the halls or gifting a little holiday magic, this whimsical design brings warmth and wonder to any corner of your home.
This pattern is perfect for crocheters who love bold colors, cozy textures, and seasonal charm. You can personalize your wreath with sparkly yarn, add tiny bells or pom-poms, or even stitch up a matching set for every room. Whether you’re crafting for fun, spreading handmade joy, or creating a centerpiece for your holiday décor, the Santa Christmas Wreath is a delightful way to celebrate the season—one festive loop at a time! 🧶✨
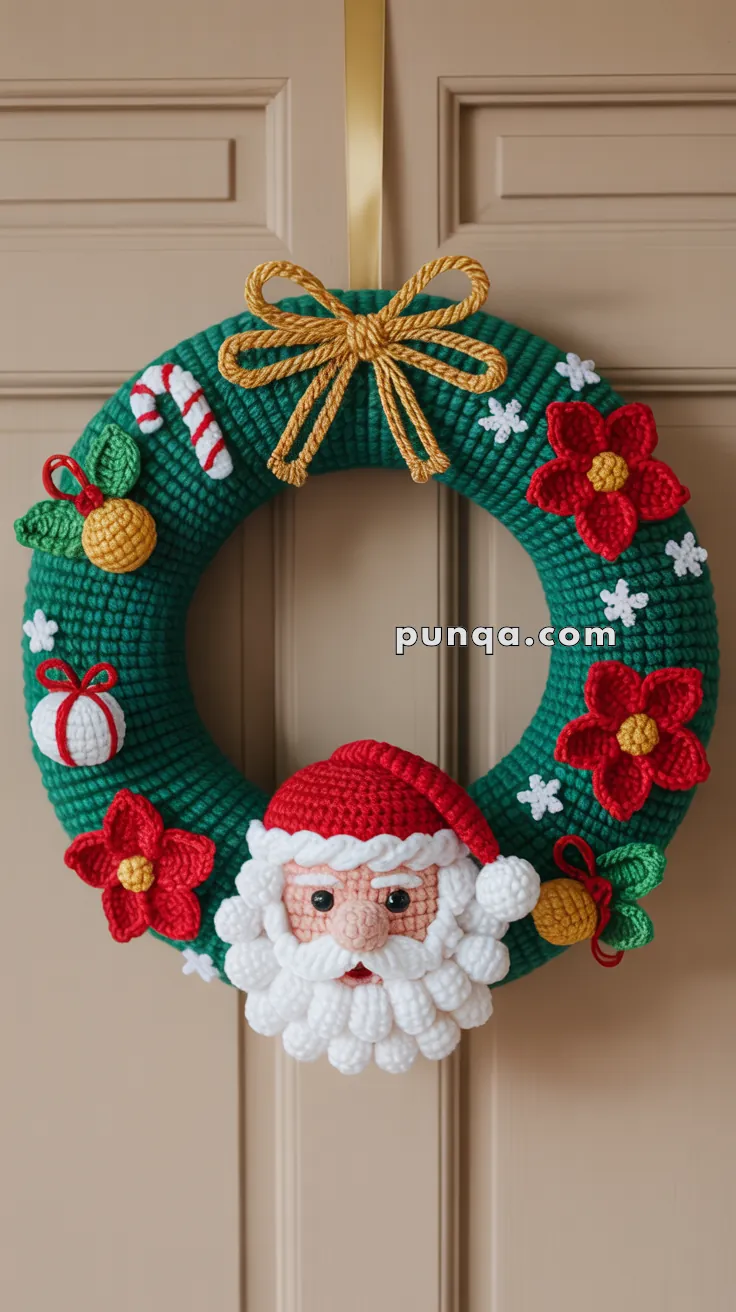
🎅 Crochet Santa Christmas Wreath Pattern
Bring handmade holiday cheer to your home with this delightful Crochet Santa Christmas Wreath!
Featuring a fluffy-bearded Santa, textured evergreen wreath, poinsettias, candy cane, ornaments, and a golden bow — it’s a festive showstopper perfect for your door or wall.
✨ Skill Level
Intermediate to Advanced – includes puff stitches, shaping, and multiple small pieces.
📏 Finished Size
Approx. 30 cm (12 in) diameter when made with medium (worsted) yarn and a 3.5 mm hook.
🧶 Materials
- Green (wreath base): 120 g
- Red (flowers, Santa hat, ribbons): 40 g
- White (Santa beard, snowflakes, candy cane, gift): 40 g
- Beige / skin tone (Santa face): 15 g
- Yellow / gold (bow and ornament tops): 20 g
- Dark green (leaves, ornament details): 10 g
- Brown (eyebrows, small accents): 5 g
Additional supplies:
- 3.5 mm crochet hook
- Fiberfill stuffing
- Yarn needle
- Stitch marker
- 10 mm safety eyes
- Foam wreath ring (25–30 cm)
- Hanging ribbon
🪡 Abbreviations (US Terms)
MR – Magic Ring
sc – Single Crochet
inc – Increase (2 sc in same st)
dec – Decrease (sc2tog)
ch – Chain
sl st – Slip Stitch
hdc – Half Double Crochet
dc – Double Crochet
puff – (Yarn over, insert hook, pull up loop) ×4, yarn over, pull through all loops
bobble – (Yarn over, pull up loop, yarn over, pull through 2) ×5, yarn over, pull through all
FO – Fasten Off
🌿 Wreath Base
With green yarn:
1️⃣ Ch enough to wrap around the foam ring (approx. 180 ch).
2️⃣ R1: sc in 2nd ch from hook, sc across.
3️⃣ R2: (2 sc, 1 bobble) repeat to end.
4️⃣ R3: sc across.
5️⃣ Repeat R2–R3 until your strip wraps fully around the wreath (approx. 35–40 rows).
6️⃣ Sew short edges together to form a tube.
7️⃣ Slide over the foam base and sew closed at the back.
This creates the dense, ribbed texture visible in the photo.
🎅 Santa Claus
Head (Beige)
R1: MR, 6 sc [6]
R2: inc ×6 [12]
R3: (1 sc, inc) ×6 [18]
R4: (2 sc, inc) ×6 [24]
R5: (3 sc, inc) ×6 [30]
R6–R11: sc around [30]
R12: (3 sc, dec) ×6 [24]
R13: (2 sc, dec) ×6 [18]
Stuff firmly.
R14: (1 sc, dec) ×6 [12]
R15: dec ×6 [6]
FO and close.
Insert safety eyes between R7–R8, about 6 stitches apart.
Embroider eyebrows with brown yarn above the eyes.
Nose (Beige)
R1: MR, 6 sc [6]
R2: (1 sc, inc) ×3 [9]
R3–R4: sc around [9]
Stuff lightly. FO.
Sew centered between eyes.
🎅 Beard (White – Individual Puff Clusters)
This beard is made of separate puff clusters, sewn individually for the full fluffy 3D effect.
Puff Cluster (make 16):
R1: MR, puff st ×6, sl st to join, FO leaving a long tail for sewing.
➡ Each cluster measures ~2–2.5 cm. Lightly stuff before attaching if desired.
Arrangement (Cloud Formation):
- Bottom row: 6 clusters forming a gentle chin curve.
- Middle row: 4 clusters just above, slightly overlapping.
- Upper row: 2–3 clusters near cheeks.
- Optional fillers: 1–2 small clusters to fill gaps.
Sew each cluster one by one to the lower face, layering them for the soft rounded shape seen in the photo.
👨🦳 Mustache (White – Upper Beard Clusters)
Formed by 2 puff clusters positioned side by side above the beard’s center.
Sew them under the nose, curving slightly upward at the outer edges.
Pinch gently while sewing to shape the mustache lift.
🎅 Hat (Red with White Brim and Pom-Pom)
R1: MR, 6 sc [6]
R2: (1 sc, inc) ×3 [9]
R3: (2 sc, inc) ×3 [12]
R4: (3 sc, inc) ×3 [15]
R5: (4 sc, inc) ×3 [18]
R6: (5 sc, inc) ×3 [21]
Continue increasing every few rounds until you reach 36 sts.
R12–R18: sc around [36]
Switch to white for brim: R19–R21: sc around [36]
FO.
Creating the slouch before pom-pom:
Work 2–3 extra rounds of plain sc after R18.
Pinch the tip gently to one side, fold about halfway down, and tack it with a few hidden stitches inside.
Attach pom-pom to the bent tip to hold the natural droop.
🎀 Poinsettias (×3)
First Layer (Red):
MR, (ch 3, 2 dc, ch 3, sl st) ×5. FO.
Second Layer (Red):
MR, (ch 4, 3 dc, ch 4, sl st) ×5. FO.
Place behind the first layer.
Center (Yellow):
MR, 6 sc, FO.
Sew to middle of flower.
(Optional: make outer petals with ch 4 for a larger look, as in the photo.)
❄️ Snowflakes (×6–8)
With white yarn:
Ch 4, sl st to form ring.
R1: (ch 3, sl st in 2nd ch, ch 2, sl st in ring) ×6. FO.
Lightly shape points for neatness.
🍬 Candy Cane (White & Red)
R1: MR, 6 sc [6]
R2–R4: sc around [6]
Switch to red: R5–R7: sc around [6]
Continue alternating 3 white / 3 red until ~14–15 rounds total.
Stuff lightly as you go.
Curve gently and sew onto wreath.
🎁 Gift Box (White & Red)
Box:
Make 6 small 8×8 sc squares.
Sew into a cube. Stuff lightly.
Ribbon:
Ch 35 in red yarn.
Wrap vertically and horizontally.
Tie small bow on top.
🎄 Ornaments (Yellow & Green)
Ball:
R1: MR, 6 sc [6]
R2: inc ×6 [12]
R3: (1 sc, inc) ×6 [18]
R4–R5: sc around [18]
R6: (1 sc, dec) ×6 [12]
R7: dec ×6 [6]
Stuff lightly and close.
Loop:
Ch 6–8 and attach at top.
Add green leaf and red bow if desired.
🎗️ Gold Bow (Top Accent)
Hold two strands of gold/yellow yarn together.
Ch 60.
Form two large loops and tie tightly at center.
Sew to the top of the wreath.
🪡 Assembly
1️⃣ Wrap and sew green wreath base securely.
2️⃣ Attach Santa at bottom center.
3️⃣ Arrange poinsettias along right and lower-left side.
4️⃣ Place candy cane on upper left, gift near bottom left.
5️⃣ Add ornaments and snowflakes for balance.
6️⃣ Sew large gold bow to top center.
7️⃣ Attach hanging ribbon at back.
💫 Finishing Touches
- Fluff the puff clusters for a cloud-soft beard.
- Adjust mustache and hat tilt with small hidden stitches.
- Shape poinsettias and snowflakes.
- Use a lint roller lightly to smooth yarn before display.
🎄 Your Crochet Santa Christmas Wreath is complete!
This joyful handmade piece captures the warmth of Christmas with every detail — a cheerful Santa, festive greens, and a touch of golden sparkle to welcome everyone home.


Non vedo l’ora di farla grazie
MERCI POUR VOS MODELES
Beautiful Christmas Wreath. Can’t wait to start working on it. Instructions seem really easy to follow. Thank you for this gorgeous pattern!