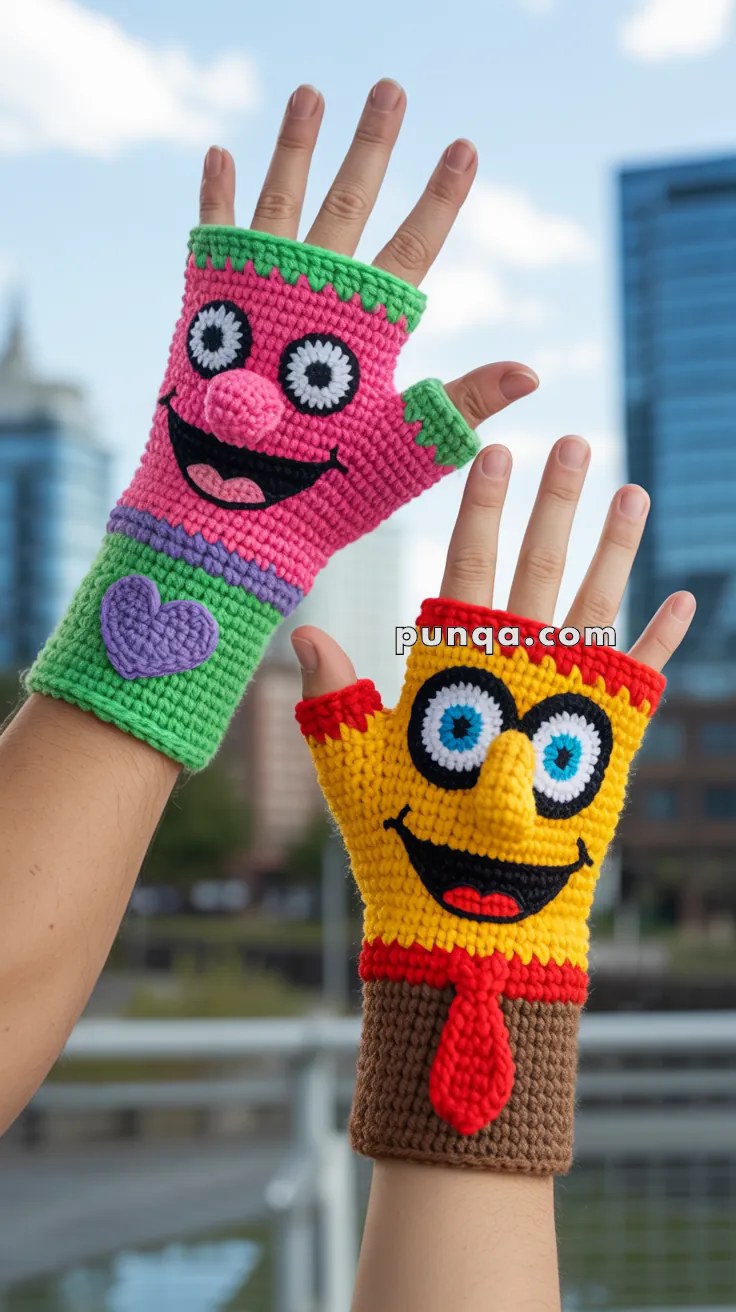
Add a splash of personality to your winter wardrobe with the Character Fingerless Gloves, a playful crochet project that’s bursting with charm and color! 🧤💖 Featuring two cheerful characters—a pink one with a round nose and heart patch, and a yellow one with a long nose and snazzy red tie—these gloves are anything but ordinary. Their bold zigzag tops and bright cartoon faces make them a standout accessory that’s sure to spark smiles wherever you go.
This pattern is perfect for crocheters who love quirky designs and expressive details. You can mix and match colors, add extra embellishments, or even create your own character variations for a truly custom look. Whether you’re crafting for fun, gifting with flair, or just keeping your hands cozy while showing off your creative side, the Character Fingerless Gloves are a joyful way to stitch up some wearable whimsy—one animated loop at a time! 🧶✨
🧤 Character Fingerless Gloves Crochet Pattern
Bring playful energy to your winter wear with these fun and colorful fingerless gloves! One glove is a cheerful pink character with a round nose and heart patch, while the other is a goofy yellow character with a long nose and tie. They’re bold, mismatched, and guaranteed to spark smiles.
✨ Skill Level
Intermediate to Advanced – Requires knowledge of working in the round, color changes, 3D shaping, and appliqué assembly.
📏 Finished Size
Fits teens/adults (hand circumference 17–20 cm / 6.5–8″). Adjustable.
🧶 Materials
Yarn: Worsted weight (4) acrylic
- Pink Glove: Hot pink, lime green, purple
- Yellow Glove: Bright yellow, red, brown
- Face Details: White, black, light blue, light pink
Other Supplies:
- 3.5 mm (E) crochet hook
- 4.0 mm (G) crochet hook (for glove body)
- Yarn needle & scissors
- Stitch markers
- Fiberfill stuffing
- Black felt (optional, for mouths)
- Fabric glue or hot glue (optional)
- Sewing thread matching yarn colors
🔤 Abbreviations (US Terms)
- MR = Magic Ring
- sc = single crochet
- hdc = half double crochet
- dc = double crochet
- inc = increase (2 sc in same st)
- dec = invisible decrease
- sl st = slip stitch
- ch = chain
- BLO = back loops only
- st(s) = stitch(es)
- R = Round/Row
- FO = fasten off
🧤 GLOVE BASE (Make 2)
Worked in continuous rounds from cuff up.
Cuff Section
Pink Glove – Purple Cuff:
- With purple and 4.0mm hook, ch 32, join with sl st to form ring (don’t twist).
- R1–4: sc in each st around (32).
- Change to hot pink.
Yellow Glove – Brown Cuff:
- With brown and 4.0mm hook, ch 32, join with sl st to form ring.
- R1–6: sc in each st around (32).
- Change to bright yellow.
Main Body
Continue with main color (pink or yellow):
- R5–18 (Pink) or R7–20 (Yellow): sc around (32).
Thumb Gusset
- R19/21: sc 16, ch 6, skip 6 sts, sc 10 (32 total).
- R20/22: sc around, working sc in each ch st (32).
Upper Hand Section
- R21–24 (Pink) or R23–26 (Yellow): sc around (32).
- R25/27: Switch to green (pink glove) or red (yellow glove) for zigzag edge.
Zigzag Edge
- R26/28: sc 3, (hdc, dc, hdc) in next st, skip 1 repeat around. Sl st to first sc. FO.
👀 3D DOME EYES (Make 4 total – 2 per glove)
These create the authentic raised, shiny-looking eyes from the photo.
Pink Glove Eyes (Make 2)
White Base (larger dome):
- With white and 3.5mm hook:
- MR, 6 sc into ring (6)
- R2: inc in each st (12)
- R3: (sc, inc) x 6 (18)
- R4: (sc 2, inc) x 6 (24)
- R5: BLO sc around (24) – creates ridge
- R6–7: sc around (24)
- R8: (sc 2, dec) x 6 (18)
- Stuff firmly with fiberfill
- R9: (sc, dec) x 6 (12)
- R10: (dec) x 6 (6)
- FO, close gap with needle.
Black Pupil (small dome):
- With black:
- MR, 6 sc into ring (6)
- R2: inc in each st (12)
- R3: BLO sc around (12) – creates ridge
- R4–5: sc around (12)
- R6: (dec) x 6 (6)
- Stuff lightly, FO, close gap.
Assembly: Sew black pupil centered on white dome.
Yellow Glove Eyes (Make 2)
White Base (same as above)
Blue Iris (medium dome):
- With light blue:
- MR, 6 sc into ring (6)
- R2: inc in each st (12)
- R3: (sc, inc) x 6 (18)
- R4: BLO sc around (18)
- R5–6: sc around (18)
- R7: (sc, dec) x 6 (12)
- Stuff firmly
- R8: (dec) x 6 (6)
- FO, close gap.
Black Pupil (small dome):
- Same as pink glove pupils above
Assembly: Sew black pupil on blue iris, then sew blue iris centered on white base.
👃 NOSES
Pink Glove – Round Bumpy Nose
Uses bobble/popcorn texture for authentic bumpy look.
- With light pink and 3.5mm hook:
- MR, 6 sc (6)
- R2: inc in each st (12)
- R3: (sc, inc) x 6 (18)
- R4: (sc 2, inc) x 6 (24)
- R5–6: sc around, adding bobbles randomly:
- Bobble: 5 dc in same st, remove hook, insert in first dc, pull through dropped loop
- Make 4–6 bobbles scattered around these rounds
- R7: (sc 2, dec) x 6 (18)
- R8: (sc, dec) x 6 (12)
- Stuff very firmly
- R9: (dec) x 6 (6)
- FO, weave closed.
Yellow Glove – Long Protruding Nose
Creates tubular shape that sticks out.
- With bright yellow and 3.5mm hook:
- MR, 5 sc (5)
- R2: inc in each st (10)
- R3: (sc, inc) x 5 (15)
- R4–10: sc around (15) – creates length
- R11: (sc, dec) x 5 (10)
- Stuff firmly
- R12: (dec) x 5 (5)
- FO, weave closed.
👄 MOUTHS
Pink Glove – Wide Smile
Cut from black felt OR crochet flat piece:
Option 1 – Felt (recommended for glossy look):
- Cut wide smile shape approximately 3 cm wide
- Curve: 0.5 cm tall at center, tapering to points
- Glue or sew in place
Option 2 – Crochet:
- With black, ch 12
- R1: sc in 2nd ch from hook, sc across (11)
- R2: sc 2, hdc 7, sc 2 (11)
- FO, leaving long tail.
- Shape into smile curve and sew down.
Yellow Glove – Wide Smile with Tongue
Mouth (same as pink glove above, but wider):
- Ch 14, work 2 rows creating curved shape
Tongue:
- With red, ch 5
- R1: sc in 2nd ch from hook, sc 3 (4)
- R2: dec, dec (2)
- R3: dec (1)
- FO.
- Sew to bottom center of mouth opening.
💜 PINK GLOVE – Heart Patch
- With purple and 3.5mm hook:
- Ch 2
- In 2nd ch from hook: (3 dc, ch 2, sl st, ch 2, 3 dc)
- This creates basic heart shape
- OR: MR, ch 3, 3 dc in ring, ch 2, sl st in ring, ch 2, 3 dc in ring, ch 3, sl st in ring. FO.
- Shape and block to create heart form.
🎀 YELLOW GLOVE – Neck Tie
Tie Knot
- With red and 3.5mm hook, ch 6
- R1–3: sc across (5), ch 1, turn
- FO.
Tie Tail (Triangle)
- With red, ch 2
- R1: 2 sc in 2nd ch from hook (2)
- R2: inc, inc (4)
- R3: inc, sc 2, inc (6)
- R4: sc across (6)
- FO.
Assembly: Sew knot rectangle centered, with triangle point below.
🎨 ASSEMBLY & PLACEMENT
Pink Glove (Right Hand in Photo)
Position with palm facing you, thumb hole on left:
- Green Zigzag Edge: Already attached at top
- Eyes: Rounds 15–17, positioned 4 stitches apart, slightly angled toward each other
- Nose: Rounds 19–21, centered between and slightly below eyes
- Mouth: Rounds 23–24, centered below nose, curved smile
- Heart Patch: On purple cuff section, rounds 2–4, positioned on outer wrist side
Yellow Glove (Left Hand in Photo)
Position with palm facing you, thumb hole on right:
- Red Zigzag Edge: Already attached at top
- Eyes: Rounds 17–19, positioned very close (2–3 stitches apart), slightly cross-eyed look
- Nose: Rounds 20–23, centered, angled slightly outward
- Mouth: Rounds 24–26, wide smile centered below nose
- Tongue: Bottom center of mouth
- Tie: On brown cuff, tie knot on rounds 3–5, triangle point extending down
🧵 Attachment Tips
- Pin all pieces in position before sewing
- Use matching thread for invisible attachment
- Sew around entire perimeter of each facial feature 2–3 times for security
- Stuff eyes and noses firmly for best 3D effect
- Use fabric glue on felt mouth edges to prevent fraying
📐 Size Adjustments
- Smaller hands: Chain 28, work 28 sts per round
- Larger hands: Chain 36, work 36 sts per round
- Longer fingers: Add 2–4 rounds before zigzag edge
- Shorter cuff: Work fewer rounds in cuff color
✨ Finishing
Weave in all ends. Block lightly if needed. The 3D facial features should be very secure and prominent. The gloves should be snug but stretchy around the hand.
They’re cozy, cartoonish, and absolutely fun! 🧤✨