Oh, the joy of crafting! There’s something utterly delightful about creating amigurumi wreaths, isn’t there? 🎉 Picture this: a whimsical circle of crocheted characters, each one lending its own bit of charm and personality to your doorway. Amigurumi wreaths have quickly become a beloved project among crocheters, and it’s not hard to see why. They offer a perfect blend of creativity and coziness, with endless possibilities to explore. Whether it’s a seasonal design bursting with vibrant flowers and buzzing bees for spring or a festive holiday wreath adorned with tiny snowmen and jolly Santas, there’s something deeply satisfying about seeing these little creations come to life.
Now, if you’re wondering how the magic happens, let me tell you—it’s quite an adventure! 😄 The process begins with the selection of themes and colors, which is my favorite part because it sets the tone for the entire project. Once I’ve settled on a theme, I dive into crafting the individual amigurumi pieces. Each one is lovingly crocheted, stuffed, and detailed, transforming mere yarn and stuffing into adorable figures. The assembly is where everything comes together like a perfect puzzle—attaching these elements onto a wreath base is so gratifying. Each stitch brings me closer to a unique, joyful masterpiece that not only enhances my space but brings smiles to everyone who sees it.
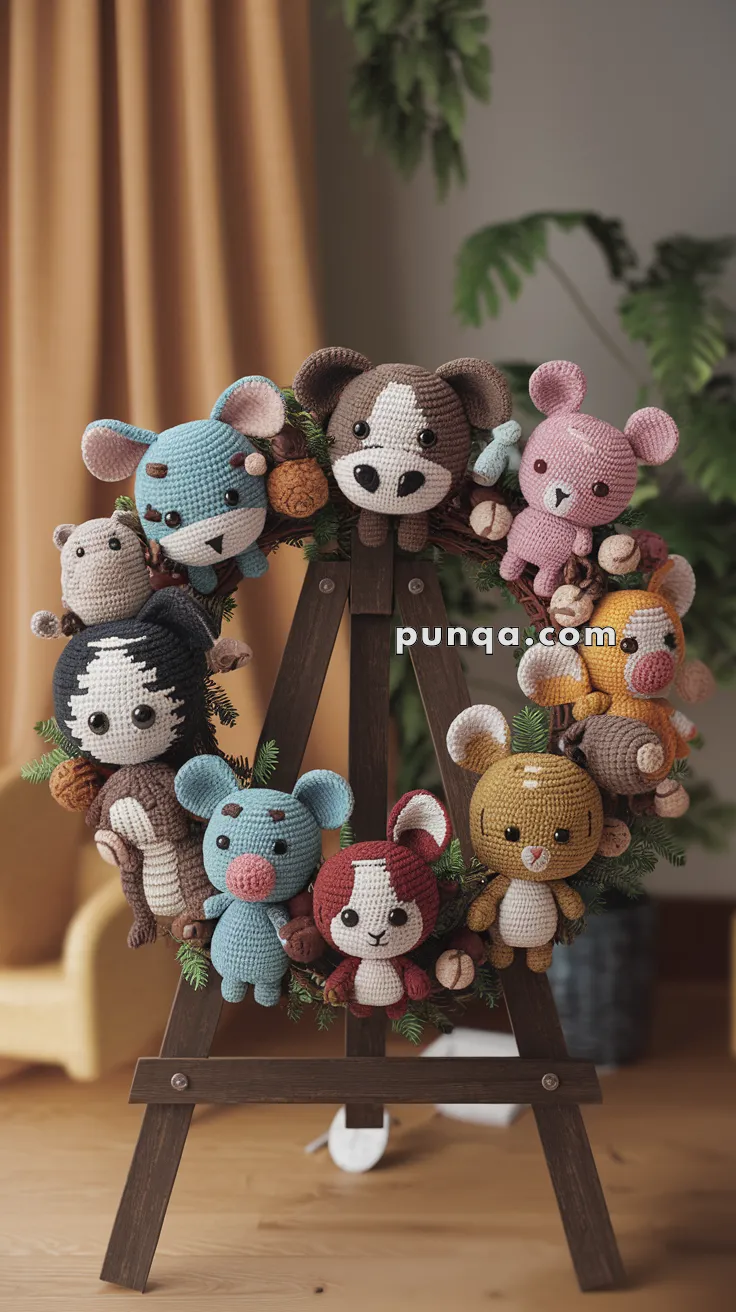
🧵 Amigurumi Woodland Wreath Pattern
Bring charm and coziness to your home with this delightful amigurumi wreath featuring a ring of tiny woodland animals. Great for holiday décor or as a year-round nature-themed statement piece!
📏 Finished Size
Wreath: approx. 12–14″ in diameter
Each animal: approx. 3–4″ tall
🧶 Skill Level
Intermediate – requires assembly and detail work
🧰 Materials
-
Worsted weight cotton yarn in assorted colors (browns, blues, pinks, red, orange, cream, white, black)
-
Crochet hook 2.5–3.0 mm
-
Polyester stuffing
-
12″ foam or wire wreath base
-
Tapestry needle
-
Hot glue gun or strong craft glue (optional for securing animals)
-
Stitch markers
-
Safety eyes (6–8 mm)
-
Pins (for positioning)
🧩 Abbreviations (US Terms)
-
MR: Magic ring
-
sc: single crochet
-
inc: increase (2 sc in one st)
-
dec: decrease (sc 2 together)
-
ch: chain
-
sl st: slip stitch
-
BLO/FLO: back/front loop only
🌿 Part 1: Wreath Base Cover
With forest green yarn (or brown if preferred):
-
Ch enough to wrap around the wreath’s circumference snugly.
-
Work sc in each ch, turn, and repeat until piece wraps fully around wreath width.
-
Seam ends together around the base using sl st or whip stitch.
Add some chain-stitched vines or sew on mini crochet “berries” and mushrooms if desired.
🧸 Part 2: Mini Animal Heads (Make 10–12 Variants)
These basic instructions cover the head base. Embellish each with specific ears, snouts, or patterns for each animal.
Basic Head:
-
MR, 6 sc
-
inc around (12)
-
(sc, inc) × 6 (18)
-
(2 sc, inc) × 6 (24)
-
(3 sc, inc) × 6 (30)
6–10. sc around (30) -
(3 sc, dec) × 6 (24)
-
(2 sc, dec) × 6 (18)
-
(sc, dec) × 6 (12)
-
dec × 6 (6), fasten off and close
Stuff lightly before closing.
🐻 Add Animal Features
-
Bear: Round ears (6 sc in MR, 2 rounds), stitched nose
-
Mouse: Large round ears, pink nose
-
Dog: Oval ears and face patch
-
Fox: Pointed ears, white chest patch
-
Squirrel: Tiny paws and tail sewn behind
-
Rabbit: Tall ears, bow optional
-
Deer: Small antlers, fawn spots
-
Piglet: Round snout, tiny arms
🌲 Assembly
-
Arrange your animals evenly around the wreath.
-
Pin them in place first for positioning.
-
Sew or glue securely to wreath base.
-
Add embellishments like felt leaves, tiny cones, or crochet berries.
💡 Final Tips
-
Mix and match animal colors for a playful variety.
-
Make it seasonal by adding crochet snowflakes or pumpkins!
-
Attach a yarn loop to the top back for easy hanging.