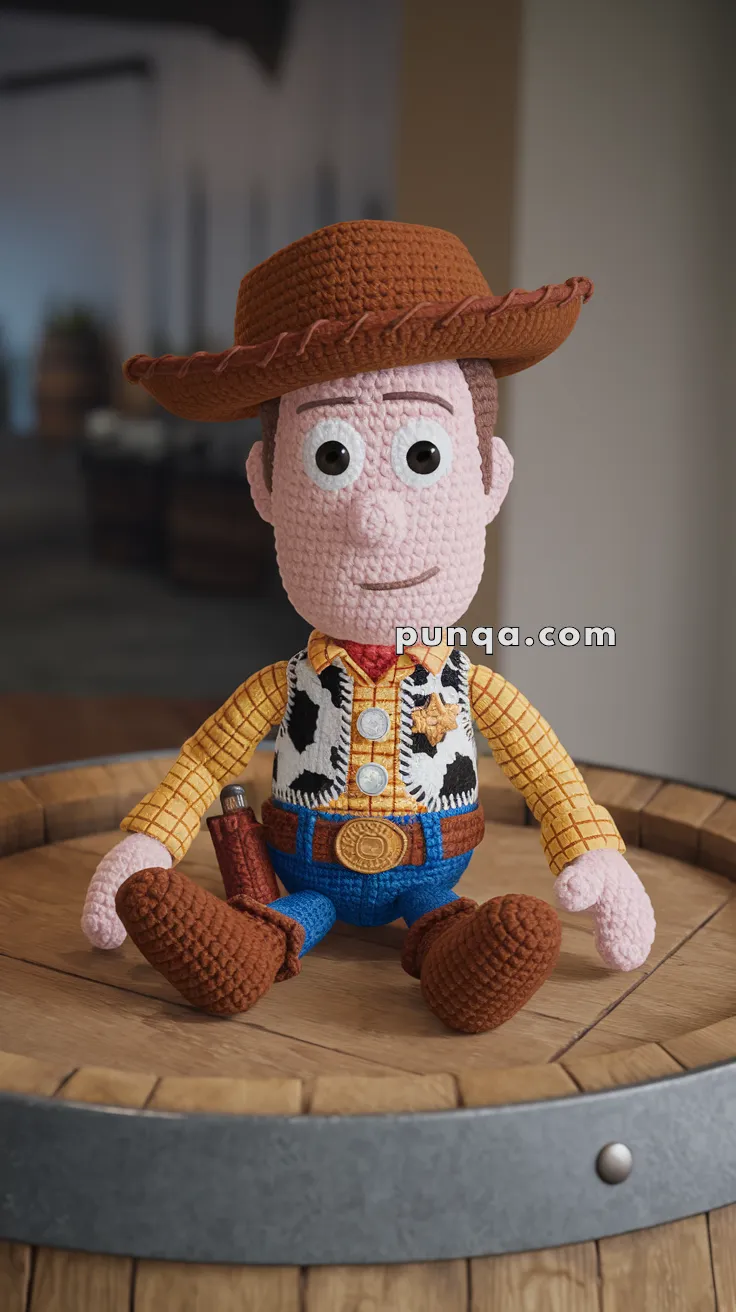
Bring the adventurous spirit of Woody to life with this Amigurumi Woody Toy Story crochet pattern! 🤠✨ With his cowboy hat, checkered shirt, and sheriff badge, this design captures the essence of the beloved Toy Story character in yarn form. Whether you’re crafting for a nostalgic décor piece, a heartfelt gift, or simply love Pixar-inspired amigurumi, this FREE pattern is a fantastic addition to your collection.
Designed for intermediate crocheters, this pattern allows for customization in hat shape, vest details, and even tiny accessories like embroidered boots or a miniature lasso to enhance his personality. Choose classic yellow, blue, and brown for an authentic look or experiment with creative hues for a unique twist! Whether displayed alongside other Toy Story characters or gifted to a fellow crochet enthusiast, this amigurumi Woody is sure to bring smiles.
Grab your hook, select your favorite yarn, and let’s bring this rootin’-tootin’ cowboy to life—one stitch at a time! 🧶✨
🤠 Amigurumi Woody (Toy Story) Crochet Pattern
Bring home your favorite rootin’-tootin’ sheriff from the wild west with this detailed amigurumi Woody! With his signature cowboy hat, sheriff badge, and checkered shirt, this nostalgic Toy Story character is perfect for Pixar fans and handmade toy collectors alike.
✨ Skill Level
Intermediate
Techniques used:
-
crocheting in continuous rounds
-
color changes
-
surface embroidery
-
shaping with increases and decreases
-
attaching layered accessories
📏 Finished Size
Approximately 30–32 cm (12–13 inches) tall when sitting using worsted weight yarn and a 3 mm crochet hook.
🧶 Yarn Requirements
Worsted weight yarn.
Skin tone — 85 g / 170 m
Brown (hat, hair, boots) — 95 g / 190 m
Yellow (shirt) — 70 g / 140 m
Blue (pants) — 60 g / 120 m
White (vest base) — 40 g / 80 m
Black (vest spots, embroidery) — 10 g / 20 m
Red (bandana) — 15 g / 30 m
Tan / light brown (belt & holster) — 20 g / 40 m
Gold / mustard (badge & buckle) — 10 g / 20 m
Polyester stuffing — approx 180 g
🧰 Tools & Supplies
3 mm crochet hook
12 mm safety eyes
Tapestry needle
Embroidery needle
Stitch markers
Polyester fiberfill
🧵 Abbreviations (US Terms)
MR – Magic Ring
sc – Single Crochet
inc – Increase (2 sc in one stitch)
dec – Invisible decrease
ch – Chain
sl st – Slip stitch
st – Stitch
FO – Fasten off
Head
Use skin tone yarn.
Round 1
MR, 6 sc (6)
Round 2
inc x6 (12)
Round 3
(1 sc, inc) x6 (18)
Round 4
(2 sc, inc) x6 (24)
Round 5
(3 sc, inc) x6 (30)
Round 6
(4 sc, inc) x6 (36)
Rounds 7–16
sc around (36)
Insert safety eyes between Rounds 11–12, spaced about 8 stitches apart.
Round 17
(4 sc, dec) x6 (30)
Round 18
(3 sc, dec) x6 (24)
Stuff firmly.
Round 19
(2 sc, dec) x6 (18)
Round 20
(1 sc, dec) x6 (12)
Round 21
dec x6 (6)
FO and close.
Nose
Use skin tone yarn.
Round 1
MR, 5 sc
Round 2
(1 sc, inc) repeat (7)
Round 3
sc around
Lightly stuff and sew centered between the eyes.
Hair Panels (Make 2)
Use brown yarn.
Round 1
MR, 6 sc
Round 2
inc x6 (12)
Rounds 3–5
sc around
Flatten slightly.
Sew one panel on each side of the head above the ears area so they sit under the hat brim.
Facial Embroidery
Using brown embroidery thread:
-
stitch two curved eyebrows above the eyes
-
embroider a soft curved smile under the nose
Body (Shirt + Jeans)
Start with yellow yarn.
Round 1
MR, 6 sc
Round 2
inc x6 (12)
Round 3
(1 sc, inc) x6 (18)
Round 4
(2 sc, inc) x6 (24)
Round 5
(3 sc, inc) x6 (30)
Rounds 6–9
sc around (30)
Change to blue yarn.
Rounds 10–14
sc around (30)
Stuff firmly.
Round 15
(3 sc, dec) x6 (24)
Round 16
(2 sc, dec) x6 (18)
Round 17
(1 sc, dec) x6 (12)
Round 18
dec x6 (6)
FO.
Arms (Make 2)
Start with skin tone yarn.
Round 1
MR, 6 sc
Round 2
inc x6 (12)
Rounds 3–5
sc around
Change to yellow yarn.
Rounds 6–12
sc around
Lightly stuff.
Flatten top and sew to shoulders.
Legs (Make 2)
Start with blue yarn.
Round 1
MR, 6 sc
Round 2
inc x6 (12)
Rounds 3–7
sc around
Change to brown yarn.
Rounds 8–11
sc around
Stuff firmly.
Flatten slightly at the top.
Boots (Make 2)
Use brown yarn.
Round 1
MR, 6 sc
Round 2
inc x6 (12)
Round 3
(1 sc, inc) x6 (18)
Rounds 4–7
sc around
Round 8
(4 sc, dec) x3 (15)
Round 9
sc around
Stuff the front toe area only so the boot keeps its rounded shape.
Sew onto the legs.
Vest
Use white yarn.
Ch 22.
Row 1–8
sc across.
FO.
Using black yarn, embroider irregular cow-print spots across the vest.
Sew the vest onto the torso leaving the front open.
Bandana
Use red yarn.
Ch 16.
Row 1
sc across.
FO.
Wrap around the neck and secure with a stitch.
Belt
Use tan yarn.
Ch 28.
Row 1
sc across.
FO.
Wrap around the waist and sew in place.
Belt Buckle
Use gold yarn.
MR, 8 sc
Round 2
inc x8 (16)
FO and flatten slightly.
Sew to the center of the belt.
Sheriff Badge
Use gold yarn.
Round 1
MR, 6 sc
Round 2
inc x6 (12)
Round 3
(sc, ch 2, sl st) repeat around to form small star points.
FO.
Sew to the vest chest area.
Holster
Use tan yarn.
Ch 10 and join.
Rounds 1–5
sc around.
Flatten slightly.
Sew to the outer leg.
Optional: crochet a small brown cylinder to represent the toy revolver handle.
Cowboy Hat
Use brown yarn.
Crown
Round 1
MR, 6 sc
Round 2
inc x6 (12)
Round 3
(1 sc, inc) x6 (18)
Round 4
(2 sc, inc) x6 (24)
Round 5
(3 sc, inc) x6 (30)
Rounds 6–10
sc around (30)
Brim
Round 11
(3 sc, inc) x6 (36)
Round 12
(5 sc, inc) x6 (42)
Round 13
sc around (42)
To recreate the classic western shape, gently curve the brim upward at both sides with your fingers.
For the stitched edge detail, embroider small running stitches around the brim using slightly lighter brown yarn.
Assembly
Attach the head securely to the body.
Sew the nose between the eyes.
Attach the hair panels to each side of the head.
Sew the arms to the shoulders.
Attach the legs so the doll sits comfortably.
Sew the boots to the legs.
Add the vest, belt, buckle, and bandana.
Attach the sheriff badge to the vest.
Sew the holster to the side of the leg.
Place the cowboy hat on the head and secure with a few stitches.
🤠Final Touch
Your Amigurumi Woody is now complete — sitting proudly just like in the photo, with his hat tilted just right, boots ready for adventure, and sheriff badge shining bright.
This doll captures Woody’s warm expression, classic outfit, and iconic cowboy charm in soft, handmade form — perfect for collectors, Pixar fans, and anyone who believes toys come alive when you’re not looking.
Yeehaw! 🤠✨