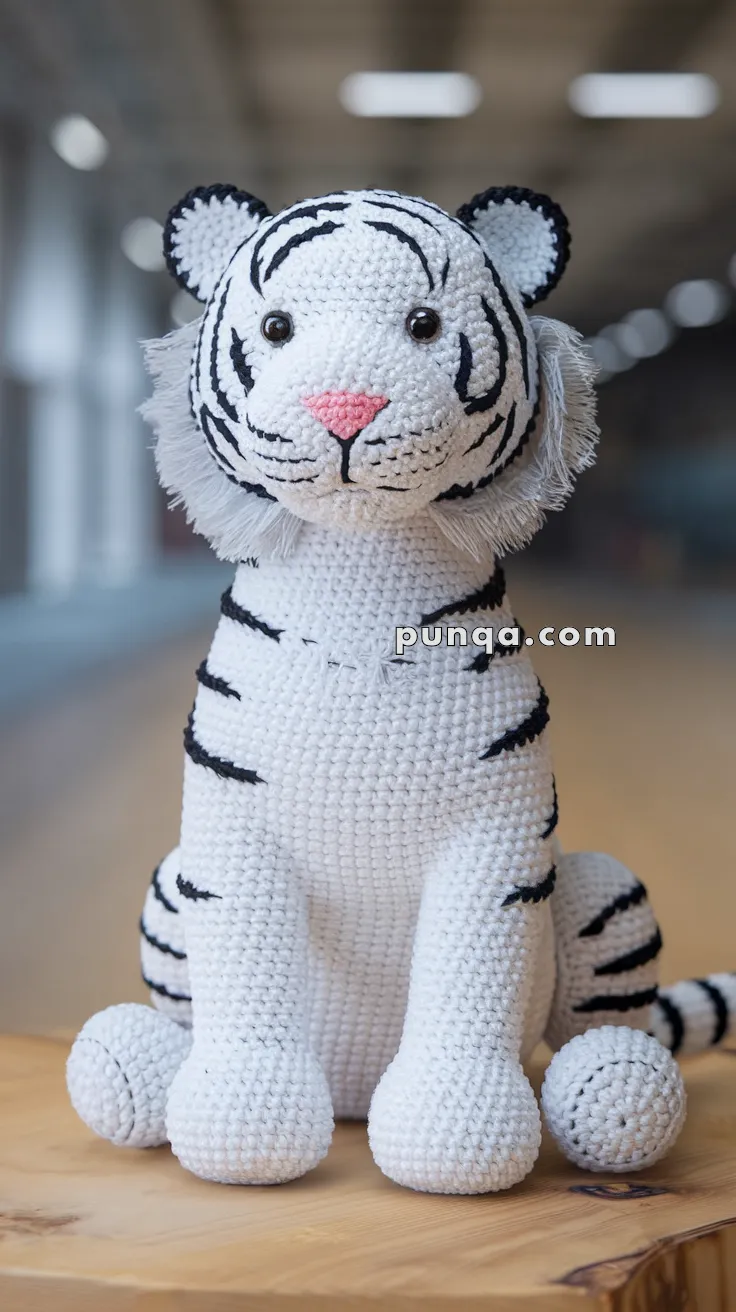
Roar into your next crochet adventure with the Amigurumi White Tiger—a majestic and cuddly creation that’s equal parts fierce and adorable! 🐯🤍 With its snowy fur, striking stripes, and soulful eyes, this plush predator brings a touch of wild elegance to your handmade collection. Whether you’re crafting a jungle-themed nursery buddy or a unique gift for an animal lover, this tiger is sure to stand out with its bold personality and soft charm.
Perfect for customizing with velvety yarns, embroidered details, or even a tiny jungle crown, this pattern invites you to play with texture and expression. From its rounded paws to its swishing tail, every stitch adds to the tiger’s lifelike appeal while keeping things delightfully huggable. Whether perched on a shelf or snuggled in a little one’s arms, the White Tiger is a powerful yet gentle friend—stitched with love, one loop at a time. 🧶🌿
🐯 Amigurumi White Tiger Crochet Pattern
Bring the magic of the wild into your home with this majestic White Tiger Amigurumi! With embroidered black stripes, a fluffy cheek mane, and carefully shaped thighs and paws, this project is a true showpiece for any crochet lover.
✨ Skill Level
Intermediate – you’ll need basic amigurumi techniques, shaping, and embroidery for the stripes.
📏 Finished Size
Approx. 35–40 cm (14–16 inches) tall when using worsted weight yarn and a 3.5 mm crochet hook.
🧶 Materials
-
White yarn (main body)
-
Black yarn (stripes, facial embroidery, ear edging)
-
Pink yarn (nose)
-
Grey or fluffy yarn (cheek tufts/mane)
-
3.5 mm crochet hook
-
12 mm safety eyes
-
Polyester stuffing
-
Yarn needle & scissors
-
Stitch markers
-
Pet brush (for fluffing cheeks)
🔑 Abbreviations (US Terms)
-
MR = Magic Ring
-
sc = single crochet
-
inc = increase (2 sc in one st)
-
dec = decrease (sc2tog)
-
sl st = slip stitch
-
ch = chain
-
(…) = stitch count at end of round
🧵 Pattern Instructions
Head (White)
-
MR, 6 sc (6)
-
inc ×6 (12)
-
(sc, inc) ×6 (18)
-
(2 sc, inc) ×6 (24)
-
(3 sc, inc) ×6 (30)
-
(4 sc, inc) ×6 (36)
-
(5 sc, inc) ×6 (42)
-
(6 sc, inc) ×6 (48)
9–12. sc around (48)
👉 Insert safety eyes between rounds 11–12, spaced ~14 sts apart. -
(6 sc, dec) ×6 (42)
-
(5 sc, dec) ×6 (36)
-
(4 sc, dec) ×6 (30)
-
(3 sc, dec) ×6 (24)
-
(2 sc, dec) ×6 (18)
-
(sc, dec) ×6 (12)
-
dec ×6 (6)
FO, close, stuff firmly.
Head Stripes (embroider with black):
-
Forehead: 3 curved stripes (center V + 2 slants).
-
Cheeks: 2 per side.
-
Tiny arcs at outer corners of eyes.
Muzzle / Snout (White)
-
MR, 6 sc (6)
-
inc ×6 (12)
-
(sc, inc) ×6 (18)
-
(2 sc, inc) ×6 (24)
5–6. sc around (24) -
(2 sc, dec) ×6 (18)
-
sc around (18)
FO, stuff lightly.
👉 Sew to lower head (rounds 14–18). Add a pink triangle nose on top and embroider mouth with a vertical line + “Y” split.
Fluffy Cheeks
-
Cut 20–30 strands of 10–12 cm white acrylic yarn.
-
Loop attach around muzzle edge (rounds 14–16).
-
Brush with a pet slicker brush until fluffy.
-
Trim to shape.
Body (White)
-
MR, 6 sc (6)
-
inc ×6 (12)
-
(sc, inc) ×6 (18)
-
(2 sc, inc) ×6 (24)
-
(3 sc, inc) ×6 (30)
-
(4 sc, inc) ×6 (36)
-
(5 sc, inc) ×6 (42)
-
(6 sc, inc) ×6 (48)
9–20. sc around (48)
👉 Stripes: 2 diagonal stripes on each side (rounds 18–20). -
(6 sc, dec) ×6 (42)
22–28. sc around (42)
👉 Stripes: 2 side diagonals (rounds 26–28).
👉 Spine stripe (rounds 30–33). -
(5 sc, dec) ×6 (36)
-
(4 sc, dec) ×6 (30)
-
(3 sc, dec) ×6 (24)
-
(2 sc, dec) ×6 (18)
-
(sc, dec) ×6 (12)
-
dec ×6 (6)
FO, stuff firmly.
Arms (Make 2 – White)
-
MR, 6 sc (6)
-
inc ×6 (12)
-
sc around (12)
4–6. sc around (12)
👉 Add a thin stripe (round 7) + another short stripe (round 11).
7–15. sc around (12)
FO, stuff lightly.
Thighs & Legs (Make 2 – White)
-
MR, 6 sc (6)
-
inc ×6 (12)
-
(sc, inc) ×6 (18)
-
(2 sc, inc) ×6 (24)
-
(3 sc, inc) ×6 (30)
6–10. sc around (30) → rounded thigh top. -
(3 sc, dec) ×6 (24)
-
(2 sc, dec) ×6 (18)
👉 Stuff firmly to shape thigh bulge.
13–16. sc around (18) → narrows into leg.
17. (sc, dec) ×6 (12)
18–20. sc around (12)
Paw Section
-
(sc, inc) ×6 (18)
-
(2 sc, inc) ×6 (24)
23–26. sc around (24) → rounded paw. -
(2 sc, dec) ×6 (18)
-
(sc, dec) ×6 (12)
-
dec ×6 (6)
FO, close.
Leg Stripes:
-
Round 8: ring stripe.
-
Round 14: 2 diagonal stripes.
-
Round 20: 1 short band.
Tail (White with Stripes)
-
MR, 6 sc (6)
-
inc ×6 (12)
3–22. sc around (12)
👉 Embroider black rings every 3–4 rounds.
FO, stuff lightly.
Ears (Make 2 – White with Black Edges)
-
MR, 6 sc (6)
-
(sc, inc) ×3 (9)
-
(2 sc, inc) ×3 (12)
-
(3 sc, inc) ×3 (15)
5–7. sc around (15)
FO, flatten.
👉 Outline ear edge with black slip stitches. Add 1 vertical black stripe on back.
🧷 Assembly
-
Sew head to body firmly.
-
Attach arms slightly forward.
-
Sew thighs at body base so paws sit flat.
-
Attach tail to back.
-
Sew ears to head top.
-
Attach muzzle, nose, and embroider mouth.
-
Embroider stripes all over body and legs.
-
Fluff cheek tufts with brush.
🌟 Finishing Touches
-
Add soft blush with fabric-safe pastel under the eyes.
-
Ensure stripes are symmetrical and balanced.
-
Position legs so tiger sits upright like in the photo.
🐾 How to Fluff the Cheeks
One of the most striking features of the white tiger is its fluffy cheek tufts, which make it look soft and realistic. Here’s how to achieve that exact effect with yarn:
✂️ Materials Needed
-
White acrylic yarn (acrylic fluffs better than cotton)
-
Pet slicker brush or fine-toothed comb
-
Scissors
🪄 Step-by-Step
-
Prepare Strands
-
Cut 10–15 cm (4–6 in) strands of white acrylic yarn.
-
You’ll need about 20–30 strands per cheek.
-
-
Attach Strands
-
Using a crochet hook or latch-hook method, pull strands through stitches around the muzzle area (rounds 14–16 of the head).
-
Fold strands in half and secure with a knot so they stay in place.
-
-
Brush Out
-
Take your slicker brush or comb and gently brush the yarn strands repeatedly.
-
Acrylic fibers will separate and fuzz up, creating a fluffy, fur-like texture.
-
-
Shape & Trim
-
Once fluffed, trim the tufts evenly with scissors.
-
Shape them so they fan out naturally to the sides of the muzzle, just like in the photo.
-
-
Set in Place (Optional)
-
If you want the fluff to hold better, you can lightly mist with water and brush again, or use a tiny touch of fabric-safe hairspray.
-
Your White Tiger Amigurumi is now complete! With its upright posture, bold stripes, fluffy cheeks, and soft yet majestic expression, it’s a truly eye-catching piece. Perfect for jungle lovers, big cat enthusiasts, or anyone who appreciates detailed amigurumi work.
💛 Happy Crocheting – and let your stitches roar with creativity!