Welcome guests with a touch of whimsical charm using this Amigurumi Welcome Mushroom Cottage crochet pattern! Designed to bring warmth and enchantment to any entryway, this delightful cottage features a cozy mushroom-shaped design, complete with textured details that make it feel like a storybook home. Whether you’re crafting for a fairy-tale-inspired decor, creating a cheerful greeting for visitors, or simply enjoy making charming amigurumi, this pattern lets you stitch up a welcoming cottage bursting with personality! Perfect for brightening up any space, this crochet creation adds a touch of handmade magic to every entrance. 🍄✨
Designed for customization, this pattern allows you to experiment with different shades of earthy tones, embroidered details, or even tiny accessories like a miniature welcome sign or tiny flowers for extra charm. Craft a classic mushroom cottage with rich reds and browns, create a pastel version for a dreamy aesthetic, or even stitch up a full set of woodland-inspired amigurumi for a delightful display! Whether gifted as a thoughtful keepsake, displayed as a charming accent, or made simply for the joy of crafting, this Amigurumi Welcome Mushroom Cottage is a fun and creative project—perfect for bringing a touch of handmade fairy-tale magic to every stitch! 🧶💖✨
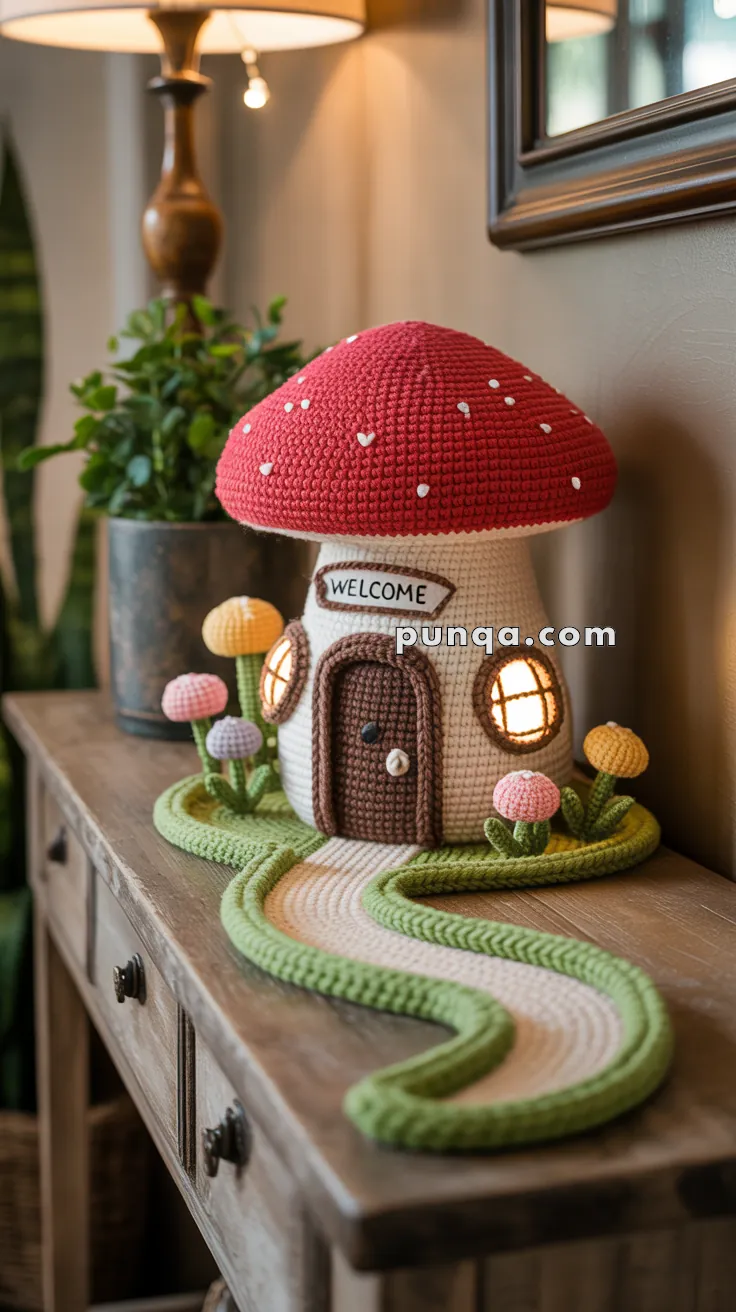
🍄 Amigurumi Welcome Mushroom Cottage Crochet Pattern
Create a whimsical fairy-tale cottage for your home with this cozy amigurumi mushroom house. Featuring a plush red mushroom cap, glowing round windows, a dimensional winding path, and cheerful mini mushrooms on a raised grassy base, this enchanting project brings warmth and magic to nurseries, shelves, and seasonal displays.
✨ Skill Level
Intermediate – Requires shaping, color changes, and structured assembly.
📏 Finished Size
Approx. 10–12 inches (25–30 cm) tall and 12–14 inches wide, depending on yarn and hook.
🧶 Materials
Yarn (DK or Worsted Weight):
- Color A – Red: Mushroom cap
- Color B – Cream/White: Mushroom house body
- Color C – Brown: Door, window frames, pathways
- Color D – Green: Grass base, path edging
- Color E – Beige: Center path
- Color F – Soft pastels: Mini mushroom caps (yellow, pink, lavender)
- Small amount of white yarn (cap dots)
- Small amount of dark brown/black (lettering, embroidery)
Other Supplies:
- Crochet hook 3.0–3.5 mm
- Tapestry needle
- Fiberfill stuffing
- Plastic canvas or cardboard circles for stability
- Optional: LED tealight or fairy-light string
- Optional: hot glue gun
🧵 Abbreviations (US Terms)
MR – Magic Ring
sc – single crochet
inc – increase
dec – decrease
ch – chain
sl st – slip stitch
BLO – back loop only
FLO – front loop only
FO – fasten off
🍄 Mushroom Cap
Color A (Red)
- MR, 6 sc
- inc ×6 (12)
- (1 sc, inc) ×6 (18)
- (2 sc, inc) ×6 (24)
- (3 sc, inc) ×6 (30)
- (4 sc, inc) ×6 (36)
- (5 sc, inc) ×6 (42)
- (6 sc, inc) ×6 (48)
- (7 sc, inc) ×6 (54)
- (8 sc, inc) ×6 (60)
11–22. sc around (60) - BLO sc around (60)
- (8 sc, dec) ×6 (54)
- (7 sc, dec) ×6 (48)
FO, lightly stuff to maintain a smooth dome shape.
Cap Dots
With white yarn, embroider or crochet tiny irregular heart-like speckles, scattering them across the cap.
🏠 Mushroom House Body
Color B (Cream)
- MR, 6 sc
- inc ×6 (12)
- (1 sc, inc) ×6 (18)
- (2 sc, inc) ×6 (24)
- (3 sc, inc) ×6 (30)
- (4 sc, inc) ×6 (36)
- (5 sc, inc) ×6 (42)
- (6 sc, inc) ×6 (48)
- (7 sc, inc) ×6 (54)
10–40. sc around (54) — tall cylinder
Insert a plastic circle at the bottom, stuff firmly, and leave the top open for attaching the cap.
🚪 Door (Thick Trim Arch)
Color C (Brown)
Door Panel:
- MR, 6 sc
- inc ×6 (12)
- (1 sc, inc) ×6 (18)
4–10. sc across in rows to form a rectangle:- Row 4: ch 1, turn, 18 sc
- Repeat until Row 10
FO.
Door Trim (Thick Edge):
- Join yarn around door edge and crochet 2 full rounds of sc for a plush border.
- Add a small white crochet circle as the doorknob.
- Embroider light vertical lines for wood texture.
Attach the door centered on the front.
🪟 Windows (Warm Glow Style)
Frames (Color C – Brown)
- Ch 18, join to ring
- sc around (18)
- sc around again for firmness (18)
FO.
Window Backing (Pale Yellow)
- MR, 6 sc
- inc ×6 (12)
- (1 sc, inc) ×6 (18)
FO.
Assembly
- Sew the pale-yellow circle behind the frame.
- Embroider thick vertical and horizontal bars to form window panes.
- Attach one window on each side of the door, placed slightly low and wide, matching the curvature.
🌿 Raised Grassy Base
Color D (Green)
- MR, 6 sc
- inc ×6 (12)
- (1 sc, inc) ×6 (18)
- (2 sc, inc) ×6 (24)
Continue increasing until approx. 70–75 stitches (about 14–15 cm diameter).
Work 6–8 rounds without increasing for a thick, plush wall.
Insert a firm disc inside and close the base neatly.
Sew the mushroom house centered onto the base.
🛤️ Winding Path (Flat Center + Raised Green Border)
Beige Path Center (Color E)
- Ch ~70
- sc across
- Turn, sc back
- Continue working 4–6 rows to form a flat, wide strip
FO.
Curve the strip into the gentle “S” shape seen in the photo.
Thick Raised Green Edges (Color D)
Work i-cord-style crochet tubes:
- Ch 3
- sc 3, do not turn
- Slide sts to left end of hook, tiny tube forms
- Continue until long enough to edge the path
Make two tubes and stitch them firmly along the left and right sides of the beige path.
Attach the completed path to the base starting at the door, curving outward.
🌸 Mini Mushroom Flowers (4–6 Pieces)
Caps (Pastel Colors)
- MR, 6 sc
- inc ×6 (12)
- (1 sc, inc) ×6 (18)
- sc around (18)
- (1 sc, dec) ×6 (12)
FO, lightly stuff.
Stems (Short & Wide – Color D or light green)
- MR, 6 sc
2–3. sc around (6) - sl st, FO
Add two small leaves at stem base (ch 5 → sc, hdc, dc, sl st).
Attach mushrooms around both sides of the path and near the house.
🪧 Welcome Sign (White Center + Brown Border)
Center Panel (White):
- Ch 12
- Row 1–3: sc 11
- Row 4: dec at both ends to soften corners
FO.
Brown Border:
- Join brown yarn around entire perimeter and sc evenly for a clean edge.
Embroider WELCOME in dark brown, slightly arched.
Attach just above the door.
✨ Final Assembly
- Sew the mushroom cap onto the house body, keeping the dome smooth.
- Add LED tealight inside if desired for a cozy glow.
- Attach the house securely onto the thick grassy base.
- Position and sew the curved path starting from the door.
- Arrange mini mushrooms around the yard.
- Add the welcome sign at the top center of the body.
🌼 Closing Thoughts
Your enchanting Mushroom Cottage is ready to brighten any room. With its soft glowing windows, winding garden path, and sweet little mushroom blooms, it becomes a heartwarming decorative piece full of charm and imagination. Display it on a shelf, gift it to someone special, or use it as a whimsical nightlight—this handmade cottage invites a little magic into every corner.