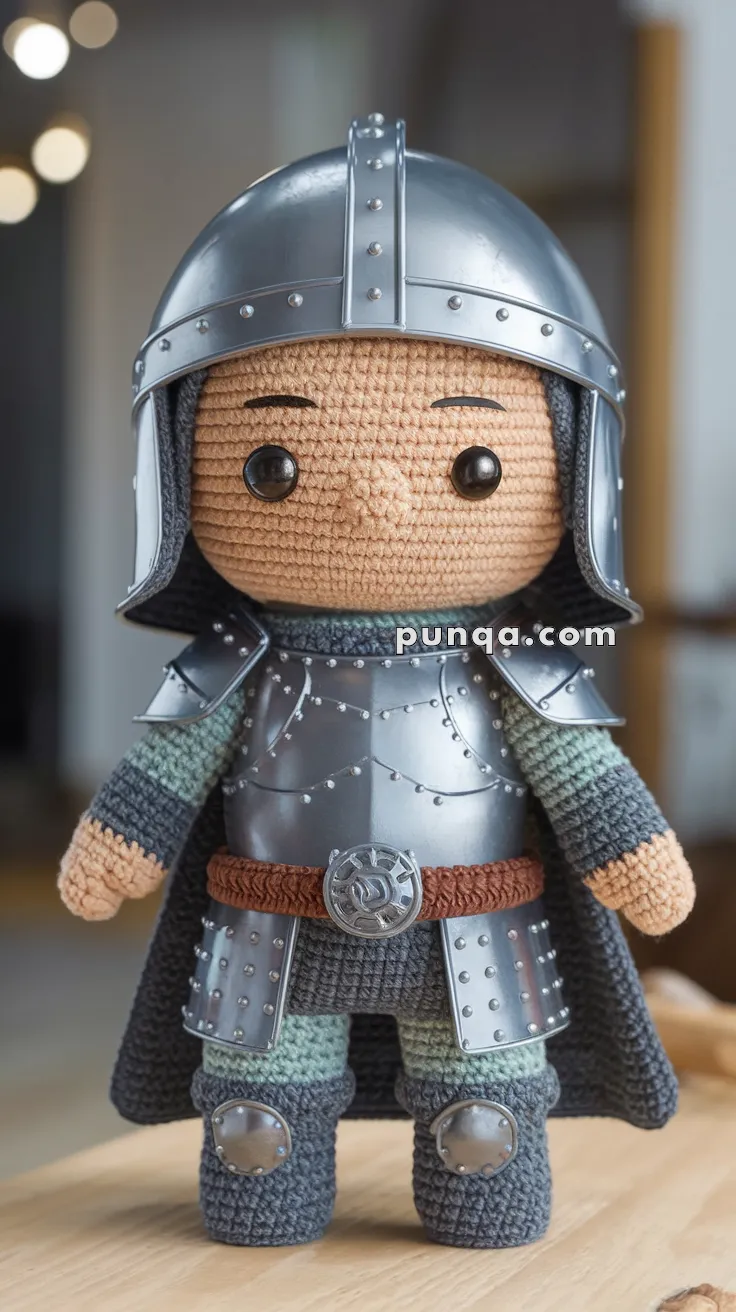
Unleash your creativity with this Amigurumi Warrior Doll crochet pattern! Whether you’re crafting for fantasy lovers, adding a heroic touch to your collection, or simply enjoy making detailed amigurumi figures, this free pattern lets you stitch up a fierce little warrior ready for adventure. With its tiny armor, expressive face, and battle-ready stance, this crochet warrior captures the spirit of bravery in every stitch. Perfect for gifting to fellow crochet enthusiasts, decorating a medieval-themed space, or simply celebrating the joy of handmade creations, this amigurumi warrior doll is sure to bring excitement to your collection! ⚔️✨
Designed for customization, this pattern allows you to experiment with different armor styles, embroidered details, or even tiny accessories like a miniature sword or shield for extra personality. Craft a classic knight, create a Viking-inspired version, or even stitch up a full set of warriors for an epic display! Whether gifted as a thoughtful handmade keepsake, displayed as a bold accent, or made simply for the joy of crafting, this Amigurumi Warrior Doll is a fun and imaginative project—perfect for bringing the spirit of adventure to every stitch! 🧶🏰
⚔️ Amigurumi Warrior Doll – Free Crochet Pattern
Suit up your handmade hero with chainmail-textured yarn, soft limbs, and custom-crafted armor! This warrior doll combines classic amigurumi with creative mixed-media details for an epic display piece or imaginative play toy.
✨ Skill Level
Intermediate to Advanced – Requires shaping, color changes, and basic craft assembly.
📏 Finished Size
Approx. 10–11 inches (25–28 cm) tall using DK or worsted yarn and a 3.0–3.5 mm hook.
🧶 Materials
-
Yarn (DK or Worsted weight):
-
Skin tone (head, hands)
-
Dark gray (armor base, boots, helmet trim)
-
Muted green/blue (tunic sleeves, inner legs)
-
Brown (belt)
-
-
Hook: 3.0–3.5 mm
-
Stuffing: Polyfill
-
Safety eyes (8–10 mm)
-
Tapestry needle
-
Fabric glue or hot glue
-
Scissors
🛠 Non-Yarn Materials (Armor)
-
Helmet, chestplate, and kneepads:
-
Silver or gunmetal gray craft foam sheets (2mm thick)
-
Metallic silver paint or chrome spray (optional)
-
Brads or mini silver beads for rivet effects
-
Velcro or glue for attachment
-
Scissors & hole punch
-
-
Cape:
-
Black felt or fabric, cut to shape
-
🧵 Abbreviations (US Terms)
MR – Magic Ring
sc – Single Crochet
inc – Increase
dec – Decrease
sl st – Slip Stitch
FO – Fasten Off
ch – Chain
BLO – Back Loop Only
👤 Head (Skin Color)
-
MR, 6 sc
-
inc x6 (12)
-
(1 sc, inc) x6 (18)
-
(2 sc, inc) x6 (24)
-
(3 sc, inc) x6 (30)
6–12. sc around -
(3 sc, dec) x6 (24)
-
(2 sc, dec) x6 (18)
-
(1 sc, dec) x6 (12)
Stuff firmly -
dec x6 (6)
FO and close
Insert safety eyes between Rnds 9–10, approx. 7 sts apart
Embroider eyebrows with black yarn or felt cutouts
💪 Arms (Make 2 – Skin to Armor Colors)
-
MR, 6 sc in skin color
-
inc x6 (12)
3–4. sc around -
Switch to gray
6–10. sc
Stuff lightly
Flatten and sew to sides of torso
🧥 Torso (Start in muted green, then switch to armor color)
-
MR, 6 sc
-
inc x6 (12)
-
(1 sc, inc) x6 (18)
-
(2 sc, inc) x6 (24)
5–8. sc around -
Switch to gray (armor)
10–14. sc around
Stuff firmly
FO
Add brown yarn belt via surface sl st or embroider after
🦵 Legs (Make 2 – Green to Gray)
-
MR, 6 sc in green
-
inc x6 (12)
3–5. sc -
Switch to gray
7–11. sc
Stuff lightly
FO and sew to bottom of torso
🥾 Boots (Gray)
-
MR, 6 sc
-
inc x6 (12)
-
(1 sc, inc) x6 (18)
-
sc BLO
5–6. sc
Stuff and flatten, then sew to legs if not crocheted as one piece
🧢 Cape (Black Fabric/Felt)
-
Cut a semicircle approx. 5″ wide
-
Fold slightly at top and sew or glue to back neckline
-
Optional: Add chain or yarn tie to front
🛡 Armor Craft Instructions
Helmet:
-
Cut a dome from silver craft foam
-
Add front strip, side guards, and rivet beads
-
Use hot glue to assemble
-
Line interior with felt for comfort
Chestplate:
-
Cut chest shape from foam, round shoulders
-
Glue in place over torso
-
Add rivets using beads or brads
-
Belt buckle can be a button painted silver
Knee Pads:
-
Circle foam pieces
-
Add dome (small button or raised foam)
-
Glue onto leg yarn
🧺 Assembly
-
Sew head to torso
-
Attach arms and legs securely
-
Glue armor pieces to front, sides, and knees
-
Stitch or glue cape in place
-
Final trim and fluff
💡 Customization Ideas
-
Add a sword or shield (foam or crocheted)
-
Change armor to gold or dark knight black
-
Add embroidery runes or symbols to the cape
This brave warrior is ready to defend your kingdom with charm and courage! Combining yarn and foam armor brings a unique dimension to your amigurumi — perfect for display, gifting, or storytime adventures. 🛡🗡