Cruise into the world of crochet with this Amigurumi VW Beetle pattern! Inspired by the iconic vintage car, this adorable design captures the rounded shape, charming headlights, and classic details in every stitch. Whether you’re crafting for car enthusiasts, adding a nostalgic touch to your collection, or simply enjoy making unique amigurumi designs, this pattern lets you stitch up a miniature VW Beetle bursting with personality! Perfect for brightening up any space, this crochet creation brings a touch of handmade retro charm to your collection. 🚗✨
Designed for customization, this pattern allows you to experiment with different colors, embroidered details, or even tiny accessories like a miniature license plate or surfboard for extra flair. Craft a classic VW Beetle with its signature look, create a playful version with pastel hues, or even stitch up a full set of vehicle-inspired amigurumi for a delightful display! Whether gifted as a quirky keepsake, displayed as a charming accent, or made simply for the joy of crafting, this Amigurumi VW Beetle is a fun and creative project—perfect for bringing a touch of handmade automotive magic to every stitch! 🧶💖✨
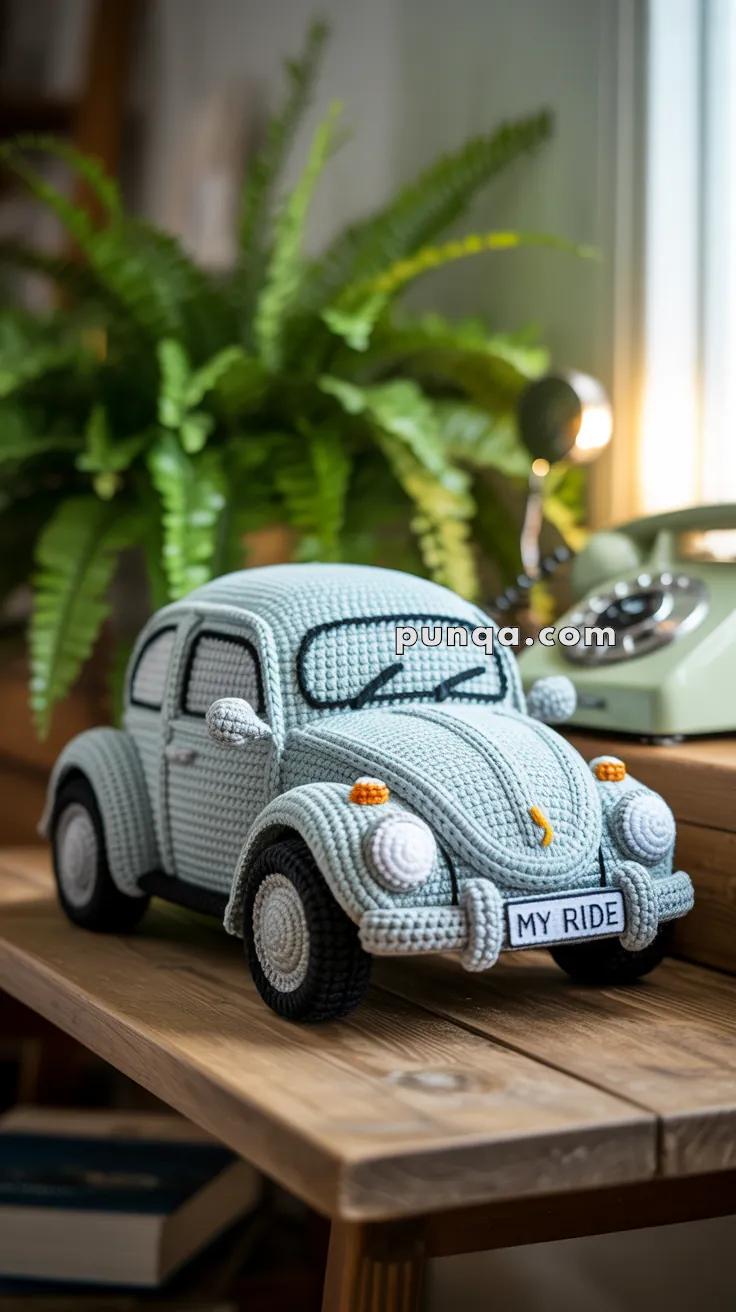
🚗 Amigurumi VW Beetle Crochet Pattern
A photo-accurate soft sculpture of the classic Bug: light-blue rounded shell; two raised hood ribs; slim grey tube bumpers; domed white headlights with small orange indicators on top of the front fenders; very light-grey windows outlined in black with two wipers; thin black underbody strip along each side; round mirrors; wheels with a white trim ring and grey hubcap; and a front plate that reads MY RIDE.
✨ Skill Level
Advanced
Required techniques:
- Large-scale 3D shaping
- Continuous-round sculpting
- Surface slip-stitch detailing
- Structured part placement
- Symmetry-sensitive assembly
📏 Finished Size
- Length: 23–25 cm (9–10 in)
- Height: 14–15 cm (5.5–6 in)
- Width: 11–12 cm (4.25–4.75 in)
Size is achieved using DK yarn with tight tension.
🧶 Yarn Requirements
DK / Light Worsted Cotton or Cotton Blend
- Light Blue (body): 150–170 g (5.3–6 oz)
- Black (tires, outlines, wipers, underbody): 75–85 g (2.6–3 oz)
- Grey (bumpers, mirrors, hubcaps): 35–45 g (1.2–1.6 oz)
- Very Light Grey / Pale Blue (windows): 25–30 g (0.9–1 oz)
- White (headlights, wheel trim, license plate): 25–30 g (0.9–1 oz)
- Orange (turn signals): scraps
- Yellow (hood emblem): scraps
🧰 Tools
- 3.0–3.5 mm crochet hook
- Polyester fiberfill (firm)
- Thin plastic canvas or stiff felt (oval base insert)
- Yarn needle
- Stitch markers
- Scissors
🧵 Abbreviations (US)
- MR – magic ring
- sc – single crochet
- inc – increase
- dec – invisible decrease
- sl st – slip stitch
- ch – chain
- st(s) – stitch(es)
- BLO / FLO – back/front loop only
🧱 Main Car Body (One Piece – Light Blue)
Oval Base
R1: MR 6 (6)
R2: inc ×6 (12)
R3: (sc, inc) ×6 (18)
R4: (2 sc, inc) ×6 (24)
R5: (3 sc, inc) ×6 (30)
R6: (4 sc, inc) ×6 (36)
R7: (5 sc, inc) ×6 (42)
R8: (6 sc, inc) ×6 (48)
R9: (7 sc, inc) ×6 (54)
R10: (8 sc, inc) ×6 (60)
R11: (9 sc, inc) ×6 (66)
R12: (10 sc, inc) ×6 (72)
R13: (11 sc, inc) ×6 (78)
R14: (12 sc, inc) ×6 (84)
R15: (13 sc, inc) ×6 (90)
R16: (14 sc, inc) ×6 (96)
R17: (15 sc, inc) ×6 (102)
Insert oval base reinforcement now.
Side Walls
R18–R25: sc around (102)
Lightly stuff the edges only.
Roof & Dome (Smooth, Rounded Profile)
R26: (15 sc, dec) ×6 (96)
R27–R28: sc around (96)
R29: (14 sc, dec) ×6 (90)
R30: sc around (90)
R31: (13 sc, dec) ×6 (84)
R32: sc around (84)
R33: (12 sc, dec) ×6 (78)
R34: sc around (78)
R35: (11 sc, dec) ×6 (72)
R36: (10 sc, dec) ×6 (66)
R37: (9 sc, dec) ×6 (60)
R38: (8 sc, dec) ×6 (54)
R39: (7 sc, dec) ×6 (48)
R40: (6 sc, dec) ×6 (42)
R41: (5 sc, dec) ×6 (36)
R42: (4 sc, dec) ×6 (30)
R43: (3 sc, dec) ×6 (24)
R44: (2 sc, dec) ×6 (18)
R45: (sc, dec) ×6 (12)
R46: dec ×6 (6)
Stuff very firmly and evenly.
FO, close.
🚙 Wheels (Make 4)
Tire – Black
R1: MR 6
R2: inc ×6 (12)
R3: (sc, inc) ×6 (18)
R4: (2 sc, inc) ×6 (24)
R5: (3 sc, inc) ×6 (30)
R6: (4 sc, inc) ×6 (36)
R7–R9: sc around (36)
R10: (4 sc, dec) ×6 (30)
R11: (3 sc, dec) ×6 (24)
R12: (2 sc, dec) ×6 (18)
R13: (sc, dec) ×6 (12)
R14: dec ×6 (6)
Lightly stuff, FO.
White Trim Ring (Make 4)
MR 6 → inc to 24 sts over 4 rounds.
Sew flat to tire front.
Hubcap – Grey (Make 4)
MR 6 → inc to 30 sts.
Sew centered over trim ring.
🛞 Fenders (Make 4 – Light Blue)
Ch 20
Rows 1–2: sc 19
Row 3–4: sc 14
Row 5–6: sc 10
Curve into arch and sew directly above each wheel.
💡 Headlights & Indicators
Headlights (2 – White)
MR 6 → inc to 24 sts
1 even round
Begin decreasing to dome shape
Stuff lightly, close, sew centered on front fenders
Indicators (2 – Orange)
MR 6
1 round sc
FO, keep very small
Sew on top of front fenders, slightly inward
🪞 Side Mirrors (2)
- Face: MR 6 → inc to 12, flatten
- Arm: ch 8, sc back
Sew near windshield corners.
🧱 Tube Bumpers (Grey)
Front
ch 42, join
R1–R4: sc around
Lightly stuff
Sew low across front
Rear
ch 38, join
R1–R4: sc around
Stuff, sew low across back
🪟 Windows (Very Light Grey)
- Windshield: ch 24, 9 rows sc
- Side Windows: ch 14, 6 rows sc (4 total)
- Rear Window: ch 20, 8 rows sc
Sew flush to surface.
Outline all windows with black surface stitching.
Add two black wipers angled upward from center bottom of windshield.
🏷 License Plate
White rectangle: ch 14, 5 rows sc
Embroider MY RIDE in black
Sew centered on front bumper
🧵 Surface Details
Hood Ribs
With light blue, surface slip-stitch two parallel raised lines running front to roof center.
Hood Badge
Short vertical yellow stitch between ribs.
Underbody Strip
Black surface slip stitch along both lower sides, from front wheel to rear wheel.
🔧 Assembly Order
- Attach wheels (front lower, rear slightly higher)
- Sew fenders
- Add bumpers
- Attach headlights and indicators
- Sew mirrors
- Add windows, outlines, and wipers
- Sew license plate
- Add hood ribs, badge, underbody strip
- Final shaping and stuffing adjustment
🧼 Care & Display
Spot clean only.
Reshape while damp and allow to air-dry.
Best displayed on a shelf or desk.
🎉 Finish & Care
Spot clean only. Reshape while damp if needed; air-dry. Display on a shelf—or make a whole fleet in your favorite colors!