Add a dash of humor and holiday cheer to your home with the Amigurumi Christmas Toilet-Paper-Holding Gnome, a crochet project that’s guaranteed to make guests smile! 🎅🧶 With his oversized striped hat, long cozy beard, and dangling legs trimmed with fluffy cuffs, this quirky little gnome is brimming with festive personality. And of course, the toilet paper roll perfectly tucked in his hands makes him the ultimate conversation starter for your bathroom or shelf décor.
Playful yet practical, this gnome is the kind of handmade decoration that spreads joy in unexpected places. Whether perched on a bathroom counter, sitting on a shelf, or gifted to someone with a great sense of humor, the Christmas Toilet-Paper-Holding Gnome is a joyful way to crochet laughter, coziness, and a sprinkle of handmade magic—one loop at a time! 🧵✨🎄

🎄Amigurumi Christmas Toilet-Paper-Holding Gnome Crochet Pattern
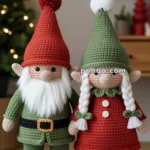
Bring holiday humor into your home with this charming Christmas gnome! With his oversized striped hat, long cozy beard, dangling legs, fluffy cuffs, and a toilet paper roll perfectly tucked in his hands, he’s the festive bathroom or shelf decoration everyone will talk about. This pattern recreates the exact design from the photo, including the green–red striping, white zigzag detail, large pom-pom, and beautifully fluffy trims.
✨ Skill Level
Easy–Intermediate — simple shaping, color changes, light sewing.
📏 Finished Size
Approx. 40–45 cm (16–18 inches) tall from pom-pom to feet.
🧶 Materials
Chunky/Velvet Yarn (6–7 weight):
- Red (body, sleeves, hat stripes, shoes)
- Green (hat stripes + brim)
- White (zigzag accent rows + fluffy cuffs)
Worsted Yarn (4 weight):
- Beige (nose, hands, legs)
Faux-fur Yarn:
- White (beard)
Hooks: 6.0 mm (chunky parts), 4.0 mm (worsted parts)
Stuffing
Large white pom-pom or pom-pom maker
Tapestry needle
Stitch markers
1 Toilet paper roll (for display)
🧵 Abbreviations (US Terms)
MR – Magic Ring
sc – single crochet
inc – increase
dec – decrease
sl st – slip stitch
BLO – back loop only
FO – fasten off
🎩 Striped Hat With Green Brim & Pom-Pom
Hat Body (top down)
Use chunky yarn + 6 mm hook.
- MR, 6 sc
- (1 sc, inc) x3 → 9
- sc around
- (2 sc, inc) x3 → 12
5–7) sc around
Begin the stripe pattern exactly as in the photo:
Stripe Sequence (repeat this order)
- 4 rounds Green
- 1 round White Zigzag Accent:
- Work sl st into FLO of every stitch (tight) → creates the raised white “V-stitch” look
- 4 rounds Red
- 1 round White Zigzag Accent
Continue alternating Green → White accent → Red → White accent while increasing slowly:
Every 6–7 rounds do:
(5 sc, inc) around → +6 sts
Continue until hat measures:
✔ 35–40 cm (14–16″) long
✔ Approx. 13–14 cm (5–5.5″) diameter at base
Stuff lightly so it bends with weight, not stiffness.
Wide Green Structured Brim
Attach green.
- sc around
- BLO sc around
3–6) sc around to build 4 thick ridged rounds
(This forms the firm horizontal brim seen in the picture.)
FO and weave ends.
Pom-Pom
Create a large white pom-pom and attach to hat tip.
It should look oversized and fluffy.
👃 Flat Beige Nose
Use beige worsted + 4 mm hook.
- MR, 6
- inc x6 → 12
- (1 sc, inc) x6 → 18
- (2 sc, inc) x6 → 24
Very lightly stuff to maintain a flat disc, not a sphere.
FO leaving a long tail.
🧔 Long White Faux-Fur Beard
Cut strands of faux-fur yarn 10–14 cm (4–6″) long.
Sew or latch into place under the hat brim.
Trim sides lightly to taper but leave full volume in center.
Beard must hang downward exactly as in the photo.
❤️ Body (Large Red Round Body)
Use chunky red yarn + 6 mm hook.
- MR, 6
- inc x6 → 12
- (1 sc, inc) x6 → 18
- (2 sc, inc) x6 → 24
- (3 sc, inc) x6 → 30
6–16) sc around (30) - (3 sc, dec) x6 → 24
- (2 sc, dec) x6 → 18
Stuff firmly so it becomes a smooth, wide, rounded belly like the photo.
FO and close.
🧤 Arms & Hands
Hands (Beige)
Use worsted + 4 mm hook.
- MR, 6
- inc x6 → 12
3–5) sc around - (1 sc, dec) x4 → 8
Lightly stuff.
FO.
Sleeves (Red)
Use chunky + 6 mm hook.
- MR, 6
- inc x6 → 12
3–10) sc around
Insert hand into sleeve and stitch together.
Fluffy White Cuffs
Use plush/chenille white yarn:
Work 2 full rounds of tight sc around sleeve edge to create thick cuffs like in the image.
💪 Optional Wire Support (for Perfect Toilet-Paper Grip)
If you want your gnome’s arms to stay perfectly curved while holding the toilet paper roll, you can add a simple wire insert inside each sleeve for extra stability.
Cut a piece of bendable craft wire (18–20 gauge), floral wire, or 2–3 twisted pipe cleaners. Make sure it is slightly shorter than the sleeve length, then bend both ends inward so no sharp tips can poke through the yarn.
Insert the wire into the sleeve after crocheting and before attaching the hand, pushing it all the way into the hand piece for added strength. Stitch the hand to the sleeve, locking the wire inside.
After attaching both arms to the gnome’s body, gently bend the sleeves so the hands curve inward and cradle the toilet paper roll securely. Adjust the curve as needed to achieve the perfect display shape.
🦵 Long Beige Legs
Use worsted + 4 mm hook.
- MR, 6
- inc x6 → 12
3–40) sc around (12)
Lightly stuff the whole length — should remain flexible and straight.
FO.
👢 Red Shoes With Thick White Cuffs
Shoe Bulbs (Red, chunky)
- MR, 6
- inc x6 → 12
- (1 sc, inc) x6 → 18
- (2 sc, inc) x6 → 24
5–6) sc around (24) - (2 sc, dec) x6 → 18
- (1 sc, dec) x6 → 12
Stuff firmly.
FO.
Extra-Thick White Cuffs
Attach plush white yarn around shoe opening:
- sc around
- sc around
Creates the large fluffy cuffs seen in the photo.
✂️ Assembly
- Sew legs to bottom front of body so they hang freely.
- Attach shoes to ends of legs.
- Attach arms to sides of body, angled inward.
- Position hands in front and lightly sew them together so they can hold the toilet paper roll.
- Place roll between hands.
- Sew nose centered at top front of body.
- Attach beard under nose, long and full.
- Pull hat down over the top, covering where eyes would be.
- Tack hat brim lightly to beard and body so it stays positioned like in the photo.
And your festive gnome is ready to take his place on the shelf! With his long dangling legs, fluffy beard, and cheerful toilet paper companion, he’s guaranteed to bring laughter and charm to any holiday corner of your home. Let him sit, swing, and spread Christmas cheer all season long. 🎄✨