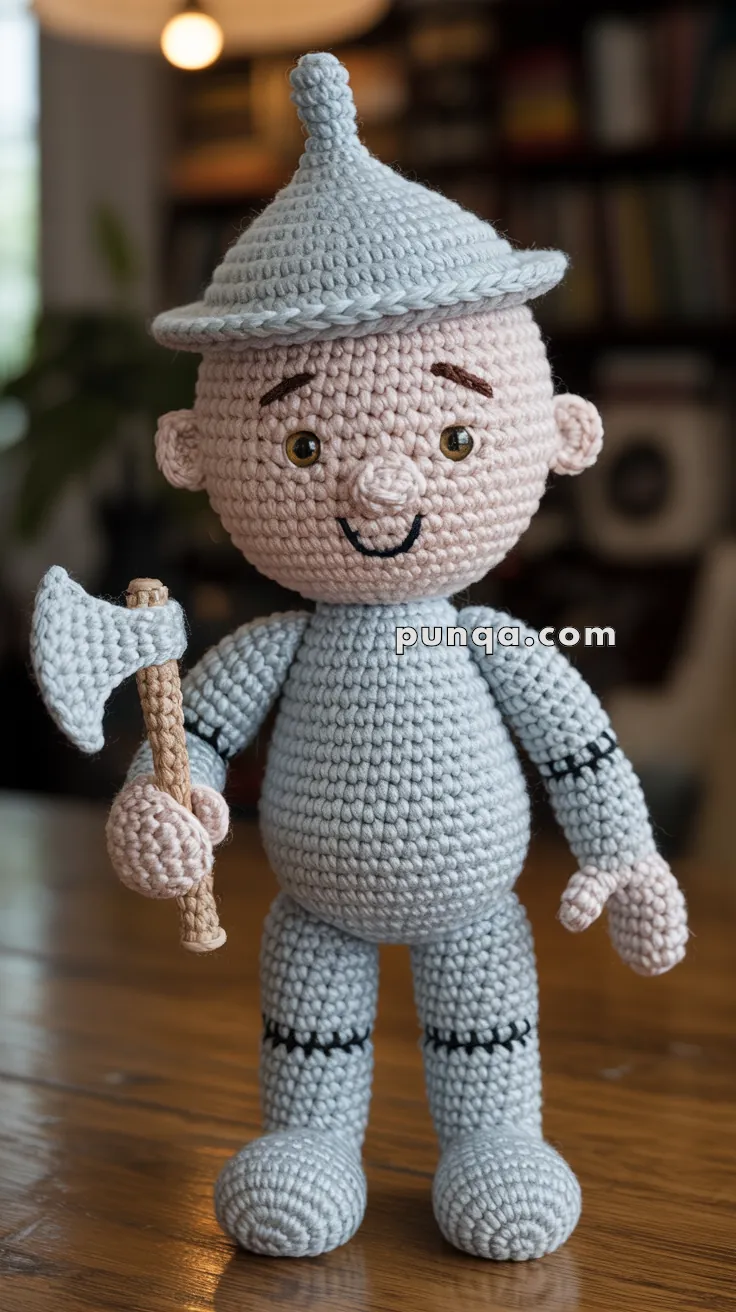
If you’ve ever wished for a handmade heartwarming hero, this Amigurumi Tin Man is ready to clank his way into your crochet collection! 🪓💖 With his silvery sheen, charming funnel hat, and gentle expression, he’s the perfect blend of whimsy and nostalgia. Whether you’re recreating the magic of Oz or simply love crafting iconic characters, this lovable Tin Man brings a touch of metallic magic to your yarn adventures—no oil can required!
From his buttoned-up torso to his poseable limbs, every detail invites creativity and customization. Add a tiny axe, stitch on a heart-shaped patch, or pair him with Dorothy and friends for a full enchanted ensemble. This pattern is ideal for intermediate crafters looking to explore shaping and texture while celebrating a timeless tale. So grab your hook and let your imagination rustle up some courage—this Tin Man is all heart, and he’s waiting to be stitched into life! 🧶✨🫶
🤖 Amigurumi Tin Man – Crochet Pattern (Wizard of Oz Collection)
Bring to life the beloved Tin Man from The Wizard of Oz with this photo-accurate amigurumi crochet pattern. This design includes his silver body, funnel hat, axe accessory, ears, nose, and shaped fingers for a true-to-character look.
✨ Skill Level
Intermediate – includes shaping, color changes, small parts, and structured assembly.
📏 Finished Size
Approx. 28–30 cm (11–12 in) tall.
🧶 Materials
- Silver-grey yarn (body, hat, axe blade) – ~100 g
- Light beige/skin-tone yarn (face, hands) – ~30 g
- Brown yarn (axe handle, eyebrows) – ~10 g
- Black embroidery thread (mouth, “bolts,” finger lines)
- 3 mm crochet hook
- 12 mm safety eyes (black with gold ring if available)
- Polyester stuffing
- Stitch markers
- Tapestry needle & scissors
🌀 Abbreviations (US Terms)
- MR = Magic Ring
- sc = single crochet
- inc = increase (2 sc in same stitch)
- dec = decrease (sc2tog)
- BLO = back loop only
- FLO = front loop only
- ch = chain
- sl st = slip stitch
🧵 Crochet Pattern
HEAD (Skin-tone)
R1: MR 6
R2: inc ×6 → 12
R3: (sc, inc) ×6 → 18
R4: (2 sc, inc) ×6 → 24
R5: (3 sc, inc) ×6 → 30
R6: (4 sc, inc) ×6 → 36
R7–14: sc around → 36
👉 Insert safety eyes between R9–10, 7 sts apart.
R15: (4 sc, dec) ×6 → 30
R16: (3 sc, dec) ×6 → 24
R17: (2 sc, dec) ×6 → 18
R18: (sc, dec) ×6 → 12
Stuff firmly. FO.
BODY (Silver Grey)
R1: MR 6
R2: inc ×6 → 12
R3: (sc, inc) ×6 → 18
R4: (2 sc, inc) ×6 → 24
R5–9: sc around → 24
R10: (3 sc, inc) ×6 → 30
R11–15: sc → 30
R16: (3 sc, dec) ×6 → 24
R17–20: sc → 24
R21: (2 sc, dec) ×6 → 18
R22–24: sc → 18
Stuff. FO.
LEGS (x2 – Silver Grey)
R1: MR 6
R2: inc ×6 → 12
R3: (sc, inc) ×6 → 18
R4–6: sc → 18
R7: (sc, dec) ×6 → 12
R8–16: sc → 12
Stuff. FO.
👉 Embroider black “hinge lines” around knees.
ARMS (x2 – Silver Grey + Beige)
Start with beige (hands):
R1: MR 6
R2: inc ×6 → 12
R3–4: sc → 12
👉 Shape fingers: Ch 4, sl st back into same st (thumb), continue 2 more times for other fingers. Keep flat.
R5: (2 sc, dec) ×3 → 9
Switch to silver grey.
R6–12: sc → 9
Stuff lightly. FO.
EARS (x2 – Beige)
R1: MR 6
R2: (sc, inc) ×3 → 9
R3: sc around → 9
Do not stuff. Flatten. Sew to sides of head.
NOSE (Beige)
R1: MR 4
R2: inc ×4 → 8
R3: sc → 8
Stuff lightly. FO. Sew centered between eyes.
FUNNEL HAT (Silver Grey)
R1: MR 6
R2: inc ×6 → 12
R3: (sc, inc) ×6 → 18
R4: (2 sc, inc) ×6 → 24
R5–7: sc → 24
R8: BLO, sc → 24 (creates rim fold)
R9–10: sc → 24
R11: (2 sc, dec) ×6 → 18
R12: sc → 18
R13: (sc, dec) ×6 → 12
R14: sc → 12
R15: dec ×6 → 6
FO.
Spout:
R1: MR 4
R2: inc ×4 → 8
R3–4: sc → 8
FO, sew to top of funnel.
AXE (Grey + Brown)
Handle (Brown):
Ch 18, sc back. FO.
Blade (Grey):
R1: MR 6
R2: inc ×6 → 12
R3: (sc, inc) ×6 → 18
R4: sc around → 18
Flatten. Sew to handle.
TAIL DETAILS (Optional “Bolts”)
Use black thread to embroider bolt details around arms & legs.
🧩 Assembly
- Sew head to body firmly.
- Attach arms at sides.
- Sew legs underneath body for balance.
- Attach ears to head sides.
- Sew funnel hat on top.
- Embroider mouth with black thread.
- Attach nose securely.
- Place axe into one hand (stitch closed grip if needed).
✨ Final Touches
- Light blush on cheeks for character expression.
- Use embroidery to highlight finger lines.
- Slight downward eyebrows for Tin Man’s worried, kind expression.
✨ And there you have it — your very own Amigurumi Tin Man straight from The Wizard of Oz! With his shiny silver body, pointed funnel hat, and trusty axe in hand, he’s ready to join Dorothy, the Scarecrow, and the Cowardly Lion on their journey down the Yellow Brick Road. This handmade doll makes a wonderful addition to any Wizard of Oz collection, a heartfelt gift, or a magical keepsake to treasure for years to come. 🌟