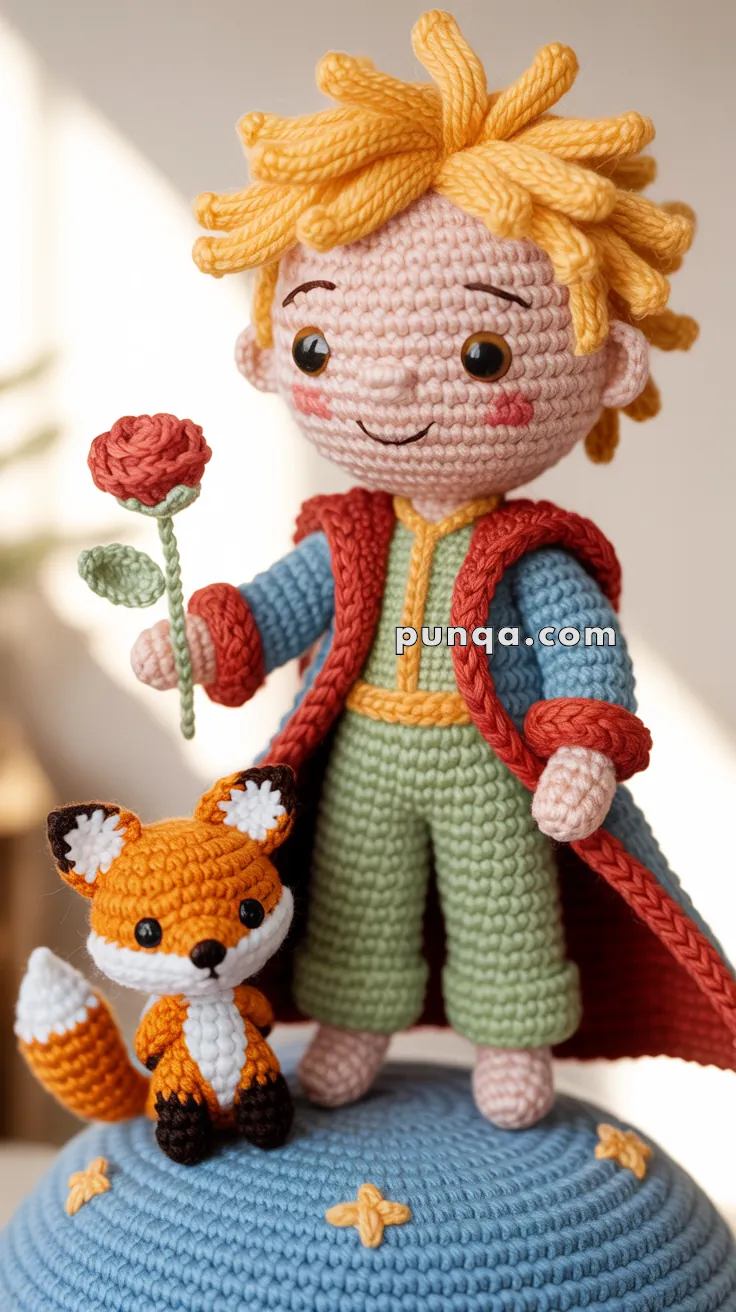
Bring a beloved tale to life with this Amigurumi The Little Prince & Fox crochet pattern! Inspired by Antoine de Saint-Exupéry’s timeless story, this charming duo captures the heart of friendship, wonder, and imagination. With the Little Prince’s flowing coat and golden hair, and the Fox’s sweet expression and bushy tail, these characters are perfect for storytelling, gifting, or adding a touch of literary magic to your crochet collection. 🧶🦊👑
Designed for detail and whimsy, this pattern invites you to explore expressive features, soft yarns, and sweet extras like a tiny rose, scarf, or planet base. Customize their colors to reflect your favorite illustrations or add personal touches to make them truly unique. Whether perched on a shelf, nestled in a gift basket, or starring in a handmade storybook scene, this Little Prince & Fox Amigurumi is a joyful and satisfying project—perfect for stitching up a little handmade wonder, one loop at a time! 💖✨🌌
🌟 Amigurumi The Little Prince & Fox Crochet Pattern
Bring the magic of Antoine de Saint-Exupéry’s beloved tale to life with this detailed amigurumi set featuring The Little Prince, his loyal Fox, and his cherished Rose—all posed atop a domed crochet planet.
✨ Skill Level
Advanced Intermediate – Includes I-cord hair, structured clothing, color changes, embroidery, and precise assembly
📏 Finished Sizes
- The Little Prince: 20–23 cm (8–9 inches) tall
- Fox: 8–10 cm (3–4 inches) tall
- Rose with stem: 7.5 cm (3 inches) tall
- Planet base: 15–18 cm (6–7 inches) diameter
🧶 Materials
Yarn (DK or Sport Weight)
For The Little Prince:
- Light peach/beige: 40g (skin)
- Golden yellow: 35g (hair, collar, belt)
- Sage/mint green: 45g (pants, inner vest)
- Dusty blue: 25g (coat lining)
- Terracotta/burnt red: 50g (coat)
- Light pink/peach: 20g (boots, blush)
- Black: 5g (embroidery)
For Fox:
- Bright orange: 30g (body, ears, tail)
- White: 15g (chest, muzzle, ear/tail tips)
- Dark brown/black: 10g (legs, nose, stripes)
For Rose & Planet:
- Coral/rose pink: 10g (flower)
- Green: 15g (stem, leaves, sepals)
- Sky blue: 60g (planet)
- Golden yellow: 10g (stars)
Other Supplies
- Hook: 2.25mm–2.5mm
- Safety eyes: 8mm black (2 for Prince, 2 for Fox)
- Fiberfill stuffing
- Tapestry needle
- Embroidery needle
- Pink chalk or pastel (for blush)
- Stitch markers
- Floral wire (20-gauge, for rose stem)
- Pins (for assembly)
- Scissors
🔤 Abbreviations (US Terms)
- MR = Magic Ring
- ch = chain
- sc = single crochet
- hdc = half double crochet
- dc = double crochet
- inc = increase (2 sc in same st)
- dec = decrease (sc2tog)
- sl st = slip stitch
- BLO = back loop only
- FLO = front loop only
- FO = fasten off
👦 THE LITTLE PRINCE
💭 HEAD (Light Peach)
Round 1: MR, 6 sc (6)
Round 2: inc × 6 (12)
Round 3: (sc, inc) × 6 (18)
Round 4: (2 sc, inc) × 6 (24)
Round 5: (3 sc, inc) × 6 (30)
Round 6: (4 sc, inc) × 6 (36)
Rounds 7–14: sc around (36)
👉 Insert 8mm safety eyes between rounds 8–9, positioned 7 stitches apart
Round 15: (4 sc, dec) × 6 (30)
Round 16: (3 sc, dec) × 6 (24)
Round 17: (2 sc, dec) × 6 (18)
👉 Stuff head firmly
Round 18: (sc, dec) × 6 (12)
Round 19: dec × 6 (6)
FO, weave through remaining stitches and pull tight
👃 NOSE (Light Peach)
Round 1: MR, 4 sc (4)
Round 2: sc around (4)
FO, leave long tail
Placement:
- Position between and slightly below eyes
- Sew securely, creating gentle bump shape
👂 EARS (Light Peach – Make 2)
Round 1: MR, 5 sc (5)
Round 2: sc around (5)
Round 3: sc around (5)
FO, leave long tail
Shaping:
- Flatten ears horizontally
- Do not stuff
Placement:
- Position on sides of head at rounds 8–9
- Angle slightly backward
😊 FACE EMBROIDERY (Black Thread)
Eyebrows:
- Position above each eye
- Create gentle curved arcs
- Use backstitch, approximately 5–6 stitches each
- Angle inner ends slightly downward for gentle expression
Mouth:
- Position between rounds 11–12
- Create soft curved smile
- Use backstitch, approximately 7–8 stitches wide
- Keep subtle and content
Blush:
- Apply pink chalk or pastel to cheeks
- Create soft circular areas
- Position on rounds 10–12, outside of eyes
- Blend gently with finger or brush
💛 HAIR (Golden Yellow)
The hair consists of individual crocheted cords (I-cords), not loose yarn strands.
Make 10–12 Hair Pieces:
Method: Crochet I-Cord
- Ch 2
- Row 1: Insert hook in first ch, pull up loop (2 loops on hook)
- Row 2: Insert hook through both loops from front to back, pull yarn through and up (still 2 loops)
- Yarn over, pull through both loops (1 loop remains)
- Repeat step 3–4 for approximately 20–25 rows to create a cord 5–7cm long
- FO, leaving 15cm tail
Alternative Method: Chain Tube
- Ch 15–18
- Work sl st in back bump of each chain to create tubular effect
Assembly:
- Arrange cords in circular pattern on top of head
- Start at center crown (rounds 1–3)
- Sew each cord at its base using the tail
- Position cords radiating outward and slightly upward
- Space approximately 3–4 stitches apart around crown
- Leave some cords longer for variation
- Style by gently bending and shaping outward
- Do not trim or brush – keep cords intact
👕 BODY & TORSO (Sage Green)
Round 1: MR, 6 sc (6)
Round 2: inc × 6 (12)
Round 3: (sc, inc) × 6 (18)
Round 4: (2 sc, inc) × 6 (24)
Round 5: (3 sc, inc) × 6 (30)
Rounds 6–10: sc around (30)
Round 11: (3 sc, dec) × 6 (24)
Rounds 12–14: sc around (24)
Round 15: (2 sc, dec) × 6 (18)
Rounds 16–18: sc around (18)
👉 Stuff body firmly
FO, leave long tail for attaching head
🦵 LEGS & BOOTS (Make 2)
Boots (Light Pink):
Round 1: MR, 6 sc (6)
Round 2: inc × 6 (12)
Round 3: (sc, inc) × 6 (18)
Round 4: BLO: sc around (18)
Rounds 5–7: sc around (18)
👉 Switch to sage green (pants)
Legs (Sage Green):
Rounds 8–9: sc around (18)
Round 10: (sc, dec) × 6 (12)
Rounds 11–22: sc around (12)
👉 Stuff legs firmly, especially boots
FO, leave long tail
Attachment:
- Position legs at bottom of body
- Space approximately 4–6 stitches apart
- Sew securely all around
- Ensure character can stand
💪 ARMS (Make 2)
Hands (Light Peach):
Round 1: MR, 6 sc (6)
Round 2: inc × 6 (12)
Rounds 3–5: sc around (12)
Round 6: (2 sc, dec) × 3 (9)
👉 Switch to terracotta/burnt red (coat sleeves)
Arms (Terracotta):
Rounds 7–18: sc around (9)
👉 Stuff lightly – keep flexible
FO, leave long tail
Cuffs (Terracotta):
- Work 1 round of sl st around wrist area (round 6–7 transition)
- This creates the cuff ridge visible in coat sleeves
🧥 COAT (Terracotta with Dusty Blue Lining)
The coat is constructed as a long vest with separate panels.
BACK PANEL (Terracotta):
Ch 18
Rows 1–24: sc across (18), ch 1, turn each row
FO, leave tail
FRONT PANELS (Make 2 – Terracotta):
Ch 9
Rows 1–24: sc across (9), ch 1, turn each row
FO, leave tail
COAT TAILS (Make 2 – Terracotta):
These create the flowing back sections.
Ch 9
Rows 1–12: sc across (9), ch 1, turn
Row 13: dec, sc 5, dec (7), ch 1, turn
Rows 14–16: sc across (7), ch 1, turn
Row 17: dec, sc 3, dec (5), ch 1, turn
Rows 18–20: sc across (5), ch 1, turn
FO, leave tail
SLEEVE CAPS (Make 2 – Terracotta):
Round 1: MR, 6 sc (6)
Round 2: inc × 6 (12)
Round 3: (sc, inc) × 6 (18)
Rounds 4–6: sc around (18)
FO, leave long tail (these will attach to shoulder area)
ASSEMBLY:
- Lay back panel flat
- Position front panels on each side, overlapping by 2–3 stitches at shoulders
- Sew shoulder seams together
- Attach coat tails to bottom back corners of back panel
- Sew sleeve caps to armhole openings
- Try coat on character before final attachments
LINING (Optional – Dusty Blue):
Create identical pieces in dusty blue, slightly smaller:
- Back panel: ch 16, work 22 rows
- Front panels: ch 8, work 22 rows
- Sew lining to inside of coat along edges
💛 YELLOW COLLAR (Golden Yellow)
Ch 28, join with sl st to form ring
Round 1: sc around (28)
Round 2: sc around (28)
Round 3: (3 sc, inc) × 7 (35)
Round 4: sc around (35)
FO, leave long tail
Shaping:
- Fold collar in half to create standing collar effect
- Position around neck area
- Sew to body at base of head
💛 YELLOW BELT/SASH (Golden Yellow)
Ch 60 (or length to fit around waist)
Row 1: sc in 2nd ch from hook, sc across (59)
Row 2: ch 1, turn, sc across (59)
FO, leave long tails
Placement:
- Wrap around waist at transition between torso and pants (around round 15–16 of body)
- Tie in front or side
- Trim excess or leave flowing
- Tack down with needle to secure
🦊 THE FOX
🦊 FOX HEAD & SNOUT (Orange)
Round 1: MR, 6 sc (6)
Round 2: inc × 6 (12)
Round 3: (sc, inc) × 6 (18)
Round 4: (2 sc, inc) × 6 (24)
Rounds 5–8: sc around (24)
Round 9: (2 sc, dec) × 6 (18)
Round 10: sc around (18)
👉 Insert 8mm safety eyes between rounds 5–6, approximately 5–6 stitches apart
Round 11: (sc, dec) × 6 (12)
👉 Stuff firmly
Round 12: dec × 6 (6)
FO, weave through remaining stitches
🤍 FOX MUZZLE (White)
Round 1: MR, 6 sc (6)
Round 2: inc × 6 (12)
Round 3: (sc, inc) × 6 (18)
Round 4: sc around (18)
FO, leave long tail
Placement:
- Flatten muzzle slightly
- Position on lower front of face, centered below eyes
- Sew securely around edges
Nose (Black):
- Embroider small triangular nose at top center of white muzzle
- Use satin stitch for solid fill
🦊 FOX EARS (Make 2 – Orange with White Tips)
Round 1: MR, 5 sc in orange (5)
Round 2: inc × 5 (10)
Round 3: (sc, inc) × 5 (15)
👉 Switch to white
Round 4: sc around (15)
Round 5: (3 sc, dec) × 3 (12)
FO, leave long tail
Inner Ear (White – Make 2):
Round 1: MR, 4 sc (4)
Round 2: inc × 4 (8)
Round 3: (sc, inc) × 4 (12)
FO, leave tail
Assembly:
- Flatten main ear piece
- Sew white inner ear to front of main ear
- Attach ears to top of head, angled upward and outward
🦊 FOX BODY (Orange with White Chest)
Start with white:
Round 1: MR, 6 sc (6)
Round 2: inc × 6 (12)
Round 3: (sc, inc) × 6 (18)
Round 4: (2 sc, inc) × 6 (24)
Round 5: sc around (24)
👉 Switch to orange
Rounds 6–10: sc around (24)
Round 11: (2 sc, dec) × 6 (18)
Round 12: sc around (18)
👉 Stuff firmly
Round 13: (sc, dec) × 6 (12)
Round 14: dec × 6 (6)
FO, weave through remaining stitches
🦊 FOX LEGS (Make 4 – Dark Brown/Black)
Round 1: MR, 5 sc (5)
Round 2: inc × 5 (10)
Rounds 3–6: sc around (10)
FO, leave long tail
Attachment:
- Stuff legs lightly
- Position at bottom/sides of body
- Sew securely
🦊 FOX TAIL (Orange with White Tip and Dark Stripes)
Start with orange:
Round 1: MR, 6 sc (6)
Round 2: (sc, inc) × 3 (9)
Round 3: (2 sc, inc) × 3 (12)
Rounds 4–6: sc around (12)
👉 Switch to dark brown – work 1 round
Round 7: sc around in dark brown (12)
👉 Switch back to orange
Rounds 8–10: sc around in orange (12)
👉 Switch to dark brown – work 1 round
Round 11: sc around in dark brown (12)
👉 Switch to white
Rounds 12–14: sc around in white (12)
Round 15: (2 sc, dec) × 3 (9)
Round 16: (sc, dec) × 3 (6)
👉 Stuff tail firmly
FO, weave through remaining stitches
Shaping:
- Bend tail into gentle curve
- Attach to back of body with curved shape
- Position so tail curves upward and to side
🦊 FINAL FOX ASSEMBLY
- Attach head to body
- Position and sew all 4 legs
- Attach tail with curve
- Ensure fox can sit or stand beside Prince
🌹 THE ROSE
🌹 FLOWER HEAD (Coral/Rose Pink)
Inner Center:
Round 1: MR, 6 sc (6)
Round 2: inc × 6 (12)
Round 3: (sc, inc) × 6 (18)
FO, set aside
Petal Strip:
Ch 36
Row 1: Starting in 2nd ch from hook:
(sc, hdc, 3 dc, hdc, sc) all in same ch, sl st in next ch
Repeat pattern across
FO, leave long tail
Assembly:
- Place the flat circle (inner center) as base
- Starting from center, coil petal strip around base
- Gradually loosen coil for outer petals
- Sew through all layers at bottom
- Arrange petals to create dimensional bloom
🌿 SEPALS (Green – Base Cup of Flower)
Round 1: MR, 5 sc (5)
Round 2: inc × 5 (10)
Round 3: (sc, inc) × 5 (15)
FO, leave long tail
Attachment:
- Position at base of completed rose
- Sew around bottom edge of flower
- This creates the green cup that holds flower
🌿 STEM (Green with Wire Support)
Cut floral wire to 10–12cm length
Wrap wire with green yarn:
- Tie yarn to top of wire
- Wrap tightly down entire length, overlapping slightly
- Secure at bottom with knot
- Apply small amount of craft glue if desired
Alternative – Crocheted Stem:
Ch 25
Work sl st in back bump of each chain to create firm tube
🍃 LEAVES (Green – Make 2)
Ch 8
Starting in 2nd ch from hook:
sc, hdc, dc, hdc, sc, sl st
Ch 1, rotate to work opposite side:
sl st, sc, hdc, dc, hdc, sc
sl st to join
FO, leave tail
Final Rose Assembly:
- Attach sepals to base of flower
- Insert wrapped wire stem through center of sepals
- Secure with needle and thread
- Attach leaves to stem at mid-point
- Bend wire gently for natural curve
🪐 PLANET BASE
🌍 DOME STRUCTURE (Sky Blue)
Round 1: MR, 6 sc (6)
Round 2: inc × 6 (12)
Round 3: (sc, inc) × 6 (18)
Round 4: (2 sc, inc) × 6 (24)
Round 5: (3 sc, inc) × 6 (30)
Round 6: (4 sc, inc) × 6 (36)
Round 7: (5 sc, inc) × 6 (42)
Round 8: (6 sc, inc) × 6 (48)
Round 9: (7 sc, inc) × 6 (54)
Round 10: (8 sc, inc) × 6 (60)
Round 11: (9 sc, inc) × 6 (66)
Round 12: (10 sc, inc) × 6 (72)
Rounds 13–20: sc around (72)
👉 This creates the flat top surface of planet
Round 21: (10 sc, dec) × 6 (66)
Round 22: (9 sc, dec) × 6 (60)
Round 23: (8 sc, dec) × 6 (54)
Round 24: (7 sc, dec) × 6 (48)
👉 Begin stuffing firmly
Round 25: (6 sc, dec) × 6 (42)
Round 26: (5 sc, dec) × 6 (36)
Round 27: (4 sc, dec) × 6 (30)
Round 28: (3 sc, dec) × 6 (24)
Round 29: (2 sc, dec) × 6 (18)
Round 30: (sc, dec) × 6 (12)
Round 31: dec × 6 (6)
FO, weave through remaining stitches and pull tight
⭐ STARS (Golden Yellow – Make 6–8)
Small Star Appliqué:
Round 1: MR, 5 sc (5)
Make points:
ch 3, sl st in 2nd ch from hook, sl st in next ch, sl st in same st of round 1
Repeat 4 more times (5 points total)
FO, leave long tail
Placement:
- Scatter stars randomly across planet surface
- Sew securely at center of each star
- Vary positioning for natural look
🎨 FINAL ASSEMBLY
Step 1: Prepare Planet Base
- Ensure planet is firmly stuffed and holds dome shape
- Attach all star appliqués
- Let sit and set shape
Step 2: Assemble The Little Prince
- Attach head to body – ensure straight and secure
- Add arms – position at shoulder level, angled naturally
- Verify legs – ensure stable standing position
- Dress in coat – drape coat over body, tack at shoulders
- Add collar – position around neck, sew securely
- Add belt – wrap around waist, tie and tack
- Attach hair – all cords secured at crown, styled outward
Step 3: Position Rose
- Place rose in Prince’s hand/arm
- Secure with a few hidden stitches
- Adjust wire stem for natural hold
Step 4: Place Characters on Planet
- Position Prince on planet surface (slightly off-center for visual interest)
- Sew Prince’s feet to planet securely
- Position Fox beside Prince
- Sew Fox’s feet to planet
- Ensure both figures are stable
Step 5: Final Details
- Check all facial features for symmetry
- Adjust Prince’s hair for best display angle
- Curve Fox’s tail naturally
- Position rose at attractive angle
- Verify stability – entire piece should sit securely
🌟 FINISHING TOUCHES
Facial Expressions:
- Ensure Prince’s gentle smile is visible
- Check Fox’s alert, friendly expression
- Adjust eye positioning if needed
Costume Details:
- Smooth any wrinkles in coat
- Ensure collar stands properly
- Verify belt is secure and visible
- Check that boot cuffs are defined
Scene Composition:
- Angle characters toward each other for connection
- Position rose between them as focal point
- Ensure stars are visible from multiple angles
📐 Approximate Measurements
The Little Prince:
- Head diameter: 6cm
- Body height: 7cm
- Leg length (including boot): 6cm
- Arm length: 5cm
- Total height: 20–23cm
- Hair cord length: 5–7cm each
Fox:
- Head diameter: 4cm
- Body length: 4.5cm
- Leg length: 2.5cm
- Tail length: 5cm
- Total height: 8–10cm
Rose:
- Flower diameter: 3cm
- Stem length: 8–10cm
- Total height: 7.5cm
Planet:
- Diameter at widest: 15–18cm
- Height: 8–10cm
- Star diameter: 2cm each
💡 Display & Care Tips
Display Ideas:
- Place on bookshelf near copies of The Little Prince
- Create shadow box display with quote
- Add LED tea light inside planet for magical glow effect
- Photograph with sunset/golden hour lighting
Care Instructions:
- Dust gently with soft brush
- Spot clean with damp cloth if needed
- Store carefully – protect hair cords from crushing
- Avoid direct sunlight to prevent color fading
- Keep away from moisture
Variations:
- Create additional asteroids/planets for expanded scene
- Add the snake, baobab trees, or other story elements
- Make different coat colors for seasonal versions
- Create the aviator character as companion piece
🎭 Color Variation Ideas
Sunset Prince: Orange coat, purple pants, pink accents
Winter Prince: White coat with silver trim, ice blue pants
Forest Prince: Brown coat, deep green pants, burgundy accents
Classic Illustration: Lighter yellow hair, brighter green, more saturated red
🌹 Your Little Prince Set is Complete!
This handcrafted scene captures the wonder, friendship, and timeless magic of Saint-Exupéry’s masterpiece. Every stitch—from the structured golden hair to the Fox’s gentle expression to the dome of stars beneath their feet—tells the story of connection, imagination, and the beauty of small, precious things.
“It is only with the heart that one can see rightly; what is essential is invisible to the eye.” 🦊✨
Display your creation with pride, knowing you’ve brought this beloved tale to life through the art of crochet!