Celebrate the heart of learning with this sweet Amigurumi Teacher & Student crochet pattern! 🍎🧶 Whether you’re honoring a favorite educator or capturing the joy of school days, this charming duo brings classroom magic to life in yarn form. With the teacher’s warm smile and the student’s eager expression, they’re perfect for gifting, decorating, or simply adding a touch of scholastic spirit to your handmade collection.
Designed with thoughtful details and plenty of room for personalization, this pattern invites you to stitch tiny accessories like books, backpacks, glasses, or even a chalkboard. You can customize their outfits to reflect real-life teachers and students or create a whimsical classroom scene all your own. Whether perched on a desk, tucked into a gift basket, or starring in a back-to-school display, this Teacher & Student Amigurumi pair is a joyful and satisfying project—perfect for stitching up a little appreciation and curiosity, one loop at a time! ✏️📚💖
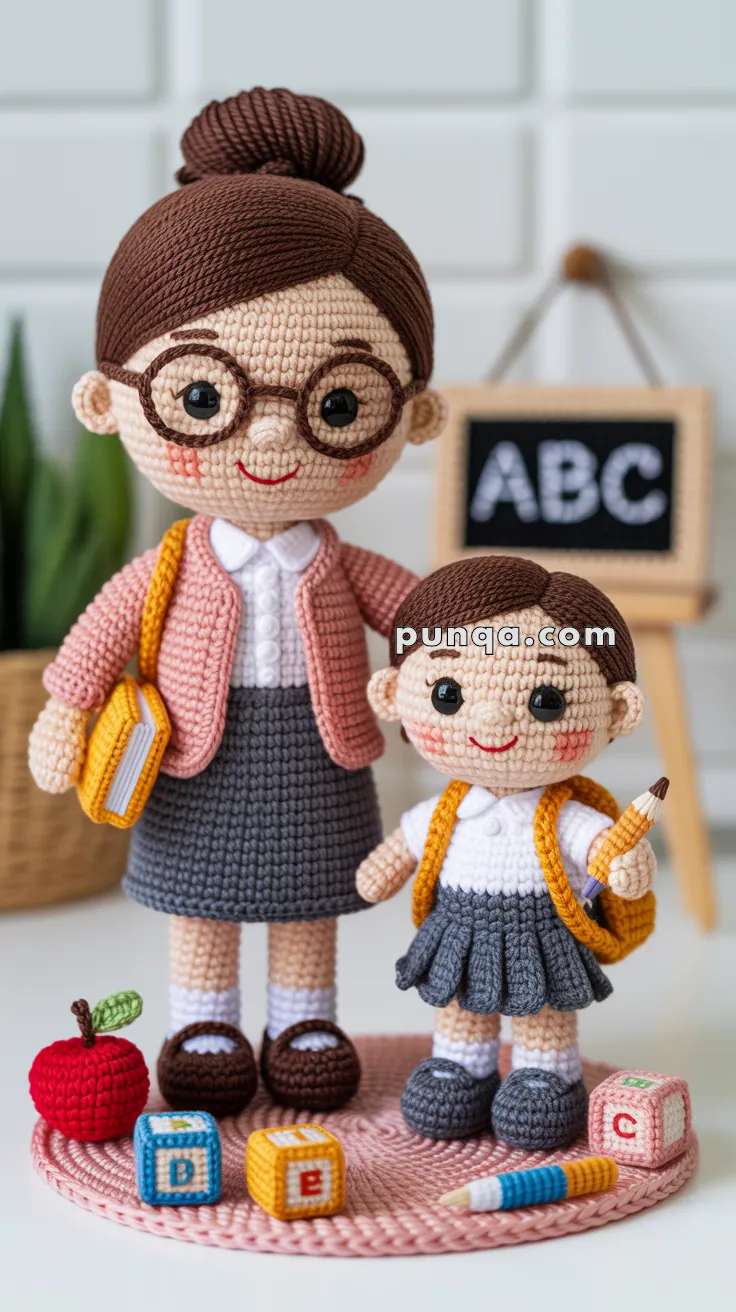
🍎 Amigurumi Teacher & Student Crochet Pattern
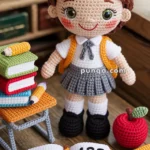
Step into the classroom with this adorable Teacher & Student set! This comprehensive tutorial includes patterns for both dolls and all their accessories — glasses, book, pencil, backpack, apple, and ABC blocks. Every charming detail brings this classroom scene to life, making it perfect as a teacher appreciation gift or educational display.
✨ Skill Level
Intermediate to Advanced – includes shaping, embroidery, hair attachment, and accessory construction.
📏 Finished Size
- Teacher: ~26 cm (10 in)
- Student: ~18 cm (7 in)
🧶 Materials
Yarn: DK cotton yarn
- Skin: beige or peach
- Hair: dark brown
- Teacher clothes: grey, white, pink cardigan, brown shoes
- Student clothes: grey skirt, white shirt, mustard yellow backpack, grey shoes
- Accessories: red (apple), yellow (book, pencil), white (pages, socks), brown (glasses), multicolor (blocks)
Other supplies:
- Crochet hook: 2.5 mm (2.25 mm for smaller student)
- Safety eyes: 8 mm (teacher), 6 mm (student)
- Black embroidery thread (eyebrows, mouth, letters)
- Fiberfill stuffing
- Tapestry needle, scissors, pins
- Blush or pink thread for cheeks
- Thin wire (optional, for glasses)
🔤 Abbreviations (US Terms)
- MR = Magic Ring
- sc = single crochet
- inc = increase (2 sc in one stitch)
- dec = decrease (sc2tog)
- ch = chain
- sl st = slip stitch
- BLO = back loop only
- FLO = front loop only
- hdc = half double crochet
👩🏫 Teacher Doll Pattern
Head (Beige)
- MR, 6 sc (6)
- inc x6 (12)
- (sc, inc) x6 (18)
- (2 sc, inc) x6 (24)
- (3 sc, inc) x6 (30)
- (4 sc, inc) x6 (36)
- (5 sc, inc) x6 (42)
- –14. sc around (42)
➡️ Insert 8 mm safety eyes between R11–R12, 8 sts apart.
➡️ Nose: Embroider with beige yarn at R13, 2 sts wide (small horizontal stitch).
➡️ Blush: Apply pink thread or blush at R12 below eyes.
➡️ Eyebrows: Embroider curved lines at R10 above eyes.
➡️ Mouth: Embroider small smile at R14–R15 with red or pink thread.
- (5 sc, dec) x6 (36)
- (4 sc, dec) x6 (30)
- (3 sc, dec) x6 (24)
- (2 sc, dec) x6 (18)
Stuff firmly.
- (sc, dec) x6 (12)
- dec x6 (6). FO, weave in end.
Glasses (Brown)
Lenses (make 2):
- MR, 8 sc (8)
- inc x8 (16). FO, leaving long tail.
Bridge:
- Ch 4, sl st back. FO.
Temples (make 2):
- Ch 12–14 (adjust to wrap around head), sl st back. FO.
Assembly:
- Sew bridge between two lenses.
- Attach temples to outer edges of lenses.
- Position glasses on face at R10–R11, sew securely.
- Optional: Insert thin wire into temples for structure.
Hair (Brown, with Bun)
Wig Cap:
- Work as head pattern through R7 (42 sts).
- Work 4 more rounds even. FO, leaving long tail.
- Pin to head, sew securely around edges.
Hair Strands:
- Cut 18–20 cm strands of brown yarn.
- Using latch-hook or crochet hook method:
- Insert hook into wig cap stitch
- Fold yarn strand in half
- Pull loop through, thread ends through loop, tighten
- Attach strands densely across entire cap
- Direct strands backward toward crown
Bun:
- MR, 6 sc (6)
- inc x6 (12)
- (sc, inc) x6 (18)
- (2 sc, inc) x6 (24)
- –8. sc around (24)
- (2 sc, dec) x6 (18)
Stuff lightly.
- dec x6. FO.
Assembly:
- Gather loose hair strands at crown
- Wrap around bun base
- Sew bun to top/back of head
- Tuck and secure strand ends under bun
- Trim any excess
Ears (make 2)
- MR, 6 sc (6). FO, leaving long tail.
- Flatten slightly.
- Sew to sides of head at R11, aligned with eyes.
Body (Grey Skirt, White Shirt, Pink Cardigan)
Start with grey yarn:
- MR, 6 sc (6)
- inc x6 (12)
- (sc, inc) x6 (18)
- (2 sc, inc) x6 (24)
- BLO sc around (24) – waistband
- –8. sc around (24)
Switch to white (shirt):
- sc around (24)
- –14. sc around (24)
Switch to pink (cardigan):
- sc around (24)
- –20. sc around (24). FO.
Stuff body.
Collar:
- With white, ch 12
- sc in 2nd ch from hook and across (11 sc). FO.
- Sew around neckline at top of body.
Cardigan Opening (optional detail):
- With black thread, embroider vertical line down center front to create cardigan opening.
Arms (make 2)
With beige:
- MR, 6 sc (6)
- –10. sc around (6)
Switch to pink (cardigan sleeves):
- –12. sc around (6). FO.
Stuff lightly. Sew to body at shoulders (R15).
Legs (make 2)
With brown (shoes):
- MR, 6 sc (6)
- inc x6 (12)
- –6. sc around (12)
Switch to white (socks):
- –8. sc around (12)
Switch to beige (legs):
- –12. sc around (12). FO.
Stuff firmly. Sew under body.
👧 Student Doll Pattern
Head (Beige)
- MR, 6 sc (6)
- inc x6 (12)
- (sc, inc) x6 (18)
- (2 sc, inc) x6 (24)
- (3 sc, inc) x6 (30)
- (4 sc, inc) x6 (36)
- –12. sc around (36)
➡️ Insert 6 mm safety eyes between R10–R11, 6 sts apart.
➡️ Nose: Embroider at R12.
➡️ Blush: Apply at R11 below eyes.
➡️ Eyebrows: Embroider at R9.
➡️ Mouth: Small smile at R13–R14.
- (4 sc, dec) x6 (30)
- (3 sc, dec) x6 (24)
- (2 sc, dec) x6 (18)
Stuff firmly.
- (sc, dec) x6 (12)
- dec x6 (6). FO.
Hair (Brown Bob with Center Part)
Wig Cap:
- Work as head through R6 (36 sts). FO.
- Pin and sew to head.
Hair Strands:
- Cut 12–14 cm strands
- Attach across entire cap using latch-hook method
- Center part: Leave 1 stitch row bare down center front
- Attach hair on both sides of part
- Direct strands downward and slightly forward
- Trim evenly to chin length in bob style
- Ensure neat, rounded shape around face
Ears (make 2)
- MR, 6 sc (6). FO.
- Flatten and sew at R10.
Body with Pleated Skirt
With grey (skirt):
- MR, 6 sc (6)
- inc x6 (12)
- (sc, inc) x6 (18)
- (2 sc, inc) x6 (24)
Pleated edge:
- FLO: ch 3, sl st in same st, sl st in next st repeat around – creates pleated ruffle
- –8. Working in BLO of R4: sc around (24)
Switch to white (shirt):
- sc around (24)
- –12. sc around (24). FO.
Stuff body.
Collar:
- With white, ch 10, sc across. Sew to neckline.
Arms (make 2)
With beige:
- MR, 6 sc (6)
- –8. sc around (6). FO.
Stuff lightly. Sew to shoulders.
Legs (make 2)
With grey (shoes):
- MR, 6 sc (6)
- inc x6 (12)
- –6. sc around (12)
Switch to white (socks):
- –8. sc around (12)
Switch to beige (legs):
- –10. sc around (12). FO.
Stuff. Sew under body.
Backpack (Mustard Yellow)
Main Body:
- MR, 6 sc (6)
- inc x6 (12)
- (sc, inc) x6 (18)
- –7. sc around (18)
- dec x6 (12). FO.
Stuff lightly. Flatten slightly.
Flap (optional):
- Ch 5, work 3 rows of 4 sc. FO.
- Sew to top of backpack.
Straps (make 2):
- Ch 18–20
- sc in 2nd ch from hook and across. FO.
- Sew one end to top of backpack, other end to bottom.
- Position backpack on student’s back, sew straps over shoulders.
Buckle detail (optional):
- Embroider small rectangle on flap with black thread.
📚 Accessories
Apple
With red:
- MR, 6 sc (6)
- inc x6 (12)
- (sc, inc) x6 (18)
- –5. sc around (18)
- (sc, dec) x6 (12)
- dec x6 (6). FO.
Stuff firmly.
Stem (brown):
- Ch 5, sl st back. Sew to top.
Leaf (green):
- Ch 5
- sl st in 2nd ch from hook, sc, hdc, sc, sl st. FO.
- Sew next to stem.
Book
Pages (white):
- Ch 12
- Work 8 rows of 10 sc. FO.
Cover (yellow):
- Ch 14
- Work 10 rows of 12 sc. FO.
Assembly:
- Place white pages inside yellow cover
- Fold in half
- Sew along spine and edges
- Optional: Embroider “ABC” on cover
Pencil
With yellow:
- MR, 4 sc (4)
- –6. sc around (4)
Switch to beige/tan (wood tip):
- sc around (4)
Switch to black (lead):
- sc around (4)
Back to yellow:
- –11. sc around (4)
Switch to pink or orange (eraser):
- –13. sc around (4)
Switch to silver/grey (ferrule – metal band):
- sc around (4). FO.
ABC Blocks (make 3–5)
For each block, make 6 squares:
- Ch 6
- Work 5 rows of 5 sc
- FO, leaving long tail
Assembly:
- Arrange 6 squares into cube shape
- Sew edges together
- Stuff lightly before closing final seam
- Embroider letters on sides: A, B, C, D, E
- Use different colors for each block (blue, yellow, pink, etc.)
🧵 Final Assembly
- Attach heads to bodies using whip stitch or mattress stitch.
- Sew arms to shoulders at R15 (teacher) or R12 (student).
- Attach legs centered under body.
- Position ears symmetrically on sides of head.
- Add glasses to teacher’s face.
- Style hair: smooth teacher’s bun, trim and shape student’s bob.
- Place accessories:
- Book in teacher’s hand or under arm
- Pencil in student’s hand
- Backpack on student’s back
- Apple and blocks arranged at base
🌟 Display Tips
Arrange your Teacher & Student set on a small crocheted base (optional):
- Ch 30, work in spiral increasing to create oval base
- Position dolls with apple and blocks around them
- Add tiny chalkboard or desk props for extra classroom charm
Your handcrafted classroom scene is complete! Perfect for teacher gifts, educational displays, or celebrating the joy of learning. 🍎📚✏️