Celebrate color, culture, and creativity with the Amigurumi Sugar Skull Flower Crown, a vibrant crochet project inspired by Día de los Muertos traditions! 💀🌸 With its cheerful skulls, bold blossoms, and festive flair, this crown is a joyful tribute to life, memory, and handmade artistry. Whether worn as a costume accessory, displayed as décor, or gifted to someone who loves meaningful crafts, it’s a stunning way to stitch up celebration.
Perfect for crocheters who enjoy bold designs and playful details, this pattern invites you to mix bright yarns, experiment with petal shapes, and personalize each skull with expressive embroidery. Add glittery accents, extra leaves, or even tiny hearts to make it uniquely yours. Whether you’re honoring loved ones or simply embracing the beauty of tradition, the Sugar Skull Flower Crown is a dazzling way to crochet connection—one colorful loop at a time! 🧶✨
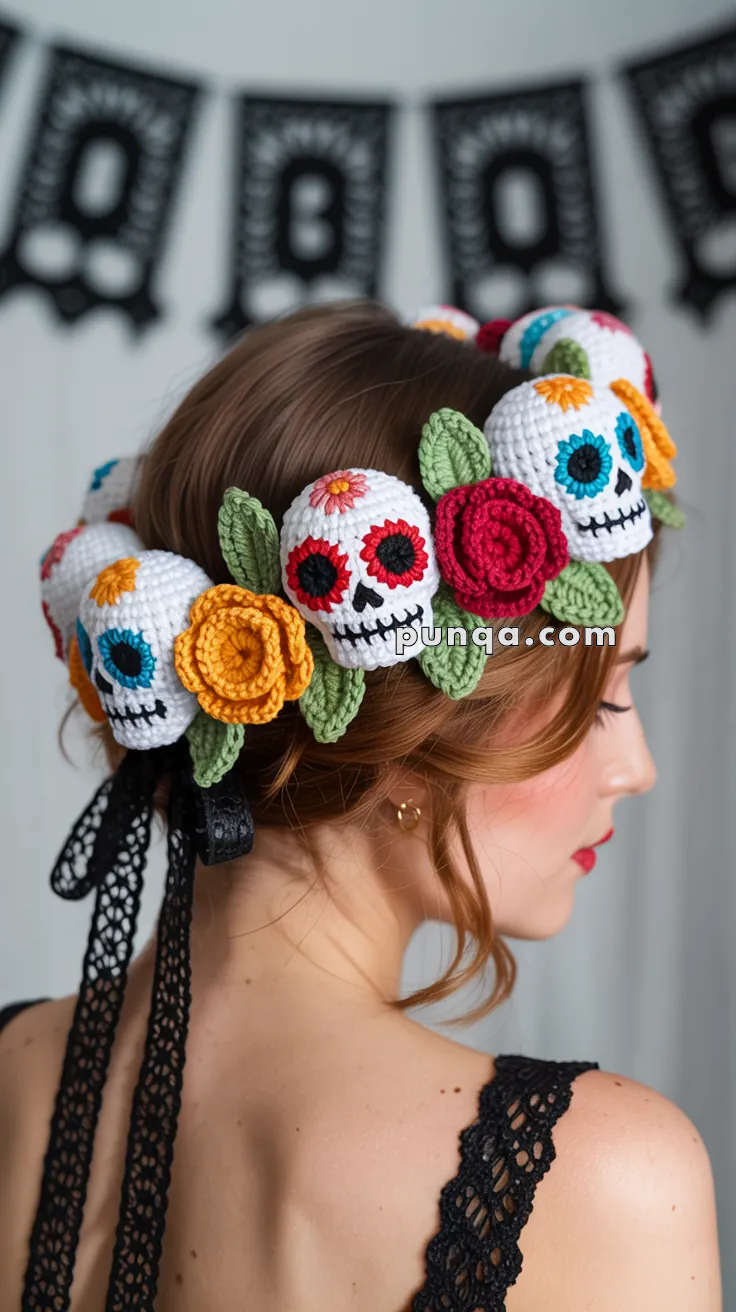
💀🌸 Crochet Sugar Skull Flower Crown Pattern – Día de los Muertos Beauty!
Create this stunning Day of the Dead inspired flower crown featuring colorful sugar skulls, vibrant spiral roses, and lush greenery on an elegant black lace base. Perfect for Día de los Muertos celebrations, Halloween parties, festivals, or as a breathtaking costume accessory!
📸 What You’ll Make
This show-stopping wearable art piece combines traditional Mexican sugar skull imagery with beautiful floral elements. Five intricately detailed calaveras (sugar skulls) sit among spiral roses, ruffled marigolds, and green leaves, all mounted on a comfortable black lace crown base that ties with long romantic ribbons. Each skull features colorful eye sockets, heart-shaped nose, and unique forehead decorations that honor Día de los Muertos traditions.
The flat construction makes this crown comfortable to wear for hours, while the layered assembly creates impressive dimension and visual impact.
🎯 Skill Level
Intermediate – This pattern requires experience with flat amigurumi construction, detailed embroidery work, color changes, and multi-component assembly. If you’re comfortable with basic crochet stitches and have made simple amigurumi before, you can definitely master this project!
📏 Finished Dimensions
- Individual Skull Size: 6.5 cm (2.5 inches) tall × 1.5 cm (0.6 inches) thick
- Large Roses: 5-6 cm (2-2.5 inches) diameter
- Small Flowers: 3-4 cm (1.5 inches) diameter
- Leaves: 6-7 cm (2.5-3 inches) long
- Crown Base: Adjustable to fit head circumferences 21-23 inches (53-58 cm)
- Ribbon Ties: 45-50 cm (18-20 inches) each side
🧶 Materials You’ll Need
Yarn
Worsted weight cotton yarn (recommended for structure and detail):
- White (60g) – skull bases
- Black (40g) – eyes, noses, mouths, crown band (optional)
- Bright Red/Magenta (30g) – roses and eye sockets
- Teal/Turquoise (25g) – eye sockets and accent flowers
- Orange (30g) – eye sockets, roses, marigolds
- Yellow/Gold (25g) – eye sockets, marigolds, small flowers
- Pink (20g) – accent flowers and forehead decorations
- Green (40g) – leaves
- Small amounts: Purple, lime green (optional accent colors)
Other Supplies
- Crochet hook: 3.0 mm (US D/3)
- Black lace ribbon: 60-65 inches long, 1.5-2 inches wide (for base and ties)
- OR make crocheted black band (pattern included)
- Embroidery needle with large eye
- Yarn needle (tapestry needle)
- Small amount of fiberfill stuffing (for slight dimension)
- Straight pins (for assembly planning)
- Scissors
- Measuring tape
- Water-soluble fabric marker (for marking embroidery placement)
- Optional: Hair clips to attach crown, interfacing for extra structure
🔤 Abbreviations (US Terms)
- MR = Magic Ring
- ch = chain
- sc = single crochet
- hdc = half double crochet
- dc = double crochet
- tr = treble crochet
- inc = increase (2 sc in same stitch)
- dec = decrease (single crochet 2 stitches together)
- sl st = slip stitch
- FO = fasten off
- BLO = back loop only
- FLO = front loop only
- ( ) × # = repeat instructions in parentheses # times
- st(s) = stitch(es)
💀 Pattern Instructions
Part 1: Sugar Skulls (Make 5)
The key to a wearable crown is creating flat, disc-shaped skulls rather than round spheres. Each skull will be approximately 0.5-0.75 inches thick.
Front Face Piece
With white yarn:
Round 1: MR, 6 sc (6)
Round 2: inc around (12)
Round 3: (sc, inc) × 6 (18)
Round 4: (2 sc, inc) × 6 (24)
Rounds 5-7: sc around (24)
Round 8: (2 sc, dec) × 6 (18)
Round 9: (sc, dec) × 6 (12)
Round 10: dec around (6)
FO leaving 15-inch tail for assembly. Set aside.
Back Face Piece
With white yarn:
Work identical to Front Face Piece through Round 10.
FO leaving 15-inch tail.
Joining Front and Back
- Place front and back pieces together, wrong sides facing
- Stuff VERY LIGHTLY with small amount of fiberfill between layers
- Using yarn needle and long tail, whipstitch around edges to join
- Press flat as you stitch – final thickness should be only 0.5-0.75 inches
- FO, weave in end
Make 5 complete skulls before adding facial features.
Part 2: Sugar Skull Facial Features
Now the fun begins! Each skull gets unique colored eyes and decorations.
👁️ Eye Sockets (Make 2 per skull)
Base Eye Socket (Make 2 in matching bright color):
Choose one color per skull: red, orange, yellow, teal, or pink.
With chosen bright color:
Round 1: MR, 6 sc (6)
Round 2: inc around (12)
Round 3: (sc, inc) × 6 (18)
FO leaving long tail
Flatten to create disc shape.
Black Pupil (Make 2):
With black yarn:
Round 1: MR, 6 sc (6)
Round 2: sl st to join
FO leaving long tail
Eye Assembly:
- Center black pupil on colored eye socket
- Sew pupil securely using black tail
- Position both complete eyes on skull face, evenly spaced
- Sew securely through to back of skull
- Make sure pupils are centered and eyes are symmetrical
❤️ Heart-Shaped Nose
Option 1: Embroidered (Recommended)
With black yarn and embroidery needle:
- Mark upside-down heart shape on skull (about 0.5 cm wide)
- Fill heart completely with satin stitch
- Heart should be positioned between and slightly below eyes
Option 2: Crocheted
With black yarn:
Round 1: MR, 3 sc (3)
Round 2: (sc, inc, sc) (4)
Round 3: Work (2 dc in next st, sl st in next, 2 dc in next st, sl st in last st) to create two bumps at top
FO leaving tail
Sew to skull face between eyes, with point facing down.
😁 Sugar Skull Smile with Teeth
With black embroidery floss or yarn:
- Using backstitch, embroider a gentle curved smile starting below the outer edge of one eye and ending below the outer edge of the other eye
- Curve should be approximately 3-4 cm wide
- Add 5-6 evenly spaced vertical stitches along smile line for teeth
- Each tooth stitch should be 2-3 mm long
- Optional: Add small decorative stitches at smile corners
🌸 Forehead Decorations (Make different for each skull)
Skull 1 – Pink Daisy:
With pink yarn:
MR, (ch 2, 2 dc, ch 2, sl st in same st) × 6 for 6 petals
With yellow yarn, add French knot center
Sew to forehead above eyes
Skull 2 – Orange Flower:
With orange yarn:
MR, (ch 1, dc, ch 1, sl st in same st) × 5 for 5 petals
With black yarn, add tiny circle center
Sew to forehead
Skull 3 – Teal Flower:
With teal yarn:
MR, (ch 2, 3 dc, ch 2, sl st in same st) × 4 for 4 large petals
With yellow yarn, add French knot center
Sew to forehead
Skull 4 – Yellow & Green:
With yellow yarn:
Make small 5-petal flower as in Skull 2
Add small green leaves on sides
Sew to forehead
Skull 5 – Embroidered Design:
With bright colored yarn:
Embroider small dots, swirls, or simple flower shapes directly onto forehead using colorful yarn
Additional Decorative Details (Optional):
Add small embroidered dots, swirls, or lines around the eyes and on cheeks using bright colors for extra authenticity.
Part 3: Spiral Roses
Create dimension and drama with these lush layered roses.
🌹 Large Spiral Rose (Make 3-4)
Make in red, magenta, or deep pink.
With chosen color:
Ch 55
Row 1: Starting in 3rd ch from hook: (dc in next st, 2 dc in next st) repeat across
Creates ruffled, wavy edge. FO leaving 20-inch tail.
Assembly:
- Starting from one end, roll the ruffled strip tightly
- As you roll, stitch through all layers at the base to secure
- Continue rolling and stitching until complete
- Secure final edge with several stitches
- FO and weave in end
- Finished rose should be 5-6 cm (2-2.5 inches) across
🌼 Medium Spiral Rose (Make 2-3)
Make in yellow, orange, or coral.
With chosen color:
Ch 40
Row 1: Starting in 3rd ch from hook: (dc in next st, 2 dc in next st) repeat across
FO and assemble same as large rose.
Finished size: approximately 4 cm (1.5 inches) across
Part 4: Ruffled Marigolds
These create textured variety among the flowers.
🌼 Ruffled Marigold (Make 2-3)
Make in orange and yellow.
With chosen color:
Ch 35
Row 1: Work 3 dc into each chain across (creates heavy ruffle)
FO leaving 15-inch tail
Assembly:
- Coil the ruffled strip into a circular flower shape
- Stitch through base layers to secure spiral
- Keep center tight, allow outer edge to flare
- Secure with multiple stitches
- FO and weave in end
Finished size: approximately 3-4 cm across
Part 5: Small Accent Flowers
🌸 Five-Petal Flower (Make 4-6)
Make in various bright colors: pink, yellow, orange, teal.
With chosen color:
Center: MR, 6 sc (6), sl st to join
Petals: Join contrasting color in any st, (ch 2, 2 dc, ch 2, sl st in next st) × 6
FO leaving tail for sewing
These add pops of color between larger elements.
Part 6: Leaves (Make 12-15)
Leaves create fullness and frame all the colorful elements.
With green yarn:
Ch 12
Row 1: Starting in 2nd ch from hook:
- sl st, sc, hdc, dc, dc, dc, dc, hdc, sc
- Work 3 sc in last ch (creates pointed tip)
- Continue on opposite side of foundation chain:
- sc, hdc, dc, dc, dc, dc, hdc, sc, sl st
FO leaving 12-inch tail for sewing
Shaping Tip: Gently pinch each leaf at the base to create dimension.
Finished length: approximately 6-7 cm (2.5-3 inches)
Part 7: Crown Base
You have two options for the crown base structure.
Option 1: Black Lace Ribbon Base (Easier)
Materials:
- 60-65 inches black lace ribbon (1.5-2 inches wide)
- Scissors
- Needle and thread
Instructions:
- Cut ribbon into three pieces:
- Center piece: 22-24 inches (main crown)
- Two tie pieces: 18-20 inches each
- Fold under 1 inch on each end of center piece and hem
- Set aside for assembly
Option 2: Crocheted Black Band (More structured – Recommended)
With black yarn:
Ch 75-85 (adjust based on head measurement – should span front half of head from ear to ear)
Row 1: sc in 2nd ch from hook, sc across, ch 1, turn
Row 2: sc across, ch 1, turn
Row 3: sc across, ch 1, turn
Row 4: sc across
FO leaving long tail
This creates a sturdy 4-row band approximately 1.5 inches wide.
Adding Lace Ribbon Ties:
Cut two pieces of black lace ribbon, each 18-20 inches long.
Sew one ribbon securely to each end of the crocheted band (or lace base).
These will tie at the back of the head for adjustable fit.
🌺 Assembly Instructions
This is where your crown comes to life! Take your time with assembly for the best results.
Step 1: Plan Your Layout
Before sewing anything permanently:
- Lay crown base flat on work surface
- Arrange 5 skulls across the center of the band
- Position center skull facing directly forward
- Angle skulls on left and right to face slightly outward
- Space skulls approximately 1-2 cm apart
- Pin in place temporarily
Step 2: Create Layers
Back Layer (Sew first):
- Position 8-10 green leaves behind where skulls will sit
- Angle leaves in various directions for natural look
- Sew each leaf securely through crown base
- Leaves should peek out from behind other elements
Step 3: Attach Skulls
- Remove pins from skulls one at a time
- Using white yarn and needle, sew each skull securely to crown base
- Stitch through multiple points on each skull (top, bottom, sides)
- Each skull should be flat against base, not tilting
- Check from front view frequently to ensure even positioning
Step 4: Add Large Roses
- Position 3-4 large roses in spaces between skulls
- Place some roses slightly overlapping skull edges
- This creates cohesive, full appearance
- Sew through base of each rose multiple times
- Stitch roses to adjacent skulls for extra security
Step 5: Fill with Medium Flowers
- Add medium roses and ruffled marigolds in remaining spaces
- Vary heights by positioning some slightly higher
- Create dimensional layers
- Sew each flower securely
- Some flowers can overlap others for fullness
Step 6: Add Small Accent Flowers
- Tuck small 5-petal flowers into any remaining gaps
- Position some at different angles for visual interest
- Use contrasting colors for pops of brightness
- Sew securely
Step 7: Final Leaf Layer
- Add remaining 4-5 leaves throughout arrangement
- Fill any visible gaps
- Tuck some leaves between flowers
- Create depth by angling some leaves forward
- Ensure leaves are visible from front view
Step 8: Final Checks
- View crown from all angles
- Check that all elements are securely attached
- Trim any long yarn tails
- Test flexibility of lace ties
- Try on crown and adjust if needed
- Add any final accent pieces if desired
💡 Pro Tips for Success
Skull Thickness is Critical: The most important aspect is keeping skulls FLAT. Over-stuffed skulls will make the crown uncomfortable and unwearable. When in doubt, stuff less!
Color Planning: Before starting, lay out your yarn and decide which skull gets which eye color. This helps create balanced color distribution across the crown.
Embroidery Precision: Use a water-soluble marker to lightly sketch facial features before embroidering. This ensures symmetry and proper placement.
Flower Rolling: When making spiral roses, keep tension tight at the center and gradually looser toward the outside edge. This creates natural-looking dimension.
Secure Stitching: Don’t rely on single stitches to hold elements. Pass through each piece multiple times and knot securely. This crown will be handled and worn, so durability matters!
Layer Strategy: Always work from back to front when assembling. This creates proper depth and ensures nothing looks flat.
Balance Over Symmetry: While skulls should be evenly spaced, flowers and leaves can be more organic and asymmetrical. This looks more natural and artistic.
Try On Frequently: During assembly, periodically place the crown on your head (or a wig form) to check how it sits and looks from all angles.
🎨 Design Variations
Color Palette Options
Traditional Día de los Muertos:
- Bright marigold orange and yellow
- Deep magenta and red
- Teal and turquoise
- Vibrant pink and purple
Pastel Sugar Skulls:
- Soft pink and lavender
- Mint green and baby blue
- Peach and cream
- Light yellow
Gothic Halloween:
- Black and white skulls
- Deep burgundy and black roses
- Dark purple accents
- Minimal bright colors
Rainbow Festival:
- Each skull a different rainbow color
- Multi-colored roses
- Maximum color variety
- Glitter yarn accents
Skull Personality Variations
Make each skull unique:
- Happy skull: Wide smile, closed eyes (embroidered U shapes)
- Surprised skull: Round eyes, small O mouth
- Winking skull: One closed eye, one open
- Fancy skull: Extra flowers and swirls on forehead
- Simple skull: Minimal decoration for contrast
Size Adjustments
Child’s Crown:
- Use sport weight yarn throughout
- Make smaller skulls (only to Round 8, then decrease)
- Reduce chain length for base band by 10-15 stitches
- Use fewer elements (3 skulls, 6-8 flowers)
Statement Piece Crown:
- Use bulky weight yarn
- Increase base rounds on skulls
- Make larger roses (ch 70-80)
- Add more flowers (12-15 total)
- Create fuller, more dramatic effect
Alternative Uses
Hair Clip Version:
- Make partial crown (3 skulls, 4-6 flowers)
- Attach to large hair clip base
- Perfect for shorter hair
Headband Style:
- Attach elements to hard plastic headband
- More comfortable for all-day wear
- Easier to position
Wall Hanging Art:
- Skip the crown base
- Mount elements on canvas or frame
- Create 3D textile art
Wreath Decoration:
- Attach elements to foam wreath form
- Perfect for door decoration
- Día de los Muertos home décor
📷 Styling & Photography Tips
Wearing Your Crown:
- Position crown slightly forward on head, not pushed back
- Secure with bobby pins hidden beneath flowers
- Let ribbons hang loose or tie in bow at nape
- Pair with simple outfit to let crown shine
Makeup Pairing:
- Bold winged eyeliner
- Bright lip color
- Light sugar skull face makeup
- Keep other accessories minimal
Photography Settings:
- Natural daylight shows colors best
- Plain background (white or neutral)
- Photograph from slightly above for best skull visibility
- Take shots from multiple angles
🧹 Care & Storage
Cleaning:
- Spot clean only with damp cloth
- Do not submerge in water
- Let air dry completely before storing
- Refresh flowers by steaming at distance
Storage:
- Store flat in box with tissue paper
- Don’t hang – this distorts shape
- Keep away from direct sunlight
- Store in cool, dry location
Maintenance:
- Check and re-tighten any loose elements before wearing
- Refresh flower shapes by gently pulling petals
- Touch up any loose embroidery
- Replace ribbons if frayed
❓ Troubleshooting
Problem: Skulls are too puffy and won’t lay flat
- Solution: Remove stuffing and restitch with less filling. Skulls should be nearly flat.
Problem: Crown tilts backward when worn
- Solution: Position more elements toward the front. Add bobby pins at temples to secure.
Problem: Elements keep coming loose
- Solution: Use more stitches to attach each piece. Pass through base multiple times and knot securely.
Problem: Crown feels too tight
- Solution: Add length to ribbon ties. Ensure base band isn’t too tight around head.
Problem: Flowers look messy
- Solution: Re-roll roses more tightly at center. Secure with additional stitches. Steam lightly to shape.
Problem: Colors look muddy together
- Solution: Separate similar colors with contrasting elements. Add more white or bright accents.
Problem: Skulls won’t stay facing forward
- Solution: Stitch skulls to adjacent flowers and base. Add small stitches at top and bottom of each skull.
Problem: Crown looks sparse
- Solution: Make 3-4 more small flowers and leaves. Fill any visible gaps in arrangement.
🎉 Occasions to Wear Your Crown
- Día de los Muertos celebrations (November 1-2)
- Halloween parties and events
- Music festivals (Coachella, EDC, etc.)
- Cultural celebrations and parades
- Costume parties and themed events
- Photography sessions and photo shoots
- Wedding accessory (for themed celebrations)
- Renaissance faires and costume events
- Theatrical performances and plays
- Day of the Dead ofrendas (display piece)
💀 The Meaning Behind Sugar Skulls
A brief cultural note:
Sugar skulls (calaveras) are a beautiful symbol of Día de los Muertos, the Mexican holiday honoring deceased loved ones. Rather than mourning, this celebration embraces death as a natural part of life and remembers those who have passed with joy, color, and love.
Traditional sugar skulls are decorated with vibrant colors, intricate patterns, and often personalized with names. They’re placed on ofrendas (altars) alongside marigolds, photos, and favorite foods of the deceased.
By creating this crown, you’re celebrating this beautiful tradition that reminds us to cherish life and remember those we love. Wear it with respect, joy, and appreciation for the rich cultural heritage it represents.
🌟 Final Thoughts
This sugar skull flower crown is truly a labor of love! With 5 detailed skulls, multiple roses and flowers, and numerous leaves, it’s definitely a time investment. But the result is absolutely worth it – you’ll have a stunning, one-of-a-kind piece that showcases your crochet skills and artistic vision.
The beauty of this project is that no two crowns will look exactly alike. Your choice of colors, skull expressions, and flower arrangements make each crown completely unique. Embrace the creative process, enjoy each step, and don’t stress about perfection. The handmade quality is what makes these crowns so special!
Whether you’re honoring Día de los Muertos traditions, creating festival fashion, or just love the aesthetic, this crown will turn heads and start conversations wherever you wear it.
¡Feliz Día de los Muertos! Happy crafting! 💀🌸✨