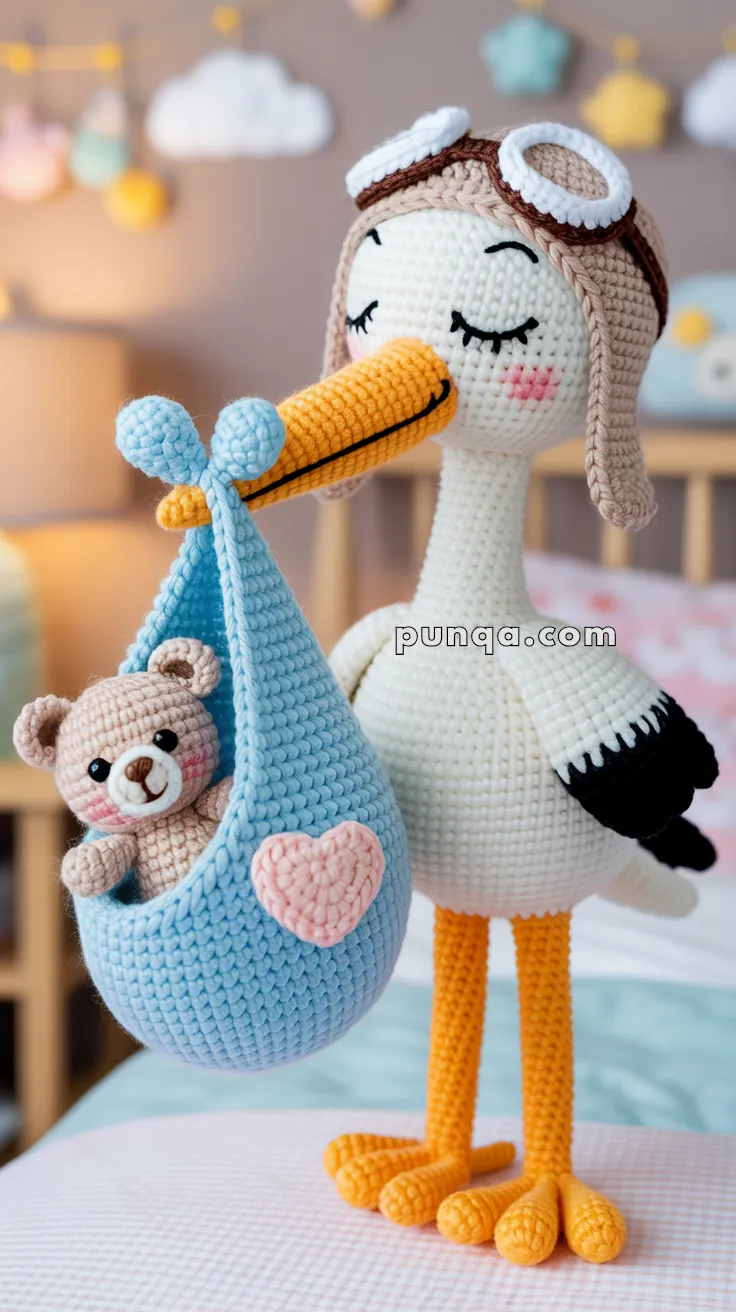
Celebrate new beginnings with this heartwarming Amigurumi Stork Delivering Baby Teddy Bear crochet pattern! With its long legs, gentle wings, and a cozy little bundle tucked in its beak, this charming stork is ready to deliver smiles and snuggles. Whether you’re crafting a baby shower gift, nursery décor, or a keepsake to mark a special arrival, this sweet duo brings a touch of magic and tenderness to every stitch. 🧶🍼🐦
Designed for storytelling and sentiment, this pattern invites you to explore soft textures, expressive shaping, and delightful extras like a tiny teddy bear, pastel baby sack, or even a stitched-on name tag. Customize the colors to match a nursery theme or add embroidered details for a personal touch. Whether perched on a shelf, nestled in a gift basket, or starring in a handmade welcome scene, this Stork Delivering Baby Teddy Bear Amigurumi is a joyful and satisfying project—perfect for stitching up a little handmade love, one loop at a time! 💖✨🎀
🧶 Amigurumi Stork Delivering Baby Teddy Bear Crochet Pattern
Bring joy to any nursery with this heartwarming crochet duo – a gentle stork delivering a teddy bear bundled in a baby-blue sling. With expressive sleepy eyes, rosy cheeks, aviator goggles, and poseable toes, this amigurumi creation makes a memorable baby shower gift or nursery décor centerpiece! 🎀
✨ Skill Level
Intermediate – involves shaping, color changes, sewing parts, and surface embroidery.
📏 Finished Size
Approx. 12–14 inches (30–36 cm) tall using DK yarn and a 2.5 mm hook.
🛒 Materials Needed
🧶 Yarn (DK or worsted weight cotton/acrylic blend)
- Cream/White: 100g for body, head, and neck
- Orange: 50g for beak and legs
- Black: 20g for wing tips and eyelash embroidery
- Light brown/Tan: 30g for aviator cap
- White: 15g for goggle rims
- Silver-grey: 10g for goggle lenses
- Pink: 15g for blush, cheeks, and heart
- Baby blue: 40g for sling
- Beige/Light tan: 30g for teddy bear body
- Dark brown: 10g for teddy bear details
🧰 Other Supplies
- Crochet Hook: 2.5 mm (US size B/1 or C/2)
- Safety Eyes: 6 mm black (for teddy bear) 👀
- Fiberfill stuffing (approx. 150g)
- Tapestry needle 🪡
- Stitch marker
- Pins for positioning parts 📌
- Optional: Wire or pipe cleaners for poseable legs and toes
📝 Abbreviations (US Terms)
- MR – Magic ring
- ch – Chain
- sc – Single crochet
- inc – Increase (2 sc in one stitch)
- dec – Decrease (invisible decrease)
- sl st – Slip stitch
- BLO – Back loop only
- FLO – Front loop only
- (…) x# – Repeat the instructions in brackets # times
- [#] – Total stitch count at end of round
🪶 Stork Pattern
👤 Head (Cream Yarn)
Round 1: MR, 6 sc [6]
Round 2: (inc) x6 [12]
Round 3: (sc, inc) x6 [18]
Round 4: (2 sc, inc) x6 [24]
Round 5: (3 sc, inc) x6 [30]
Round 6: (4 sc, inc) x6 [36]
Round 7: (5 sc, inc) x6 [42]
Round 8: (6 sc, inc) x6 [48]
Rounds 9-16: 48 sc (8 rounds)
Round 17: (6 sc, dec) x6 [42]
Round 18: (5 sc, dec) x6 [36]
Round 19: (4 sc, dec) x6 [30]
Stuff head firmly. 💪
🦢 Neck (Cream Yarn)
Continue from head:
Round 20: (3 sc, dec) x6 [24]
Round 21: (2 sc, dec) x6 [18]
Rounds 22-25: 18 sc (4 rounds)
Stuff neck lightly but keep it firm.
🫶 Body (Cream Yarn)
Continue from neck:
Round 26: (2 sc, inc) x6 [24]
Round 27: (3 sc, inc) x6 [30]
Round 28: (4 sc, inc) x6 [36]
Round 29: (5 sc, inc) x6 [42]
Round 30: (6 sc, inc) x6 [48]
Rounds 31-42: 48 sc (12 rounds) – creates a plump, pear-shaped body 🍐
Round 43: (6 sc, dec) x6 [42]
Round 44: (5 sc, dec) x6 [36]
Round 45: (4 sc, dec) x6 [30]
Round 46: (3 sc, dec) x6 [24]
Stuff body very firmly to maintain shape and support weight of sling.
Round 47: (2 sc, dec) x6 [18]
Round 48: (sc, dec) x6 [12]
Round 49: (dec) x6 [6]
Fasten off and close the opening.
🦆 Beak (Orange Yarn)
Round 1: MR, 6 sc [6]
Round 2: (inc) x6 [12]
Round 3: 12 sc
Round 4: (3 sc, inc) x3 [15]
Round 5: 15 sc
Round 6: (4 sc, inc) x3 [18]
Rounds 7-14: 18 sc (8 rounds) – creates a long, uniform cylindrical beak
Round 15: 18 sc
Do not decrease. Fasten off leaving long tail. Stuff lightly but evenly to maintain cylindrical tube shape.
Add a black embroidered smile line (curved upward) about halfway down the underside of beak. 😊 Sew to front of head, positioned horizontally, slightly angled upward for a cheerful expression.
🪽 Wings (Cream and Black Yarn)
Make 2.
Round 1: MR, 6 sc [6]
Round 2: (inc) x6 [12]
Round 3: (sc, inc) x6 [18]
Rounds 4-8: 18 sc (5 rounds) in cream
Change to black yarn:
Rounds 9-12: 18 sc (4 rounds) in black
Flatten the wing and sew closed across the opening. Sew wings to sides of body, positioned at upper body/shoulder level, pointing slightly downward and backward.
🦵 Legs and Feet (Orange Yarn)
Make 2 complete legs.
🦶 Individual Toes (Make 3 per foot)
Round 1: MR, 6 sc [6]
Rounds 2-5: 6 sc (4 rounds)
For first two toes: Fasten off and leave tail.
For third toe: Do not fasten off.
👣 Joining Toes into Foot
After completing the third toe, continue working:
Chain 1, join to second toe with sl st, work 6 sc around second toe, chain 1, join to first toe with sl st, work 6 sc around first toe, work 6 sc around third toe [18]
Round 1: 18 sc around all joined toes
Round 2: 18 sc
Round 3: (sc, dec) x6 [12]
🦿 Leg
Rounds 4-30: 12 sc (27 rounds) – creates long, prominent legs characteristic of a stork
Stuff legs very firmly. If desired, insert wire or pipe cleaner for poseable legs and bendable toes. Leave long tail for sewing.
Sew legs to bottom of body with legs positioned slightly apart for stability. Position toes to bend slightly forward and spread naturally.
🧢 Aviator Hat (Light Brown Yarn)
Round 1: MR, 6 sc [6]
Round 2: (inc) x6 [12]
Round 3: (sc, inc) x6 [18]
Round 4: (2 sc, inc) x6 [24]
Round 5: (3 sc, inc) x6 [30]
Round 6: (4 sc, inc) x6 [36]
Round 7: (5 sc, inc) x6 [42]
Rounds 8-10: 42 sc (3 rounds) – for deeper cap
Round 11: BLO: 42 sc (creates brim edge)
Fasten off, leaving tail for sewing.
🥽 Goggles (Make 2)
White rim:
Round 1: MR, 6 sc [6]
Round 2: (inc) x6 [12]
Round 3: (sc, inc) x6 [18]
Round 4: 18 sc
Fasten off white.
Silver-grey lens:
Round 1: MR, 6 sc [6]
Round 2: (inc) x6 [12]
Fasten off, leaving tail. Sew lens to center of white rim. Position goggles on front of hat, slightly overlapping if desired.
🎀 Goggle Strap
With light brown yarn, chain 35-40. Sew one end to left side of hat (near edge), other end to right side, creating a chin strap effect.
Position hat on top/back of head and sew securely, allowing goggles to rest on forehead area.
😴 Face Details
- Eyes: Embroider closed, contented eyes with black yarn using curved horizontal lines (about 6-8 stitches wide per eye), positioned below where hat sits
- Eyelashes: Add 3-5 short diagonal stitches extending from outer edge of each eye ✨
- Cheeks: Embroider pink circles or ovals below and slightly to outer side of eyes using pink yarn in satin stitch, or apply with blush/chalk 💗
- Optional: Add tiny white highlights on cheeks with white yarn for dimension
🧸 Teddy Bear Pattern
🐻 Head (Beige Yarn)
Round 1: MR, 6 sc [6]
Round 2: (inc) x6 [12]
Round 3: (sc, inc) x6 [18]
Round 4: (2 sc, inc) x6 [24]
Round 5: (3 sc, inc) x6 [30]
Rounds 6-10: 30 sc (5 rounds)
Insert 6mm safety eyes between rounds 8-9, about 6-7 stitches apart. 👀
Round 11: (3 sc, dec) x6 [24]
Round 12: (2 sc, dec) x6 [18]
Stuff firmly. 💪
Round 13: (sc, dec) x6 [12]
Round 14: (dec) x6 [6]
Fasten off and close.
Embroider muzzle: With white or light beige yarn, create a small oval/circular patch between and below eyes. Add dark brown nose (small triangle or circle) and smiling mouth. 😊
🫶 Body (Beige Yarn)
Round 1: MR, 6 sc [6]
Round 2: (inc) x6 [12]
Round 3: (sc, inc) x6 [18]
Round 4: (2 sc, inc) x6 [24]
Rounds 5-9: 24 sc (5 rounds)
Round 10: (2 sc, dec) x6 [18]
Round 11: (sc, dec) x6 [12]
Stuff firmly.
Round 12: (dec) x6 [6]
Fasten off and close.
💪 Arms (Beige Yarn)
Make 2.
Round 1: MR, 5 sc [5]
Round 2: (inc) x5 [10]
Rounds 3-7: 10 sc (5 rounds)
Round 8: (sc, dec) x3, sc [7]
Stuff very lightly. Flatten and sew closed. Leave tail for attaching.
🦵 Legs (Beige Yarn)
Make 2.
Round 1: MR, 6 sc [6]
Round 2: (inc) x6 [12]
Rounds 3-6: 12 sc (4 rounds)
Round 7: (sc, dec) x4 [8]
Stuff lightly. Flatten and sew closed. Leave tail for attaching.
👂 Ears (Beige Yarn)
Make 2.
Round 1: MR, 5 sc [5]
Round 2: (inc) x5 [10]
Round 3: 10 sc
Flatten and sew to top sides of head.
🧩 Teddy Assembly
Sew head to body. Attach arms at shoulder level on sides of body. Attach legs to bottom of body. Position ears on upper sides of head. Add small pink cheek patches with embroidery or felt if desired. 💕
🩵 Baby Sling Pattern (Baby Blue Yarn)
👶 Pouch Base
Round 1: Chain 14, starting in 2nd ch from hook: 12 sc, 3 sc in last ch; working on opposite side of chain: 11 sc, 2 sc in last ch, join with sl st [28]
Round 2: ch 1, inc, 11 sc, inc x3, 11 sc, inc x2, join with sl st [34]
Round 3: ch 1, sc, inc, 11 sc, (sc, inc) x3, 11 sc, (sc, inc) x2, join with sl st [40]
Rounds 4-16: ch 1, 40 sc around (13 rounds) – creates deep pouch
Fasten off, leaving long tail.
🎀 Sling Straps
Make 2 long straps.
With baby blue yarn, chain 65-75 (adjust length as needed to reach from bottom sides of pouch up and around to tie at beak).
Sew one end of first strap to left side of sling at rim level. Sew one end of second strap to right side of sling at rim level.
💗 Heart Patch (Pink Yarn)
Start with magic ring:
Round 1: 3 sc in MR [3]
Round 2: ch 1, turn, inc, sc, inc [5]
Round 3: ch 1, turn, inc, 3 sc, inc [7]
Round 4: ch 1, turn, 7 sc [7]
Round 5: ch 1, turn, dec, 3 sc, dec [5]
Round 6: ch 1, turn, dec, sc, dec [3]
Fasten off.
For heart top bumps: Attach yarn to top right corner, make 3 sc in same spot for bump, sl st to center top, make 3 sc for second bump, sl st to top left corner. Work sc edging around entire heart for neat finish.
Sew heart to front center of sling pouch. 💖
🎨 Final Assembly
- Insert teddy bear into sling with head, arms, and upper body visible over the rim of the pouch 🧸
- Add fiberfill around teddy inside sling to support it and keep pouch full and rounded
- Position sling against stork’s chest/belly at a natural carrying angle
- Bring both sling straps up along the front of the stork’s body/neck
- Cross or tie straps together at the beak level, creating a neat bow or knot 🎀
- Secure the bow/knot to the beak with several stitches so it appears the stork is holding the sling bundle in its beak
- Tack the back of the sling to the stork’s chest/belly with a few invisible stitches to prevent shifting
- Adjust leg positioning so stork stands balanced with feet slightly spread and toes bent naturally forward 🦵
- Final adjustments: Ensure teddy’s face is clearly visible, heart patch is centered, and all parts are secure ✨
💡 Finishing Tips
- Use matching thread and invisible stitches when attaching all parts 🪡
- Pin pieces in position before sewing to ensure proper placement 📌
- Stuff the body very firmly to support the weight of the sling and teddy 💪
- The beak should remain cylindrical and horizontal, pointing straight forward
- Long legs are a key feature – make them sturdy enough to support the stork 🦵
- Wire in legs and toes allows for adjustable, natural posing
- The sling straps should look like they’re being held in the beak
- Add a hanging loop to the top back of the head if desired for display purposes 🎨
🧼 Care Instructions
Spot clean only. Do not machine wash. Not suitable for children under 3 years due to small parts and safety eyes. ⚠️
🎉 Congratulations!
You’ve completed an adorable amigurumi stork delivering a precious teddy bear! This charming creation makes a wonderful baby shower gift, nursery decoration, or treasured keepsake. Enjoy sharing your handmade masterpiece! 💕✨🧶