Welcome to the enchanting world of whimsical amigurumi! 🍃✨ Today, I’m delighted to share my free crochet pattern for a playful little Sprite—a magical creature brimming with woodland charm and mischievous energy! 🌿 Whether you’re a lover of fantasy folklore, enjoy crafting tiny nature-inspired beings, or simply want to add a touch of enchantment to your handmade collection, this pattern will guide you through creating your very own pint-sized guardian of the forest! 🍄💚
This pattern is beginner-friendly, featuring simple stitches and clear instructions to bring this lively little Sprite to life! 🧚♂️ I’ve carefully detailed each step to ensure your creation turns out just right—ready to spread joy, magic, and maybe even a little playful mischief! 🪄 So grab your hooks, choose your most magical yarn colors, and let’s stitch up a charming sprite that will brighten any space! 🌟✨
![]()
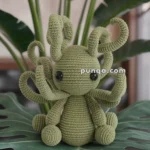
🧚 Amigurumi Sprite Crochet Pattern
This whimsical little sprite, with her oversized ears, leafy crown, and flared dress, looks like she’s just stepped out of an enchanted forest. She’s sweet, charming, and makes a magical handmade companion or display piece.
✨ Skill Level
Intermediate – involves shaping, decorative details, and assembly.
📏 Finished Size
Approx. 20 cm (8 in) tall with worsted weight yarn and a 3.5 mm hook.
🧶 Materials
-
Worsted weight yarn in:
-
Light pink – skin
-
Olive green – dress & crown trim
-
White – edging & buttons
-
Coral/pink – nose
-
-
Crochet hook: 3.5 mm
-
Safety eyes: 10 mm black
-
Fiberfill stuffing
-
Yarn needle, stitch marker, scissors
🪡 Abbreviations (US Terms)
-
MR – Magic Ring
-
sc – Single Crochet
-
inc – Increase (2 sc in same st)
-
dec – Decrease (sc 2 together)
-
BLO – Back Loop Only
-
ch – Chain
-
sl st – Slip Stitch
-
FO – Fasten Off
🧑🎨 Head (Light Pink)
-
MR, 6 sc
-
inc x6 (12)
-
(sc, inc) x6 (18)
-
(2 sc, inc) x6 (24)
-
(3 sc, inc) x6 (30)
-
(4 sc, inc) x6 (36)
7–14. sc around (36) -
(4 sc, dec) x6 (30)
-
(3 sc, dec) x6 (24)
-
(2 sc, dec) x6 (18)
-
(sc, dec) x6 (12)
-
dec x6 (6)
– FO, stuff firmly.
📌 Insert 10 mm safety eyes between R9–10, ~8 sts apart.
👂 Oversized Ears (Make 2 – Light Pink)
-
MR, 4 sc
-
(sc, inc) x2 (6)
-
(2 sc, inc) x2 (8)
-
(3 sc, inc) x2 (10)
-
(4 sc, inc) x2 (12)
-
(5 sc, inc) x2 (14)
-
(6 sc, inc) x2 (16)
-
(7 sc, inc) x2 (18)
-
(8 sc, inc) x2 (20)
-
(9 sc, inc) x2 (22)
11–13. sc around (22)
– FO, fold flat, sew shut, leave tail.
👉 This makes longer, sharper triangular ears like in the photo.
👃 Nose (Coral/Pink)
-
MR, 6 sc
-
sc around (6)
– FO, stuff lightly, sew centered between eyes.
🧍 Body (Light Pink + Olive Green Dress)
-
With pink, MR, 6 sc
-
inc x6 (12)
-
(sc, inc) x6 (18)
-
(2 sc, inc) x6 (24)
5–7. sc around (24) -
Switch to green (dress base)
9–12. sc around (24) -
(3 sc, inc) x6 (30) → begin skirt flare
14–16. sc around (30) -
(4 sc, inc) x6 (36)
18–20. sc around (36) -
(5 sc, inc) x6 (42)
22–23. sc around (42) -
(6 sc, inc) x6 (48)
-
sc around (48)
-
(7 sc, inc) x6 (54)
-
sc around (54)
– FO, stuff firmly.
👉 Wider stitch counts give the longer, fuller skirt in the photo.
🧦 Legs (Make 2 – Light Pink)
-
MR, 6 sc
-
(sc, inc) x3 (9)
3–7. sc around (9)
– FO, stuff, sew to body bottom in sitting pose.
🧤 Arms (Make 2 – Light Pink)
-
MR, 6 sc
2–6. sc around (6)
– FO, stuff lightly, sew to body sides.
👗 Dress Edging (White)
-
Hem: attach white to bottom edge, [sc, ch 3, sc] in each st → ruffled hem.
-
Sleeves: attach white around armholes, sc evenly for trim.
🍃 Leafy Crown (Olive Green)
-
ch 38
-
Work pattern: (sc, hdc, dc, hdc, sc) across every 6 ch.
👉 At center, make a slightly taller point (sc, hdc, dc, tr, dc, hdc, sc) for the forehead peak.
– FO, sew around head so peak sits at forehead center.
🎀 Buttons (White)
Make 4 small circles:
-
MR, 6 sc, sl st to close. FO.
– Sew vertically down front of dress bodice.
🧷 Assembly
-
Sew head to body securely.
-
Attach legs at base front for sitting pose.
-
Sew arms to upper body sides.
-
Attach oversized ears wide on head.
-
Sew nose between eyes.
-
Add leaf crown across forehead with tall center point.
-
Sew 4 buttons down dress front.
-
Finish with white trim on hem and sleeves.
✨ Finishing Touches
-
Embroider small eyelashes at eye corners.
-
Add light blush to cheeks with yarn or pastel.
-
Shape skirt flare with gentle steam (use cloth barrier).
🌟 Your Sprite Amigurumi is complete! With her oversized ears, leafy crown, and flared green dress with white trim and buttons, she looks just like the enchanting doll in the photo – ready to sit prettily and spread woodland magic.