Carry a little piece of Bikini Bottom with you wherever you go with this Amigurumi SpongeBob Bag crochet pattern! Inspired by the beloved animated character, this fun design captures SpongeBob’s signature square shape, big blue eyes, and cheerful grin in every stitch. Whether you’re crafting for cartoon fans, adding a playful touch to your accessories, or simply enjoy making character-inspired amigurumi designs, this pattern lets you stitch up a quirky SpongeBob bag bursting with personality! Perfect for holding small essentials, this crochet bag is both adorable and practical. 🍍✨
Designed for customization, this pattern allows you to experiment with different shades of yellow, embroidered details, or even tiny accessories like a miniature jellyfish or Krabby Patty charm for extra flair. Craft a classic SpongeBob bag with his iconic look, create a whimsical version with pastel hues, or even stitch up a full set of cartoon-inspired amigurumi for a delightful display! Whether gifted as a quirky keepsake, displayed as a charming accent, or made simply for the joy of crafting, this Amigurumi SpongeBob Bag is a fun and creative project—perfect for bringing a touch of handmade underwater magic to every stitch! 🧶💖✨
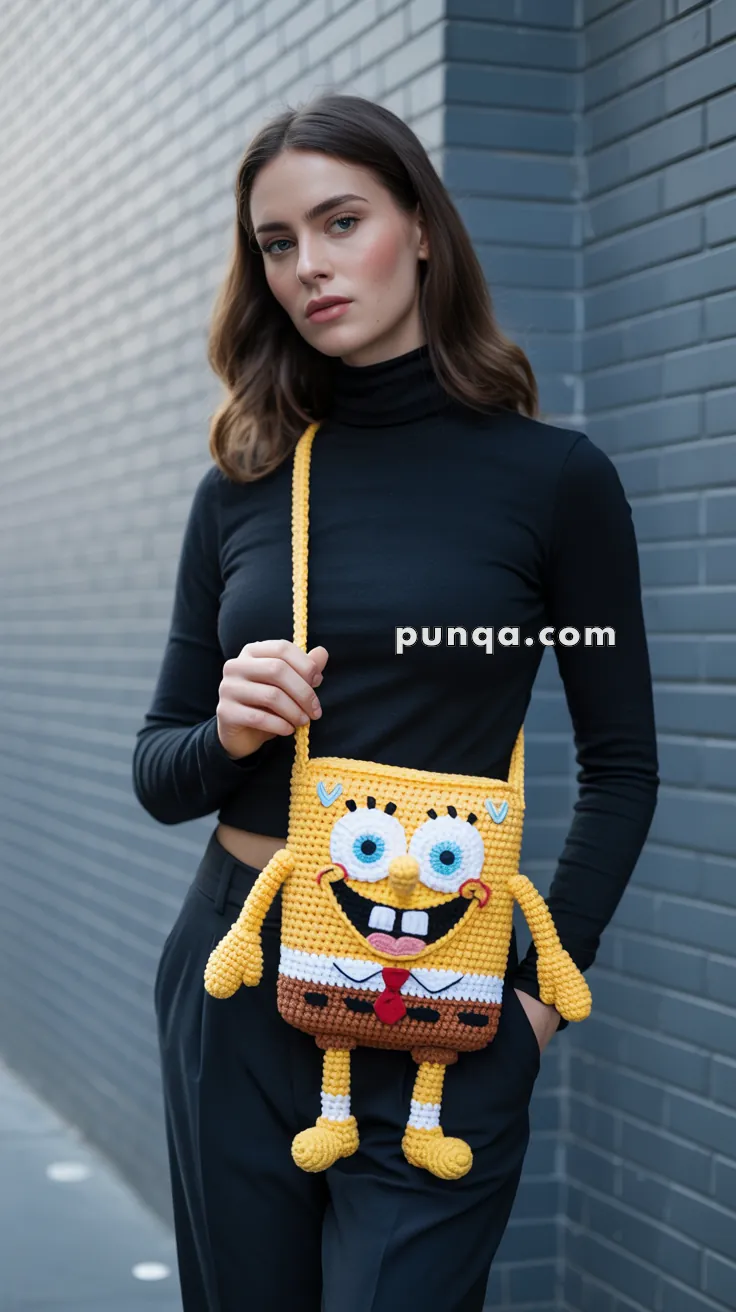
🧽 SpongeBob Amigurumi Bag Crochet Pattern
Bring a splash of fun to your outfit with this cheerful SpongeBob-inspired crochet bag! With expressive eyes, a big smile, and wiggly limbs, this project is as functional as it is adorable. Perfect for SpongeBob fans of all ages—whether you’re heading out for errands or gifting a handmade treasure.
✨ Skill Level
Intermediate – includes shaping, color changing, surface detailing, embroidery, and basic bag assembly.
📏 Finished Size
- Bag body: approx. 8″ x 10″ (20 x 25 cm)
- Total length (with legs): approx. 14″ (35 cm)
🧶 Materials
- Yarn (Worsted weight):
- Yellow (body, arms, legs, strap)
- White (eyes, socks, shirt)
- Brown (pants)
- Red (tie, tongue, pant spots)
- Black (mouth, shoes, pupils, belt)
- Blue (eye color)
- Pink (tongue and cheeks)
- Hooks: 3.5 mm
- Other Tools & Supplies:
- Tapestry needle
- Stitch markers
- Polyfill stuffing
- 1 small magnetic snap or button (for closure)
- Optional: black felt for detailing, zipper lining
🧵 Abbreviations (US Terms)
MR – Magic Ring
sc – Single Crochet
inc – Increase (2 sc in 1 st)
dec – Decrease (sc2tog)
sl st – Slip Stitch
ch – Chain
st(s) – Stitch(es)
FO – Fasten Off
👜 Bag Body (Make 2 Panels – Front and Back)
Using yellow yarn:
- ch 36
2–24. sc across (35 sts), ch 1, turn
25–28. Switch to white yarn for shirt, sc across
29–36. Switch to brown yarn for pants, sc across
FO and weave in ends.
Optional Belt Detail: Use black yarn or felt to create a thin horizontal stripe across the middle of the brown section.
👁️ Facial Features
Eyes (Make 2):
- White Layer:
- MR, 6 sc
- inc in each st (12)
- (sc, inc) x6 (18)
- (2 sc, inc) x6 (24)
- FO, leave long tail.
- Blue Iris: MR, 6 sc, sl st to join, FO.
- Black Pupil: MR, 4 sc, sl st to join, FO.
Sew all eye parts together and attach to face.
Nose:
- MR, 6 sc
- sc around for 4 rows
- Stuff, FO and sew to center of face.
Mouth:
- Embroider with black yarn.
- Tongue: pink yarn, ch 5, sc along both sides for a rounded oval.
- Teeth: small rectangles in white felt or crocheted squares.
Cheeks:
- MR, 6 sc in pink, FO. Sew on either side of mouth.
Eyebrows & Eyelashes:
- Embroider with black yarn.
✋ Arms (Make 2)
- MR, 6 sc
- inc x6 (12)
3–12. sc (12)
Stuff lightly, FO, and shape hand by stitching thumb curve in place.
🧦 Legs (Make 2)
Start with yellow yarn (legs):
- MR, 6 sc
2–5. sc (6)
Switch to white (socks):
6–7. sc (6)
Switch to brown (shorts):
8–9. sc (6)
Switch to black (shoes):
10. inc x6 (12)
11–12. sc (12)
Stuff and FO, flatten and stitch closed.
👔 Red Tie
- ch 9
- sc back across (8 sts)
- FO and pinch center to shape triangle, stitch onto shirt area
🎒 Strap
- With yellow yarn, ch 100–120 (adjustable)
- sc back and forth for 2–3 rows to reinforce
- Sew securely to top corners of the front and back panels.
🧷 Closure Options
Option 1: Magnetic Snap
- Sew or glue magnetic snap to the inside top center of each panel before final assembly.
Option 2: Button & Loop
- Add a button on the inside of the back panel.
- On the front panel, ch a small loop (ch 12–15), attach securely.
Option 3: Zipper (Advanced)
- Line both panels with fabric before joining.
- Stitch zipper between the top edges using sewing thread and needle.
🧩 Assembly Instructions
- Sew arms to the side edges of the front panel.
- Sew legs to the bottom edge of the front panel.
- Stitch both bag panels together around sides and bottom.
- Add closure inside the bag top.
- Attach strap ends to both upper corners securely.
- Optional: line bag interior for extra durability.
🌟 Final Touches
- Use fabric glue to reinforce small pieces.
- Add a bit of stuffing behind facial features before sewing for a 3D effect.
- Want extra fun? Add a small internal zippered pocket or attach a matching SpongeBuddy keychain!
💛 Final Thoughts
Your SpongeBuddy crossbody bag is now ready to brighten your day! Whether you’re gifting it to a fan or proudly wearing it yourself, this playful accessory is guaranteed to turn heads and spark smiles. Keep experimenting with expressions, accessories, or even turning it into a backpack version!