Dive into the whimsical world of crochet with this Amigurumi SpongeBob pattern! 🍍✨ With his square shape, big expressive eyes, and signature outfit, this design brings the beloved SpongeBob SquarePants to life in yarn form. Whether you’re crafting for a cartoon fan, a themed décor piece, or simply love character-inspired amigurumi, this FREE pattern is a fantastic addition to your collection.
Designed for intermediate crocheters, this pattern allows for customization in facial details, outfit textures, and even tiny accessories like a miniature spatula or jellyfish to enhance SpongeBob’s playful personality. Choose classic bright yellows and browns for an authentic look or experiment with pastel hues for a quirky twist! Whether displayed alongside Patrick and Squidward or gifted to a fellow crochet enthusiast, this amigurumi SpongeBob is sure to bring smiles. Grab your hook, select your favorite yarn, and let’s bring this cheerful sea sponge to life—one stitch at a time! 🧶✨
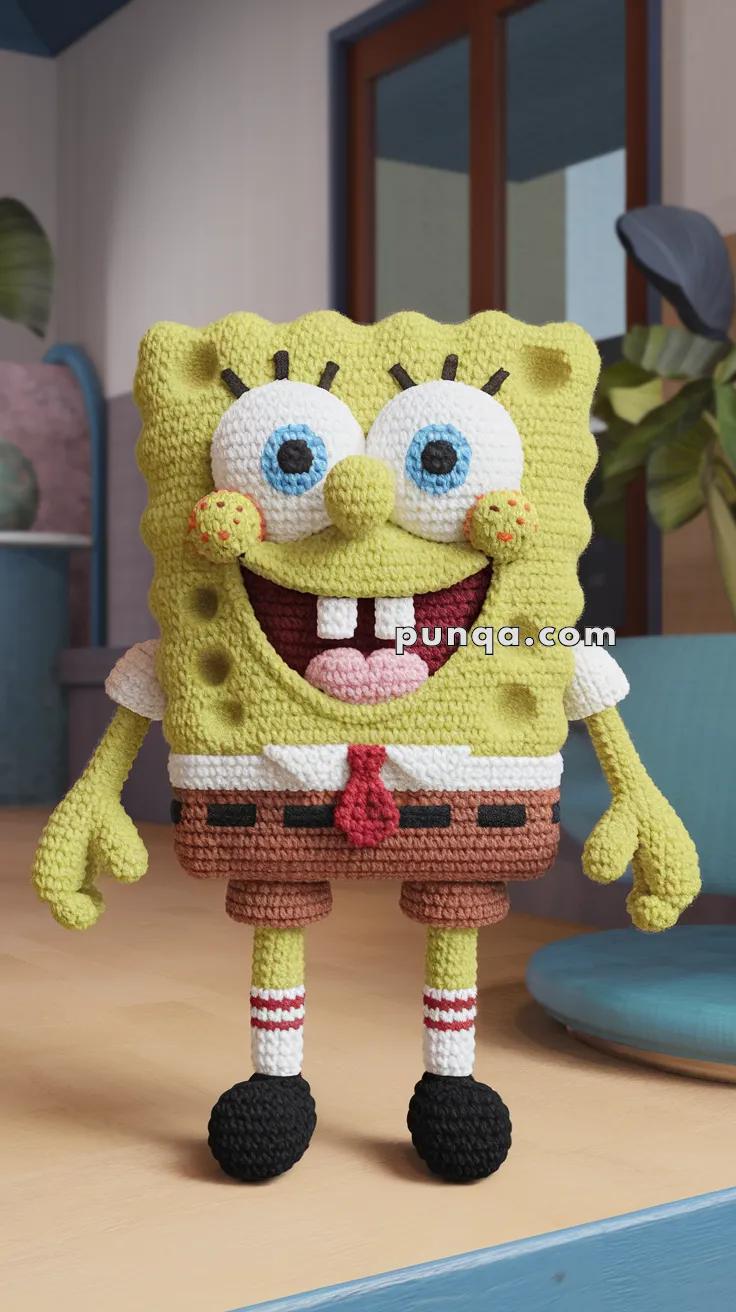
🍍 Amigurumi SpongeBob SquarePants Crochet Pattern
Bring Bikini Bottom to life with this huggable SpongeBob! With his squishy square body, big eyes, and goofy smile, he’s full of personality. This handmade version captures every detail — from his shirt and tie to his socks and shiny shoes.
✨ Skill Level
Intermediate
Skills required:
• crocheting in continuous rounds
• color changing
• crocheting small facial pieces
• shaping with increases and decreases
• sewing multiple parts together
📏 Finished Size
Approximately 30 cm (12 inches) tall using worsted weight yarn and a 3.0–3.5 mm crochet hook.
🧶 Yarn Requirements
Worsted weight yarn.
Yellow — 110 g / 240 m (body, arms, legs, cheeks, nose)
Brown — 40 g / 90 m (shorts)
White — 35 g / 80 m (eyes, shirt, socks, teeth)
Red — 18 g / 40 m (tie, mouth interior, sock stripes)
Pink — 6 g / 12 m (tongue)
Blue — 8 g / 18 m (iris)
Black — 18 g / 40 m (shoes, pupils, eyelashes, freckles, belt)
Polyester stuffing — approx 140 g
🧰 Tools & Supplies
3.0–3.5 mm crochet hook
Tapestry needle
Stitch markers
Scissors
Fiberfill stuffing
🧵 Abbreviations (US Terms)
MR – Magic Ring
sc – Single Crochet
inc – Increase (2 sc in one stitch)
dec – Invisible decrease
ch – Chain
sl st – Slip stitch
st – Stitch
FO – Fasten off
🟨 Body
The body is crocheted as a rectangular sponge block with color sections.
Start with brown yarn (shorts).
Round 1
Ch 26, sc in second chain and across, rotate and crochet around foundation chain (50)
Rounds 2–6
sc around (50)
Switch to white yarn (shirt band)
Rounds 7–9
sc around (50)
Switch to yellow yarn
Rounds 10–36
sc around (50)
Stuff firmly while crocheting.
Round 37
(6 sc, dec) around
Round 38
(5 sc, dec) around
Round 39
(4 sc, dec) around
Round 40
dec around until closed.
FO and weave in.
The body should remain square with slightly soft edges, not overly stuffed.
🧽 Sponge Holes
With yellow yarn.
MR, 6 sc
Round 2: inc x6 (12)
FO leaving long tail.
Make 7–8 pieces.
Sew randomly across the body while pulling the center slightly inward to create sponge dents.
👀 Eyes (Make 2)
White Eye Base
MR, 6 sc
inc x6 (12)
(1 sc, inc) x6 (18)
(2 sc, inc) x6 (24)
FO leaving tail.
Blue Iris
MR, 6 sc
inc x6 (12)
(1 sc, inc) x6 (18)
FO.
Black Pupil
MR, 6 sc
inc x6 (12)
FO.
Sew pupil onto iris and iris onto white eye.
Attach both eyes very close together near the top center of the face.
👁 Eyelashes
With black yarn embroider three thick lashes above each eye.
👃 Nose
With yellow yarn.
MR, 6 sc
Round 2: (1 sc, inc) x3 (9)
Rounds 3–6: sc around (9)
Stuff lightly.
Sew centered between the eyes and the mouth.
😊 Cheeks (Make 2)
With yellow yarn.
MR, 6 sc
inc x6 (12)
Rounds 3–4
sc around (12)
Stuff lightly and sew beside the mouth.
Embroider small red freckles on each cheek.
😄 Mouth
The mouth is a large curved piece with depth.
Outer Mouth Shape
With yellow yarn.
Ch 16
Row 1
sc across (15)
Row 2
inc, 13 sc, inc
Row 3
sc across
FO.
Sew curved under the cheeks.
Inner Mouth Panel
With dark red yarn
Ch 14
Row 1
sc across (13)
Row 2
sc across
FO.
Sew inside the mouth opening.
Teeth (Make 2)
With white yarn.
MR, 6 sc
Round 2
sc around
FO.
Flatten slightly and sew along the top inside edge of the mouth.
Tongue
With pink yarn.
MR, 6 sc
inc x6 (12)
Rounds 3–4
sc around
Round 5
(2 sc, dec) x3
FO.
Flatten and sew inside the bottom of the mouth.
👔 Shirt Collar
With white yarn.
Make two small triangles.
Ch 6
Row 1
sc across
Row 2
dec, sc, dec
FO.
Attach on each side of the neckline.
👔 Tie
With red yarn.
Ch 8
Row 1
sc across
Row 2
dec, sc, dec
FO.
Create a small diamond for the knot and sew above the tie strip.
🟫 Shorts
With brown yarn.
MR, 6 sc
inc x6 (12)
(1 sc, inc) x6 (18)
(2 sc, inc) x6 (24)
Rounds 5–7
sc around (24)
FO.
Sew around the lower body section.
💪 Arms (Make 2)
With yellow yarn.
MR, 6 sc
inc x6 (12)
Rounds 3–11
sc around (12)
Round 12
(2 sc, dec) x3
FO leaving tail.
✋ Hands
Flatten the arm end slightly.
Shape three finger bumps using small increases or embroidery shaping.
🦵 Legs (Make 2)
With yellow yarn.
MR, 6 sc
inc x6 (12)
Rounds 3–12
sc around (12)
FO.
🧦 Socks
Attach white yarn.
Round 1–2
sc around
Round 3
switch to red
Round 4
switch to white
FO.
👞 Shoes
With black yarn.
MR, 6 sc
inc x6 (12)
(1 sc, inc) x6 (18)
Rounds 4–6
sc around
Round 7
(1 sc, dec) x6 (12)
Stuff firmly.
FO.
🖤 Belt
With black yarn embroider rectangular belt segments across the shorts.
Add a small buckle if desired.
🧩 Assembly
Attach the eyes first.
Sew the nose between them.
Attach the mouth beneath the nose.
Sew cheeks beside the mouth.
Attach collar and tie at the neckline.
Sew arms to the sides of the shirt area.
Attach legs underneath the shorts.
Sew shoes to legs.
Make sure the body remains square and balanced.
✂️ Final Shaping
Adjust stuffing to keep the sponge block even.
Ensure the legs stand straight and the arms hang naturally.
🎉🌊 SpongeBob is Ready!
Your blocky best friend from Bikini Bottom is complete! With his goofy smile, bright eyes, and classic outfit, this amigurumi SpongeBob is perfect for gifting, display, or your own adventures under the sea. 🧽🍍💛