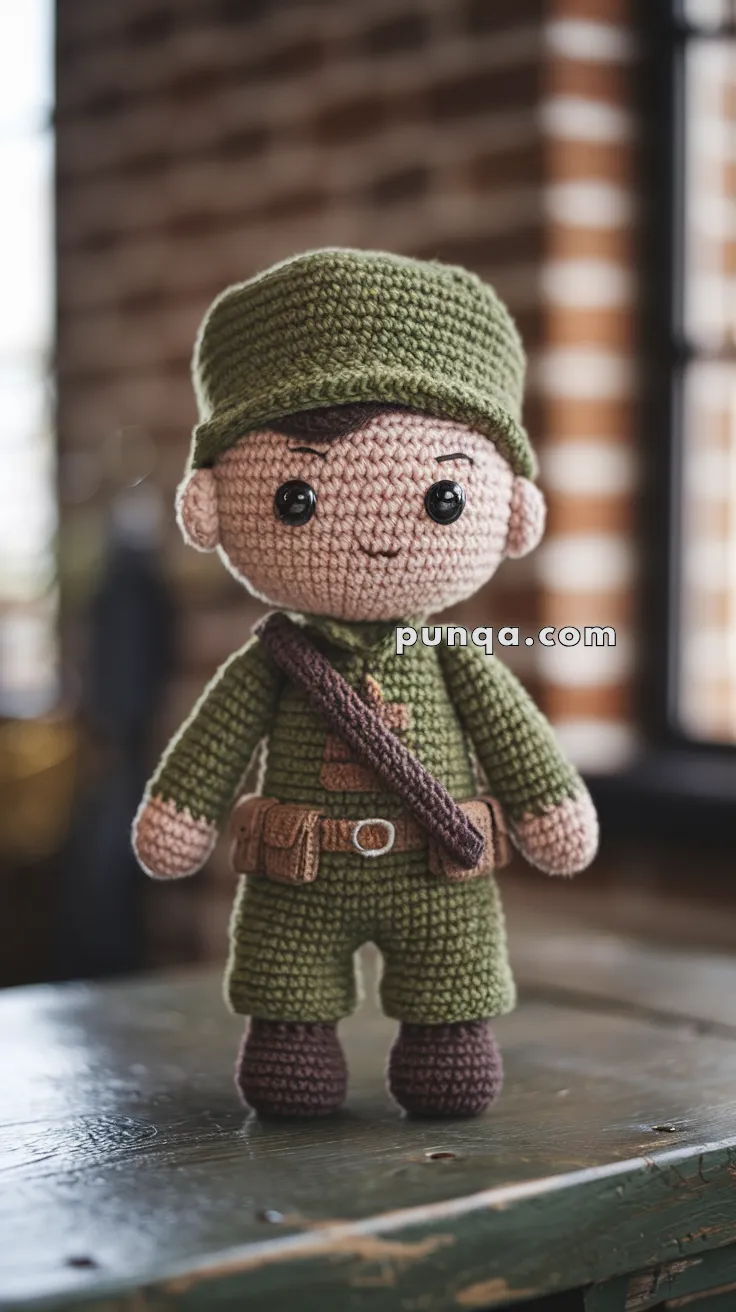
Stand at attention for the Amigurumi Soldier Doll, a proud and playful crochet project that salutes craftsmanship and character! 🪖🧶 With its crisp uniform, buttoned details, and sturdy stance, this little soldier is ready to march into your handmade collection with charm and courage. Whether you’re honoring a loved one in the military, crafting for a themed display, or simply love dolls with personality, this design brings heart and heroism to every stitch.
Perfect for crocheters who enjoy thoughtful details and expressive figures, this pattern invites you to customize everything from uniform colors to facial features. Add medals, a name tag, or even a tiny flag for extra flair. Whether gifted as a keepsake or displayed with pride, the Soldier Doll is a meaningful way to stitch up strength, gratitude, and creativity—one brave loop at a time! 🇺🇸🧵
🧶 Soldier Amigurumi Crochet Pattern
Bring courage and charm into your crochet projects with this Soldier Amigurumi. Dressed in a detailed uniform with belt, pouches, boots, and cross-body strap, this little hero makes a meaningful handmade gift for military families, collectors, or anyone who admires bravery and service.
✨ Skill Level
Intermediate – Involves shaping, color changes, sewing of parts, and adding small details.
📏 Finished Size
Approximately 20–25 cm (8–10 inches) tall when made with DK yarn and a 2.5 mm hook.
🧰 Materials
- DK weight cotton yarn in:
- Olive green (uniform & hat)
- Skin tone (face, ears, hands)
- Brown (boots, belt, strap)
- Black (eyebrows, smile, boot detail)
- 2.5 mm crochet hook
- Safety eyes (8 mm)
- Stuffing (polyester fiberfill)
- Yarn needle
- Stitch marker
- Scissors
🔤 Abbreviations (US Terms)
- MR – Magic Ring
- sc – single crochet
- inc – increase (2 sc in one st)
- dec – decrease (sc two stitches together)
- BLO – back loops only
- FLO – front loops only
- ch – chain
- FO – fasten off
🧵 Pattern Instructions
👦 Head
With skin tone yarn:
- MR, 6 sc [6]
- inc × 6 [12]
- (sc, inc) × 6 [18]
- (2 sc, inc) × 6 [24]
- (3 sc, inc) × 6 [30]
- (4 sc, inc) × 6 [36]
7–14. sc around [36] - (4 sc, dec) × 6 [30]
- (3 sc, dec) × 6 [24]
- (2 sc, dec) × 6 [18]
- (sc, dec) × 6 [12]
- dec × 6 [6]
👉 Insert safety eyes between Rnds 9–10, approx. 7 sts apart.
👉 Stuff firmly as you go. FO, weave in end.
👂 Ears (Make 2)
With skin tone:
- MR, 6 sc [6]
- (sc, inc) × 3 [9]
- sc around [9]
FO leaving long tail for sewing.
👀 Face Details
- Embroider thin arched eyebrows with black yarn.
- Add a small side-smile with black yarn just under the eyes.
🎩 Hat (With Brim Correction)
With olive green:
- MR, 6 sc [6]
- inc × 6 [12]
- (sc, inc) × 6 [18]
- (2 sc, inc) × 6 [24]
- (3 sc, inc) × 6 [30]
6–10. sc around [30]
Brim (FLO):
11. (4 sc, inc) × 6 [36]
12. sc around in FLO [36]
👉 This creates the wider forward brim, matching the photo.
- sc around [36]
FO, stuff lightly if needed, and sew neatly onto head.
👕 Body
With olive green:
- MR, 6 sc [6]
- inc × 6 [12]
- (sc, inc) × 6 [18]
- (2 sc, inc) × 6 [24]
- (3 sc, inc) × 6 [30]
6–12. sc around [30] - (3 sc, dec) × 6 [24]
14–18. sc around [24]
Stuff as you go. FO, leave tail.
💪 Arms (Make 2)
Start with skin tone:
- MR, 6 sc [6]
- inc × 6 [12]
3–5. sc around [12]
Change to olive green:
6–15. sc around [12]
Stuff lightly. FO, leave tail for sewing.
👖 Legs (Make 2)
Start with brown (boots):
- MR, 6 sc [6]
- inc × 6 [12]
- (sc, inc) × 6 [18]
4–5. sc around [18]
Change to olive green (pants):
6–12. sc around [18]
Stuff and FO one leg.
👉 On second leg, do not fasten off — continue with join.
🧍 Join Legs & Torso
- Ch 3, join to first leg, sc around both legs and chain [42].
- Rnds 14–22. sc around [42].
- Then decrease:
- (5 sc, dec) × 6 [36]
- (4 sc, dec) × 6 [30]
- (3 sc, dec) × 6 [24]
- (2 sc, dec) × 6 [18]
Stuff firmly. FO, leaving tail for sewing.
👞 Boots (Optional Detail)
- Embroider a horizontal line in brown around the top of the boots to create a cuff.
👜 Belt, Buckle & Pouches (Correction Added)
With brown yarn:
Belt:
- Ch 30, sc across. FO.
Pouches (Make 2):
- Ch 5, sc in 2nd ch from hook [4].
- Rows 2–3: sc across [4].
- FO and stitch onto belt.
Buckle:
- With tan or light brown yarn, embroider or crochet a small rectangle (Ch 6, sc 2 rows) and sew to the front center of belt.
👉 This detail makes the belt photo-accurate.
🎒 Cross-Body Strap
With brown:
- Ch 25–30, sc back.
- Attach diagonally from left shoulder to right hip.
🪖 Assembly
- Sew arms to body sides.
- Attach head to top of body.
- Sew ears to head.
- Add hat securely on top.
- Attach belt around waist, adding buckle & pouches.
- Stitch strap diagonally across chest.
- Weave in all ends neatly.
🎉 Final Touch
Your soldier amigurumi is complete! Standing tall with his uniform, boots, belt buckle, pouches, and cross-body strap, he’s ready for display or gifting. This handmade hero makes a thoughtful keepsake and a unique addition to any amigurumi collection.