Step into a world of nostalgia and whimsy with this Amigurumi Smurf with Mushroom Base crochet pattern! Inspired by the beloved blue characters, this adorable design captures the charm of a tiny Smurf perched on its classic mushroom home, complete with bright colors and playful details. Whether you’re crafting for fans of the Smurfs, adding a cheerful touch to your collection, or simply enjoy making character-inspired amigurumi designs, this pattern lets you stitch up a delightful Smurf bursting with personality! Perfect for brightening up any space, this crochet creation brings a touch of handmade magic to your collection. 🍄✨
Designed for customization, this pattern allows you to experiment with different shades of blue, embroidered details, or even tiny accessories like a miniature flower or butterfly for extra charm. Craft a classic Smurf with its signature look, create a whimsical version with pastel hues, or even stitch up a full set of Smurf-inspired amigurumi for a nostalgic display! Whether gifted as a quirky keepsake, displayed as a charming accent, or made simply for the joy of crafting, this Amigurumi Smurf with Mushroom Base is a fun and creative project—perfect for bringing a touch of handmade fairy-tale magic to every stitch! 🧶💖✨
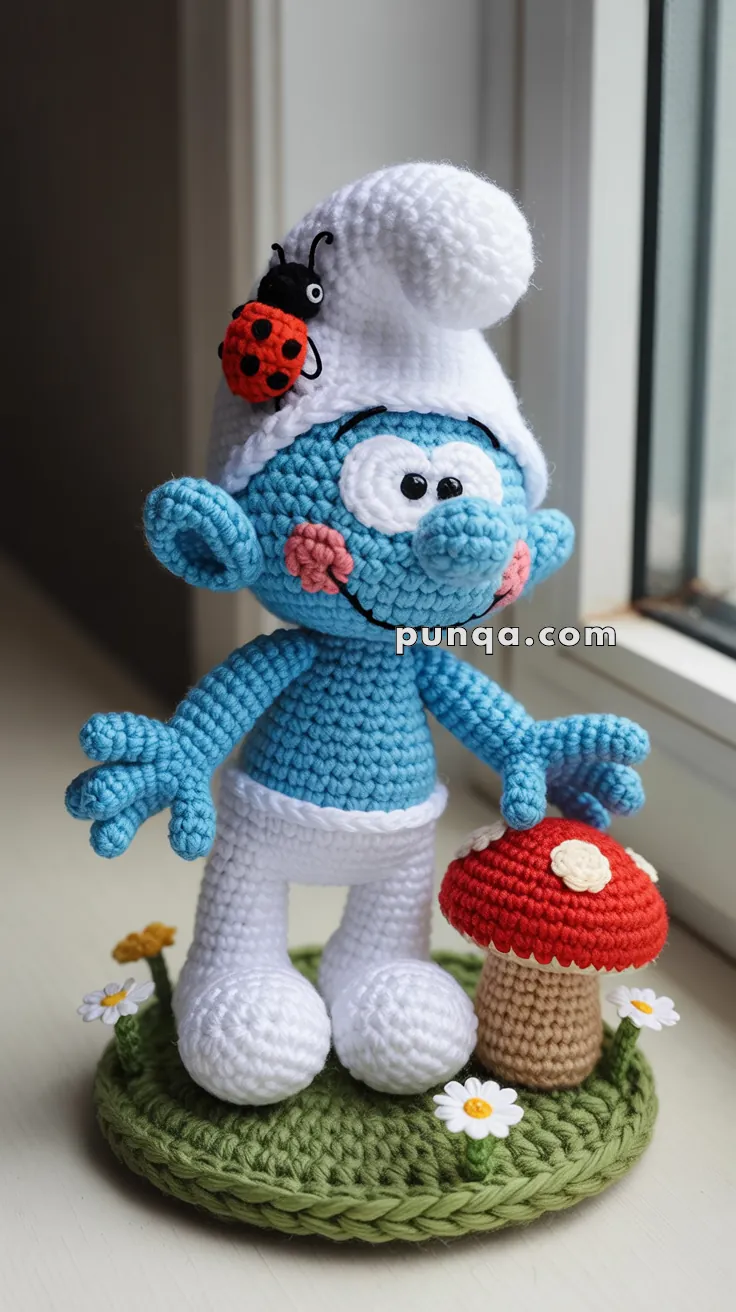
💙 Amigurumi Smurf with Mushroom Base Crochet Pattern
This cheerful Smurf is full of charm, standing proudly on a grassy meadow dotted with daisies and a bright red mushroom. With his rounded blue face, pink cheeks, floppy white hat, and tiny ladybug companion, this design captures a playful woodland spirit. The sculpted details, expressive smile, and textured base make this a delightful handmade display piece.
✨ Skill Level
Intermediate – includes shaping, several small components, and detailed assembly.
📏 Finished Size
• Smurf height: 18–20 cm (≈ 7–8 inches)
• Base diameter: 12–13 cm (≈ 4.7–5.1 inches)
• Mushroom height: 7–8 cm (≈ 2.7–3.1 inches)
🧶 Materials
Blue yarn – 55 g
White yarn – 50 g
Red yarn – 20 g
Beige/light brown yarn – 15 g
Green yarn – 25 g
Pink yarn – 5 g
Black yarn/thread – 10 g
Yellow yarn – 5 g
2.5–3.0 mm crochet hook
8 mm safety eyes
Polyester fiberfill
Cardboard circle (optional for base)
Tapestry needle, scissors
🪡 Abbreviations (US Terms)
MR – Magic Ring
sc – single crochet
inc – increase
dec – invisible decrease
sl st – slip stitch
ch – chain
BLO – back loop only
FO – fasten off
🧍 Smurf Pattern
Head (Blue)
R1: MR 6
R2: inc × 6 = 12
R3: (1 sc, inc) × 6 = 18
R4: (2 sc, inc) × 6 = 24
R5: (3 sc, inc) × 6 = 30
R6: (4 sc, inc) × 6 = 36
R7–R14: 36 sc
R15: (4 sc, dec) × 6 = 30
R16: (3 sc, dec) × 6 = 24
R17: (2 sc, dec) × 6 = 18
Stuff firmly.
R18: (1 sc, dec) × 6 = 12
R19: dec × 6 = 6
FO.
Eyes (White – 2 pcs)
R1: MR 6
R2: inc × 6 = 12
FO.
Sew the two eye patches touching each other.
Eye placement:
Insert black safety eyes into the lower third of each white circle, close to where the circles meet, creating a bright, expressive look.
Add a thin embroidered blue eyelid along the top edge.
Nose (Blue)
R1: MR 6
R2: inc × 6 = 12
R3–R5: 12 sc
R6: (1 sc, dec) × 4 = 8
Stuff and sew between the eyes.
Cheeks (Pink – 2 pcs)
MR, 5 sc, sl st, FO.
Sew just below and slightly outward from the nose.
Mouth (Black)
Embroider a long curved smile:
• Begin at left cheek edge
• Curve down one to two rounds
• End at right cheek edge
This gives a friendly, joyful expression.
Ears (Blue – 2 pcs)
R1: MR 6
R2: inc × 6 = 12
R3: 12 sc
Flatten and sew slightly below eye level on each side.
Torso & Pants
Torso (Blue → White)
R1: MR 6
R2: inc × 6 = 12
R3: (1 sc, inc) × 6 = 18
R4: (2 sc, inc) × 6 = 24
R5–R7: 24 sc
R8: (2 sc, dec) × 6 = 18
Switch to white.
R9–R13: 18 sc
R14: (1 sc, dec) × 6 = 12
R15: dec × 6 = 6
Stuff and FO.
Arms (Blue – 2 pcs)
Arm Base
R1: MR 6
R2: inc × 6 = 12
R3–R10: 12 sc
Lightly stuff.
Four Fingers
Make 4 per hand (thumb + 3 fingers):
• Ch 4
• sl st in 2nd ch
• sc in next
• sl st in last
• sl st into next arm stitch
Attachment:
Sew arms so they sit slightly forward and very gently inward, with fingers pointing toward the front-center.
Legs & Shoes (White – 2 pcs)
Shoes
R1: MR 6
R2: inc × 6 = 12
R3: (1 sc, inc) × 6 = 18
R4–R6: 18 sc
R7: (1 sc, dec) × 6 = 12
R8–R10: 12 sc
Stuff firmly for the rounded shape.
Legs
R11–R20: 12 sc
FO and sew under the torso.
🧢 Smurf Hat (White)
R1: MR 6
R2: inc × 6 = 12
R3: (1 sc, inc) × 6 = 18
R4: (2 sc, inc) × 6 = 24
R5: (3 sc, inc) × 6 = 30
R6: (4 sc, inc) × 6 = 36
Ribbed Hat Band
R7–R8: 36 sc BLO
Upper Hat
R9–R14: 36 sc
R15: (5 sc, dec) × 6 = 30
R16: (4 sc, dec) × 6 = 24
Lightly stuff the front portion.
Shape the tip:
Bend forward and slightly toward the Smurf’s left and secure with a few hidden stitches.
Sew hat onto the head.
🐞 Ladybug
Body (Red)
R1: MR 6
R2: inc × 6 = 12
R3: (1 sc, inc) × 6 = 18
R4: 18 sc
FO.
Head (Black)
R1: MR 6
R2: 6 sc
Sew to body.
Black Spots (5–6 pcs)
• 2 large: MR 6
• 3–4 small: MR 4–5
Sew asymmetrically.
Antennae
Ch 4, sl st back. Make 2.
Attach ladybug to the left front of the hat.
🍄 Mushroom
Cap (Red)
R1: MR 6
R2: inc × 6 = 12
R3: (1 sc, inc) × 6 = 18
R4: (2 sc, inc) × 6 = 24
R5: (3 sc, inc) × 6 = 30
R6: (4 sc, inc) × 6 = 36
R7–R10: 36 sc
R11: (5 sc, dec) × 6 = 30
R12: (4 sc, dec) × 6 = 24
R13: (3 sc, dec) × 6 = 18
R14: dec × 9 = 9
Stuff lightly and FO.
Stem (Beige)
R1: MR 6
R2: inc × 6 = 12
R3–R10: 12 sc
Stuff and sew to cap.
Mushroom Spots (White)
• 1 large: MR 8 → 16
• 2 medium: MR 6 → 12
• 2 small: MR 5
Attach around the cap.
🌼 Daisies
Center (Yellow)
MR 6, FO.
Petals (White)
Attach white yarn:
(ch 3, sl st in 2nd ch from hook, sl st into next center st) × 6
This creates crisp raised petals.
🌿 Grass Base (Green)
R1: MR 6
R2: inc × 6 = 12
R3: (1 sc, inc) × 6 = 18
R4: (2 sc, inc) × 6 = 24
R5: (3 sc, inc) × 6 = 30
R6: (4 sc, inc) × 6 = 36
Continue increasing until 12–13 cm across.
Work 3 rounds BLO to form a raised edge.
Insert a cardboard disc and lightly stuff if desired.
🧷 Assembly
- Attach head to body with a gentle forward tilt.
- Sew arms so they angle slightly forward and inward.
- Add legs beneath the torso with firm stitching for balance.
- Sew hat in place and shape its tip.
- Attach ladybug securely to the hat.
- Position mushroom and daisies on the grass base.
- Stitch the Smurf to the base so he stands solidly.
🌟 Final Touch
Your Smurf is now ready to brighten any room with his joyful expression and charming woodland surroundings. The combination of sculpted features, playful accessories, and the textured base creates a delightful keepsake. Display him on a shelf, gift him to a Smurf fan, or pair him with more forest friends for a whole whimsical scene. Enjoy every stitch and the magic it brings! 💙✨