Creating an amigurumi skunk is such an enchanting adventure! 🦨💖 There’s something delightfully playful about transforming a simple ball of yarn into a cute, cuddly creature. The charm of amigurumi lies in its ability to take the mundane and spin it into whimsy. With a skunk, in particular, we can capture that blend of mischief and adorableness while steering clear of the spray! As I sit down with my crochet hook and soft, colorful yarn, I’m filled with a sense of wonder and excitement. Each stitch is a step closer to seeing my little skunk friend come to life, complete with its signature bushy tail and striking stripes.
The process itself is like crafting magic with every loop and twist. I start by selecting the perfect yarn colors, usually shades of black, white, and maybe a little pop of pink for the nose. Then it’s on to the foundation of the body and head, working in the round to create that plump, huggable shape. As the form begins to take shape, I can’t help but smile at the little face emerging from my hands. Then comes the fun of adding details – tiny ears, a sprightly tail, and of course, those contrasting stripes that make skunks so recognizable. The whole experience is an absolute delight, filled with creativity and joy, inviting me to embrace my whimsical side. 🧶✨
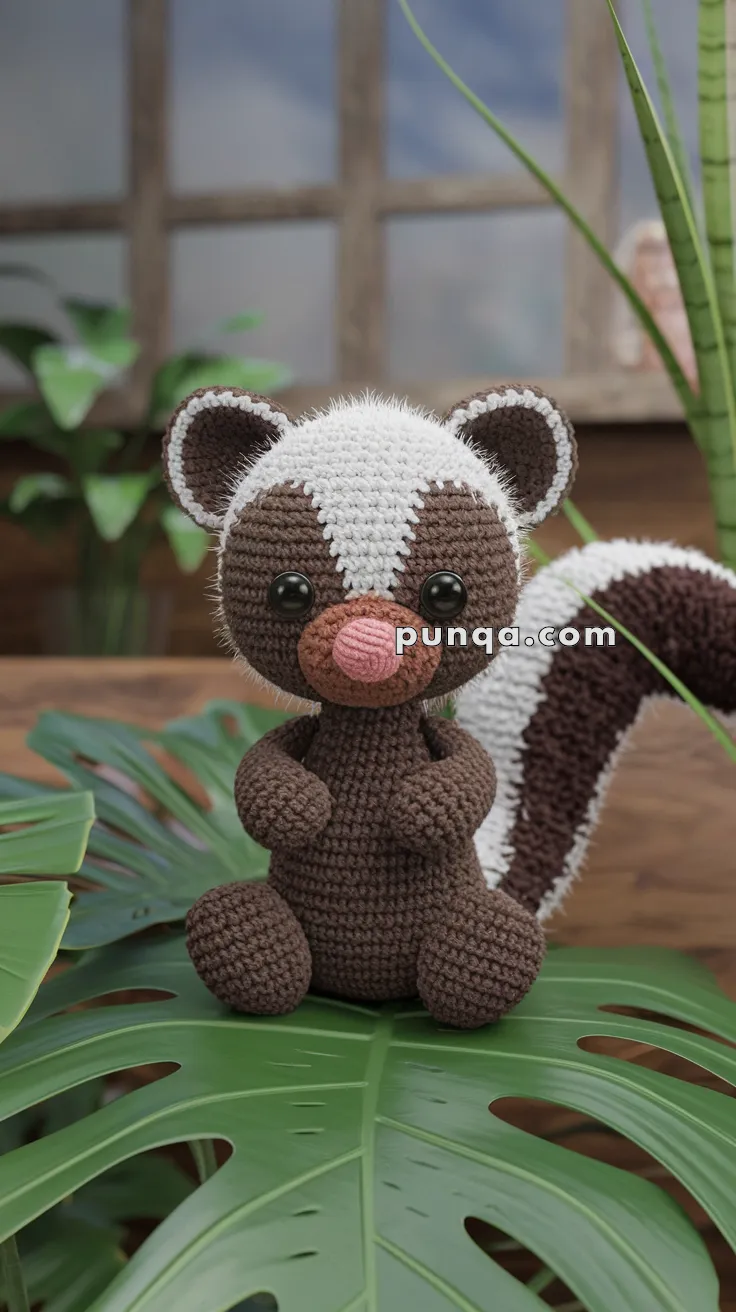
🦨 Amigurumi Skunk Crochet Pattern
This adorable Amigurumi Skunk is far from stinky — it’s sweet, snuggly, and full of woodland charm! With a fluffy white stripe, a curled tail, and a soft pink nose, this little critter is perfect for forest-themed decor or a cute handmade gift.
✨ Skill Level
Intermediate — includes shaping, color changes, layered ears, and sculpting.
📏 Finished Size
Approx. 10–11 in (25–28 cm) when using worsted yarn and a 3.25–3.5 mm hook.
🧶 Materials
Yarn (worsted weight):
• Dark Brown – ~60 g (body, limbs, outer ears, tail)
• White – ~45 g (face stripe, tail stripe, ear layer, fluff edge)
• Pink – ~5 g (nose)
Other:
• 10–12 mm black safety eyes
• 3.25–3.5 mm crochet hook
• Stuffing
• Tapestry needle
• Pet slicker brush (optional for fluffing)
🔤 Abbreviations (US Terms)
MR – Magic ring
sc – single crochet
inc – increase
dec – decrease
sl st – slip stitch
ch – chain
FLO – front loop only
BLO – back loop only
FO – fasten off
All rounds worked in continuous spirals unless noted.
🧠 Head (Dark Brown + White)
The head is large, round, and shaped with a tapered facial stripe.
Head base (brown)
R1: MR, 6 sc
R2: inc ×6 = 12
R3: (sc, inc) ×6 = 18
R4: (2 sc, inc) ×6 = 24
R5: (3 sc, inc) ×6 = 30
R6: (4 sc, inc) ×6 = 36
R7: (5 sc, inc) ×6 = 42
R8: (6 sc, inc) ×6 = 48
R9–11: 48 sc
Begin facial stripe shaping (white)
For the next rounds, switch only for the center top stitches.
Stripe shape:
• 3 sts wide → 5 sts → 7 sts → 9 sts at peak → taper to 5 → 3
R12: work 3 white sts centered, rest brown = 48
R13: 5 white sts centered = 48
R14: 7 white sts centered = 48
R15–16: 9 white sts centered = 48
R17: 7 white sts = 48
R18: 5 white sts = 48
R19: 3 white sts = 48
Eye placement & shaping
Insert eyes between R12–13, spaced 6 sts apart, close to edge of stripe.
Add a tiny bit of stuffing behind the eye area for rounded cheeks.
Finish head
R20: (6 sc, dec) ×6 = 42
R21: (5 sc, dec) ×6 = 36
R22: (4 sc, dec) ×6 = 30
R23: (3 sc, dec) ×6 = 24
Stuff firmly, shaping a chubby round head.
R24: (2 sc, dec) ×6 = 18
R25: (sc, dec) ×6 = 12
R26: dec ×6 = 6
FO, close tightly.
🐽 Nose (Pink)
R1: MR, 6
R2: inc ×6 = 12
R3–4: 12 sc
FO and sew high on face, almost touching the white stripe.
Add a tiny stitch below for a subtle mouth.
🧵 Fluffy Face Edge (White)
Attach white to the side of the stripe.
Work loose sl sts around stripe edges.
Brush gently for the soft fuzzy halo seen in the photo.
🐾 Ears — Three-Layer Construction
The ears in the photo show a pale inner ring with a brown outline.
Inner Ear (brown)
R1: MR, 6
R2: inc ×6 = 12
FO.
Middle Layer (white)
R1: MR, 6
R2: inc ×6 = 12
R3: (sc, inc) ×6 = 18
FO.
Outer Ring (brown)
R1: MR, 6
R2: inc ×6 = 12
R3: (sc, inc) ×6 = 18
FO.
Layer white between the two brown pieces.
Sew ears to head at diagonal angles (8 o’clock & 4 o’clock positions).
🧸 Body (Dark Brown)
The body is short, rounded, and sits under the head with almost no visible neck.
R1: MR, 6
R2: inc ×6 = 12
R3: (sc, inc) ×6 = 18
R4: (2 sc, inc) ×6 = 24
R5: (3 sc, inc) ×6 = 30
R6–8: 30 sc
R9: (3 sc, dec) ×6 = 24
R10: (2 sc, dec) ×6 = 18
R11: (sc, dec) ×6 = 12
FO, stuff firmly.
Flatten the top slightly.
Sew head deeply into body for chibi proportions.
🐾 Arms (Make 2)
R1: MR, 6
R2: inc ×6 = 12
R3–6: 12 sc
R7: (2 sc, dec) ×3 = 9
Stuff very lightly.
FO and sew in a bent “hands together” pose as in the photo.
🦵 Legs (Make 2)
Legs sit in a relaxed forward position.
R1: MR, 6
R2: inc ×6 = 12
R3: (sc, inc) ×6 = 18
R4–6: 18 sc
R7: (sc, dec) ×6 = 12
FO, stuff firmly, sew to bottom front.
🦨 Tail (Thick + Curved + White Stripe)
The tail is large, very thick, and curls dramatically.
Tail base
R1: MR, 6
R2: inc ×6 = 12
R3: (1 sc, inc) ×6 = 18
R4: (2 sc, inc) ×6 = 24
R5–9: 24 sc
Add gentle curve
Work 3 rounds decreasing on one side only:
R10: 22 sc
R11: 22 sc
R12: 20 sc
Continue length
R13–20: 20 sc
Stuff firmly as you go.
FO.
White stripe
Work a 7–9 stitch wide stripe down the entire length, using either:
• surface slip stitch, or
• crocheting a long white strip and sewing it on
Brush the edges lightly for a softened look.
Sew tail to lower back curved upward and to the side.
✨ Final Details
• Add tiny pink mouth stitch under nose
• Shape cheeks by pinching slightly while sewing
• Brush white areas for soft fur effect
• Adjust tail curve until it matches the photo pose
Your little woodland skunk is now complete — perfectly round, fluffy, sweet-faced, and full of character, just like the photo. An adorable friend for forest-themed décor, nurseries, or cozy handmade gift giving. 🦨💗